
Learning Objective
Learn how to communicate with the user by displaying text messages and sensor data on a1602 LCD Screen using the I2C protocol.
Visual Output (LCD Display)
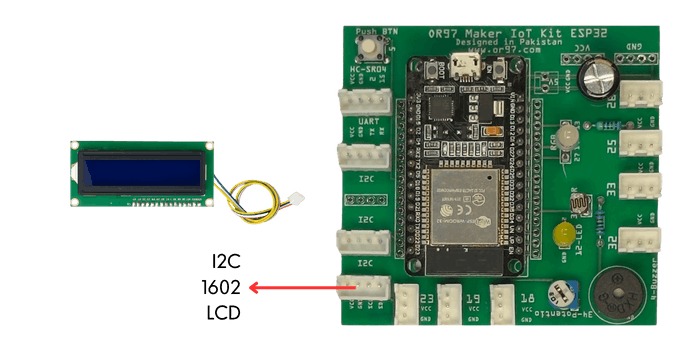
Hardware: 1602 Character LCD Module with I2C
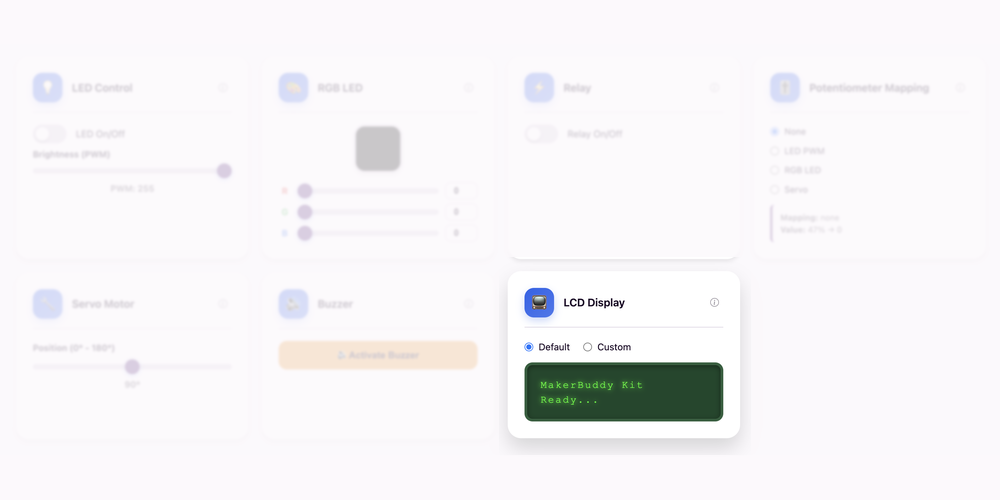
Dashboard: LCD Display Control Card
Theory: Talking to the User
The 1602 Screen
So far, our output has been abstract (lights, beeps or movement). Today, we give our robot a voice (or rather, a notepad). The 1602 LCD gets its name because it displays 16 characters per line and has 2 lines.
It uses "Liquid Crystal" technology—little crystals that block light when electricity passes through them. A backlight behind them makes the text readable.
The I2C Protocol
Normally, a screen requires 16 pins to control! That's too messy. We use a special backpack on the screen called an I2C Adapter.
I2C (Inter-Integrated Circuit) uses just TWO wires to talk:
- SDA (Data): The wire where information is sent.
- SCL (Clock): The wire that keeps timing so bits don't get lost.
The Grid System
The screen is a grid of boxes. To write text, we tell the cursor where to go using (column, row) coordinates. It's like the game Battleship!
(0,0) is the top-left.
(15,0) is the top-right.
(0,1) is the bottom-left.
For Teachers
This is a great moment to explain "Protocols". I2C is like a language. Each device has an "Address" (usually 0x27 for these screens). The ESP32 shouts "Hey 0x27!" and only the LCD listens. This allows us to daisy-chain many sensors on the same two wires!
For Parents
Look at your microwave, printer or car dashboard. They all use simple character displays like this. Learning to control this screen is the first step towards building user interfaces for devices.
Activity: Electronic Billboards
Activity Duration: 25 minutes
Part 1: Connection
Connect the LCD to the matching labelled LCD / I2C connector on your MakerBuddy IoT Board. Do not use pin numbers.
Part 2: Hello World
- Go to the LCD Control card on the dashboard.
- Select Custom radio button
- Type "Hello Class!" in the text box.
- Hit Send. Watch it appear instantly on your physical screen!
Part 3: Positioning
- Try to put your name on the Top Line.
- Try to put "MakerBuddy" on the Bottom Line.
Part 4: Dynamic Data & Wildcards
The LCD card has a Custom Mode that lets you mix text with live sensor data. Use specific "Wildcards" inside curly braces, and the dashboard will replace them with real values!
- {temp} - Temperature (°C)
- {humidity} - Humidity (%)
- {distance} - Distance (cm)
- {pot} - Potentiometer (%)
- {light} - Light Level (%)
- {gas} - Gas Level (0–100)
- {ds18b20} - Probe temperature (°C)
- {soil} - Soil moisture (%)
- {button} - Push-button state
- {motion} - Motion (Detected/Clear)
Try typing these:
Temp: {temp}CLight: {light}
Note
If you don't see anything, check the blue square on the back of the screen. That is the Contrast Potentiometer. Use a screwdriver to turn it until white boxes or text appear.
Challenge: The Marquee
Scrolling Text
The screen is only 16 characters wide. What if your message is longer?
Challenge Goal
Simulate a scrolling "Marquee" sign manually.
- Pick a long word: "SUPERCALIFRAGILISTIC" (20 letters).
- Write the first 16 letters: "SUPERCALIFRAGILI".
- Delete the first letter and add one from the end: "UPERCALIFRAGILIS".
- Keep going! This is how scrolling signs work—shifting the window one char at a time.
Bonus: The Status Monitor
Can you simulate a dashboard?
- Line 1: "Temp: 24C"
- Line 2: "Hum: 60%"
Try to update just the numbers without erasing the labels.
Discussion Questions:
- Why are there only 2 wires for I2C? (Data travels serially, one bit after another).
- What are the limitations of this screen? (Only text, no graphics, limited size).
Key Takeaways
✓ I2C Protocol
I2C is a communication protocol that allows multiple devices (like screens and sensors) to share just two wires (Data and Clock). Each device has a unique address.
✓ Character Displays
Unlike your phone screen which uses pixels (dots), this screen uses pre-made character blocks. It's simpler and uses much less processing power.
✓ Coordinates
We control the screen using a grid system (Column, Row). Mastering coordinates is essential for any kind of computer graphics or UI design.
✓ User Feedback
The LCD allows the computer to tell the user what it's thinking. Whether it's "Processing..." or "Error!", feedback is crucial for good user experience.
Coming Up Next Week:
Week 20: Algorithmic Thinking & Flowcharts