
Learning Objective
Understand how to measure soil moisture using conductivity and apply this knowledge to build a "Thirsty Plant" detector for Smart Agriculture applications.
Smart Agriculture (Soil Moisture)
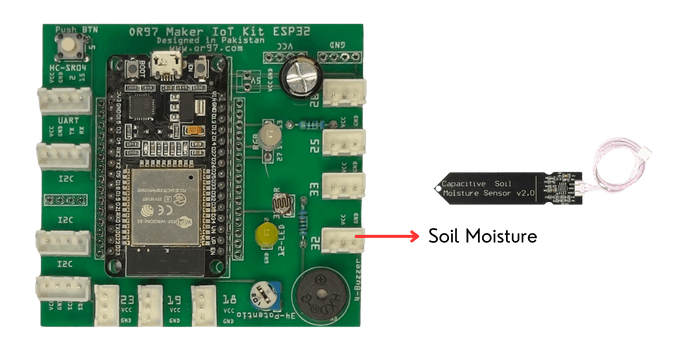
Hardware: Soil Moisture Resistance Probe

Dashboard: Soil Moisture Percentage Card
Theory: Conductivity & Soil Moisture
From Sensing Air to Sensing Earth
So far, we have learned to sense conditions in the air around us (light, temperature, humidity, gas). Now we're expanding our sensing capabilities to measure conditions in soil - the foundation of agriculture! The soil moisture sensor is our gateway into precision agriculture, where technology helps farmers optimize water usage, improve crop yields and conserve resources. This sensor doesn't measure water directly; instead, it measures electrical conductivity, which changes dramatically between dry and wet soil.
How Conductivity Works
Conductivity is the ability of a material to conduct electricity. Pure water is actually a poor conductor, but soil water contains dissolved minerals (salts, nutrients) that make it conductive. The soil moisture sensor has two metal prongs that act like an open circuit. When inserted into dry soil, almost no current flows between the prongs - high resistance. When inserted into wet soil, water creates a conductive path between the prongs - low resistance. By measuring this resistance change, we can determine moisture levels!
Understanding the Sensor Reading
The soil moisture sensor outputs an analog voltage that varies with moisture content. Your MakerBuddy reads this voltage and converts it to a percentage or numerical value. Typical readings:
- Dry soil (0-30%): Very little conductivity, high resistance, low sensor reading
- Moist soil (30-60%): Moderate conductivity, comfortable for most plants
- Wet soil (60-100%): High conductivity, low resistance, high sensor reading
- In water (100%): Maximum conductivity, sensor reads highest value
Calibrating the Moisture Percentage
The dashboard converts the sensor's raw analog reading into a 0–100% moisture level. Because sensor modules can report either higher or lower raw values as moisture increases, do not guess the direction or reuse someone else's numbers. Calibrate the two endpoints with the same probe and soil used in the project.
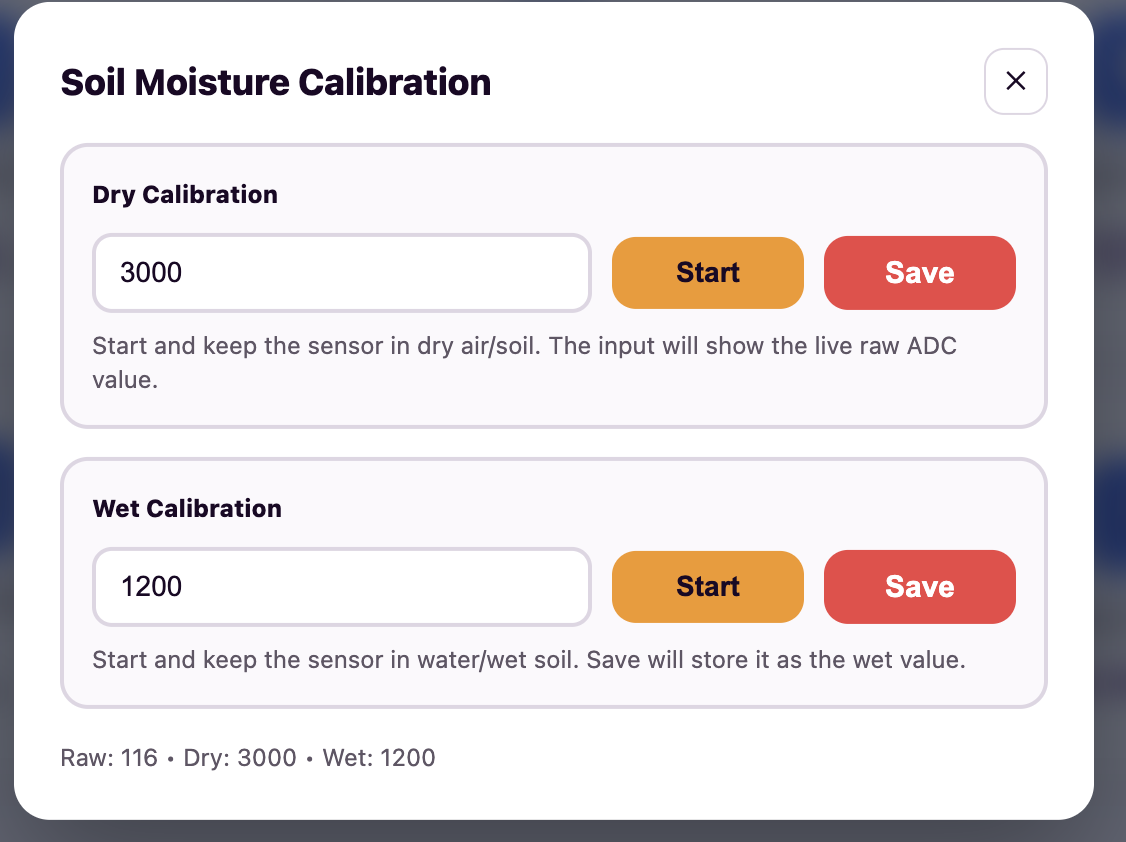
- Open the Soil Moisture card and select its calibration settings.
- Hold the probe in dry soil (or air for a baseline), wait for the reading to settle, and save that raw value as Dry.
- Place the probe in thoroughly wet soil, wait for the reading to settle, and save that raw value as Wet.
- Return to the dashboard and test dry, damp, and wet soil. If the percentage moves in the wrong direction, repeat both endpoint measurements and check that the probe is connected correctly.
Why Soil Moisture Matters
Plants need water to survive, but too much or too little causes problems. Overwatering wastes water and can rot roots. Underwatering stresses plants and reduces growth. Smart agriculture uses soil moisture sensors to water only when needed, saving billions of gallons of water globally while improving crop health. Farmers use networks of these sensors across fields to create moisture maps, identifying dry spots that need irrigation and wet spots that need drainage.
Real-World Applications
Soil moisture sensors power automated irrigation systems in farms, vineyards and golf courses. Smart gardens use them to water plants automatically via app control. Greenhouses maintain optimal growing conditions. Even NASA uses soil moisture sensors on Mars rovers to search for water! Urban gardens, vertical farms and home plant monitors all rely on this technology to optimize water usage and plant health.
For Teachers
This lesson bridges electronics and biology, connecting IoT to environmental science and agriculture. Emphasize the conductivity principle - students may think the sensor "detects water molecules," but it actually measures electrical resistance. Connect to chemistry: dissolved minerals make water conductive. Discuss global water scarcity and how technology helps conserve resources. If possible, bring actual plants to class for hands-on testing. Challenge students to research precision agriculture and its impact on food production. This sensor will be crucial for upcoming automation projects!
For Parents
Your child is learning about agricultural technology and environmental sensing. This week introduces soil moisture measurement - a critical technology for sustainable farming and water conservation. Understanding how sensors detect moisture through conductivity connects electronics to real-world environmental challenges. This knowledge applies to smart gardens, automated plant watering systems and precision agriculture. Your child will soon be able to build systems that automatically water plants based on soil conditions, combining sensing and automation skills!
Hands-On Activity: Soil Moisture Testing
Activity Duration: 20-25 minutes
Students will connect the soil moisture sensor, test it in various conditions (dry, moist, wet) and observe how conductivity changes with water content. This hands-on exploration demonstrates the relationship between moisture and electrical resistance.
Step-by-Step Instructions:
- Identify the Sensor: Locate the soil moisture sensor - it has two metal prongs (electrodes). The prongs should be clean and free of corrosion.
- Locate the Connector: Find the connector labelled 32 on your MakerBuddy IoT Board.
- Open the Dashboard: Navigate to your MakerBuddy web interface and locate the Soil Moisture sensor card showing the current reading (usually 0-100%).
- Air Test (Baseline): Hold the sensor in the air, not touching anything. Record this "dry" baseline value (From Soil Moisture Calibration Popup, Save as dry Calibration) - it should be very low (near 0%) since air doesn't conduct electricity.
- Wet Test: Dip just the metal prongs (not the circuit board!) into a cup of water. The reading should jump to near maximum (90-100%) (From Soil Moisture Calibration Popup, Save as wet Calibration).
- Moist Soil Test: Add a small amount of water to the soil and mix it. Insert the sensor again. Watch the reading increase as moisture creates conductive paths. Record the value.
- Recovery Test: Remove the sensor from water and dry it with a paper towel. Watch the reading drop back to baseline. This demonstrates the sensor's responsiveness.
What Students Should Observe:
- Clear difference between dry (low reading) and wet (high reading) conditions
- Gradual increase in reading as moisture increases
- Instant response when sensor touches water (high conductivity)
- Reading drops when sensor is removed and dried
- Sensor values update in real-time on the dashboard
- Metal prongs must be inserted into soil/water for accurate readings
Important Note
Never submerge the entire sensor in water - only the metal prongs should get wet! The circuit board at the top contains electronics that will be damaged by water. Also, prolonged exposure to moisture can corrode the metal prongs over time, so dry the sensor after each use.
Challenge
Your Mission: The Thirsty Plant Detective
Become a plant scientist! Use the soil moisture sensor to understand plant watering needs and create a monitoring system.
Challenge 1: The Thirsty Plant Test
If you have a potted plant available (or use a cup of soil):
- Insert the sensor into the soil and record the initial moisture reading
- Water the plant and watch the sensor reading increase in real-time
- Leave the sensor in place and check readings every 5 minutes for 20 minutes
- Create a data table: Time vs Moisture Level
- Observe how quickly the soil drains and moisture decreases
Challenge 2: Moisture Mapping
Test different materials and create a "moisture map":
- Test dry sand, wet sand, dry soil, wet soil, gravel, clay
- Record the moisture reading for each material
- Rank them from driest to wettest
- Which material holds water best? Which drains fastest?
- How does this relate to real farming? (Clay soil vs sandy soil)
Challenge 3: The Watering Threshold
Determine the ideal watering threshold for a plant:
- Research: What moisture level do most houseplants prefer? (Hint: Usually 40-60%)
- Set a "watering threshold" value (e.g., if moisture drops below 40%, plant needs water)
- Monitor your plant and note when it reaches this threshold
- In Term 4, we'll automate watering using this threshold!
Discussion Questions:
- Why does wet soil conduct electricity better than dry soil? (Water + dissolved minerals create conductive paths)
- How could farmers use thousands of these sensors? (Precision irrigation, water conservation, crop optimization)
- What happens if you water plants too much? (Root rot, oxygen deprivation, nutrient leaching)
- How does this sensor help conserve water? (Water only when needed, not on a fixed schedule)
Bonus Challenge: Design a "smart plant pot" system on paper. Draw a diagram showing: soil moisture sensor → MakerBuddy → water pump (actuator). When moisture is low, the system automatically waters the plant. What threshold would you use? How often should it check moisture? This is precision agriculture in action!
Sustainability Connection
Agriculture uses 70% of global freshwater. Smart irrigation systems using soil moisture sensors can reduce water usage by 30-50% while improving crop yields. As climate change makes water scarcer, this technology becomes critical for feeding the world's growing population. You're learning skills that directly address global challenges!
Key Takeaways
✓ Conductivity Principle
Soil moisture sensors measure electrical conductivity, not water directly. Wet soil conducts electricity better than dry soil because water contains dissolved minerals (ions) that carry electrical current. By measuring resistance between two metal prongs, we can determine moisture content. This principle applies to many sensing applications beyond agriculture.
✓ Agricultural IoT
Smart agriculture uses sensor networks to optimize farming. Soil moisture sensors enable precision irrigation - watering only when and where needed. This conserves water, reduces costs, improves crop health and minimizes environmental impact. IoT transforms traditional farming into data-driven agriculture, addressing global food security and sustainability challenges.
✓ Moisture Measurement
Understanding soil moisture levels is crucial for plant health. Too little water stresses plants; too much causes root rot. Different plants and soil types have different optimal moisture ranges. By continuously monitoring moisture, we can maintain ideal growing conditions. This sensor provides real-time feedback, enabling responsive plant care and automated watering systems.
✓ Automation Foundation
This sensor lays groundwork for automated irrigation systems. In Term 4, you'll learn to create rules: "IF moisture < 40% THEN activate water pump." This combines sensing (soil moisture) with actuation (water control) through logic (threshold comparison). Smart agriculture demonstrates the complete IoT cycle: sense → decide → act, all without human intervention.
Coming Up Next Week:
Week 19: Visual Output (LCD Display)