
Learning Objective
Control an SG90 servo accurately and calibrate its useful positions for a real project.
Introduction to Motors: SG90 Servo
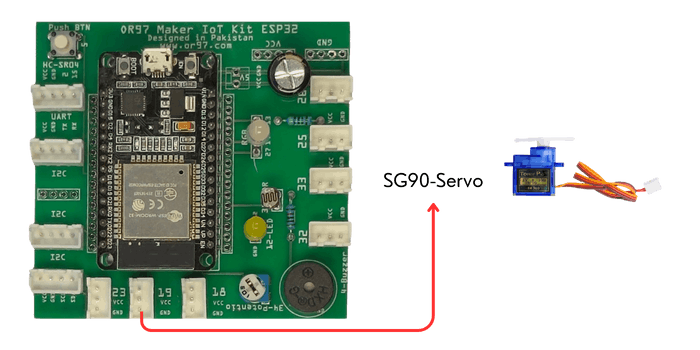
Hardware: SG90 Micro Servo Motor
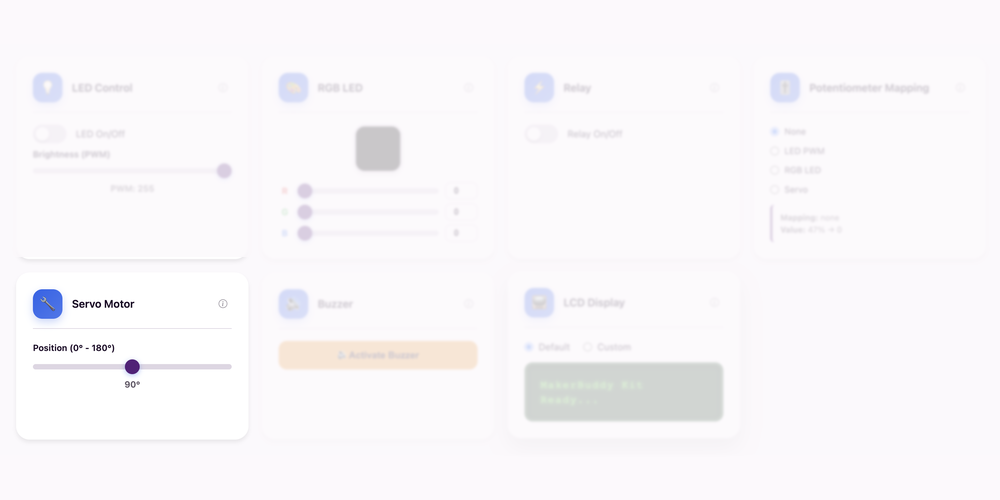
Dashboard: Servo Motor Control Card
Theory: Precise Mechanical Motion
From Sensing to Movement
In recent lessons, MakerBuddy has gathered information about temperature, distance and motion. An IoT system becomes even more useful when it can act on that information. A device that turns electrical energy into physical movement is called an actuator. The SG90 servo is a small actuator that can move a gate, pointer, flap or lightweight robotic arm to a chosen position. Instead of only displaying data, MakerBuddy can now make something in the physical world move.
Servo Motor vs. Ordinary DC Motor
An ordinary DC motor normally spins continuously while power is applied. Its direction and speed can be controlled, but it does not automatically know its exact position. A positional servo behaves differently: it receives a target angle and moves its output shaft toward that position. The SG90 commonly provides a useful movement range of about 0° to 180°. That controlled movement makes it ideal for projects that need a repeatable open, middle or closed position rather than continuous rotation.
How the SG90 Holds an Angle
Inside the blue case are a small DC motor, reduction gears, a position sensor and a control circuit. MakerBuddy sends a repeating control signal that represents the requested angle. The servo compares that request with its measured shaft position, powers the motor in the required direction and stops when the two positions match. This repeating process is called closed-loop control. If a light load nudges the horn away from its target, the servo attempts to correct the error and return to the selected angle.
Angles, Horns and Mechanical Limits
The removable plastic arm on the shaft is called a servo horn. Its starting orientation determines where an attached pointer or gate arm will point. Although the dashboard offers angle values across the servo range, every physical build is different. A cardboard gate might be fully closed at 15° and fully open at 105°. Calibration means testing the real mechanism and recording the safest useful angles. Never twist the horn by hand or force it past an obstacle: stalled gears can buzz, draw extra current and become damaged.
Real-World Applications
Servos create controlled movement in robot arms, camera mounts, model aircraft, automatic vents and small sorting machines. In accessibility devices, servos can press buttons or move simple controls. Smart agriculture systems use them to open greenhouse vents, while entry systems use them to move miniature locks and barrier arms. The parking gate built later in this course will combine a distance sensor for input with a servo for output: sense a vehicle, decide what to do and move the barrier.
For Teachers
This lesson is the bridge from sensing to actuation. Ask students to compare an input device such as the HC-SR04 with an output device such as the servo, then describe a complete sense-decide-act system. Demonstrate closed-loop control by moving an unloaded servo between two angles and discussing how its internal position sensor provides feedback. Keep attached mechanisms light, leave clearance around the horn and require students to approach mechanical limits gradually. If a servo buzzes continuously, becomes warm or makes the board restart, remove the obstruction and power down before inspecting the build.
For Parents
Your child is learning how digital commands become controlled physical movement. The SG90 is the same type of small servo used in beginner robotics, model vehicles and automatic mechanisms. The important skill is not simply moving it to 0°, 90° and 180°; students also test, measure and calibrate positions that work in a real construction. This introduces mechanical design, feedback control and safe prototyping—core ideas in robotics and mechatronics.
Hands-On Activity: Servo Positioning and Calibration
Activity Duration: 20-25 minutes
Students will connect the SG90, command several reference angles and calibrate safe open, middle and closed positions for a lightweight mechanism.
Step-by-Step Instructions:
- Inspect the Servo: Identify the blue SG90 case, output shaft, removable horn and three-wire lead. Make sure the horn can move without hitting nearby objects.
- Power Down First: Disconnect power from the MakerBuddy IoT Board before attaching or removing the servo.
- Connect the Servo: Plug the SG90 into its matching labelled MakerBuddy connector. Align the keyed connector correctly; do not force it or use unlabelled pin numbers.
- Open the Dashboard: Power the board, open the MakerBuddy web interface and locate the Servo Motor control card.
- Center the Servo: Select 90° and allow the servo to stop. With teacher guidance and the power disconnected, fit the horn so a pointer is approximately centred.
- Test Reference Angles: Reconnect power and command 0°, 45°, 90°, 135° and 180°, pausing after every change. Observe the direction and size of each movement.
- Add a Lightweight Load: Attach a short cardboard pointer or barrier arm. Keep the area around the horn clear of fingers and loose objects.
- Calibrate Useful Positions: Move in small increments to find a safe closed, middle and open angle. Stop before the arm contacts the table, frame or another mechanical stop.
- Record the Results: Write the three angle values in a table and repeat each position three times to check that the movement is consistent.
What Students Should Observe:
- The servo moves to a requested angle and then stops instead of spinning continuously
- 90° is near the middle of the available movement range
- Increasing and decreasing angle values move the horn in opposite directions
- The same command returns the horn to approximately the same position each time
- The best physical open and closed positions may not be exactly 0° and 180°
- A loaded servo may make a brief sound while moving, but it should not remain stalled or buzz continuously
Servo Safety
Connect the servo only while the board is powered off. Use a lightweight arm, keep fingers clear while it moves and never force the horn by hand. If the servo buzzes continuously, stops against an obstacle or becomes warm, return it to a safe angle and disconnect power.
Challenge
Your Mission: Build and Calibrate a Parking Barrier
Turn your calibrated servo into a miniature parking barrier that moves reliably between a closed position and an open position without striking its frame.
Challenge 1: Find the Physical Limits
- Attach a short, lightweight cardboard barrier arm to the centred servo horn
- Start at 90° and move downward in 5° steps until the arm is horizontal
- Record that value as your closed angle
- Return to 90° and move upward in 5° steps until the arm is vertical
- Record that value as your open angle
- Test closed → open → closed five times and note any inconsistency
Challenge 2: Improve the Motion
Evaluate your mechanism like a robotics engineer and make one improvement:
- Adjust the horn position so the useful angles stay away from the servo endpoints
- Shorten or lighten the barrier arm if the servo struggles to lift it
- Add a marked middle position for testing and maintenance
- Create a calibration label listing the final closed, middle and open angles
Discussion Questions:
- Why might two groups need different angle values even when both use an SG90?
- What happens when the barrier hits a mechanical stop before reaching its target angle?
- Why is repeatability more important than using the full 0° to 180° range?
- Which sensor could detect a vehicle and tell this barrier when to open?
Bonus Challenge: Use the Potentiometer Mapping card to select Servo, then turn the MakerBuddy board's built-in potentiometer to control the barrier manually. Only one mapping—LED, RGB or Servo—can be selected at a time. After a power restart, select the mapping again before testing.
Key Takeaways
✓ Servo Position Control
A positional servo moves to a requested angle rather than spinning continuously. This makes the SG90 useful for gates, pointers, flaps and lightweight robotic mechanisms that need repeatable positions. MakerBuddy's dashboard translates an angle selection into the repeating control signal the servo understands.
✓ Closed-Loop Feedback
The SG90 contains a motor, gears, a position sensor and a controller. It compares the requested position with the measured shaft position and drives the motor until the error is small. This feedback loop allows the servo to stop at and attempt to hold a selected angle.
✓ Mechanical Calibration
Dashboard angles are commands, but the useful positions depend on horn alignment and the physical build. Calibration finds safe closed, middle and open values through careful testing. Good designs avoid forcing the mechanism against its limits and verify that each position is repeatable.
✓ Sense-Decide-Act Systems
Sensors provide information, control logic makes a decision and actuators create a physical result. Combining an HC-SR04 distance sensor with a servo can produce an automatic parking barrier. This input-process-output pattern is the foundation of robotics, smart devices and industrial automation.
Coming Up Next Week:
Week 15: High Voltage Control (The Relay) — Use a low-voltage control signal to switch a separate load safely.