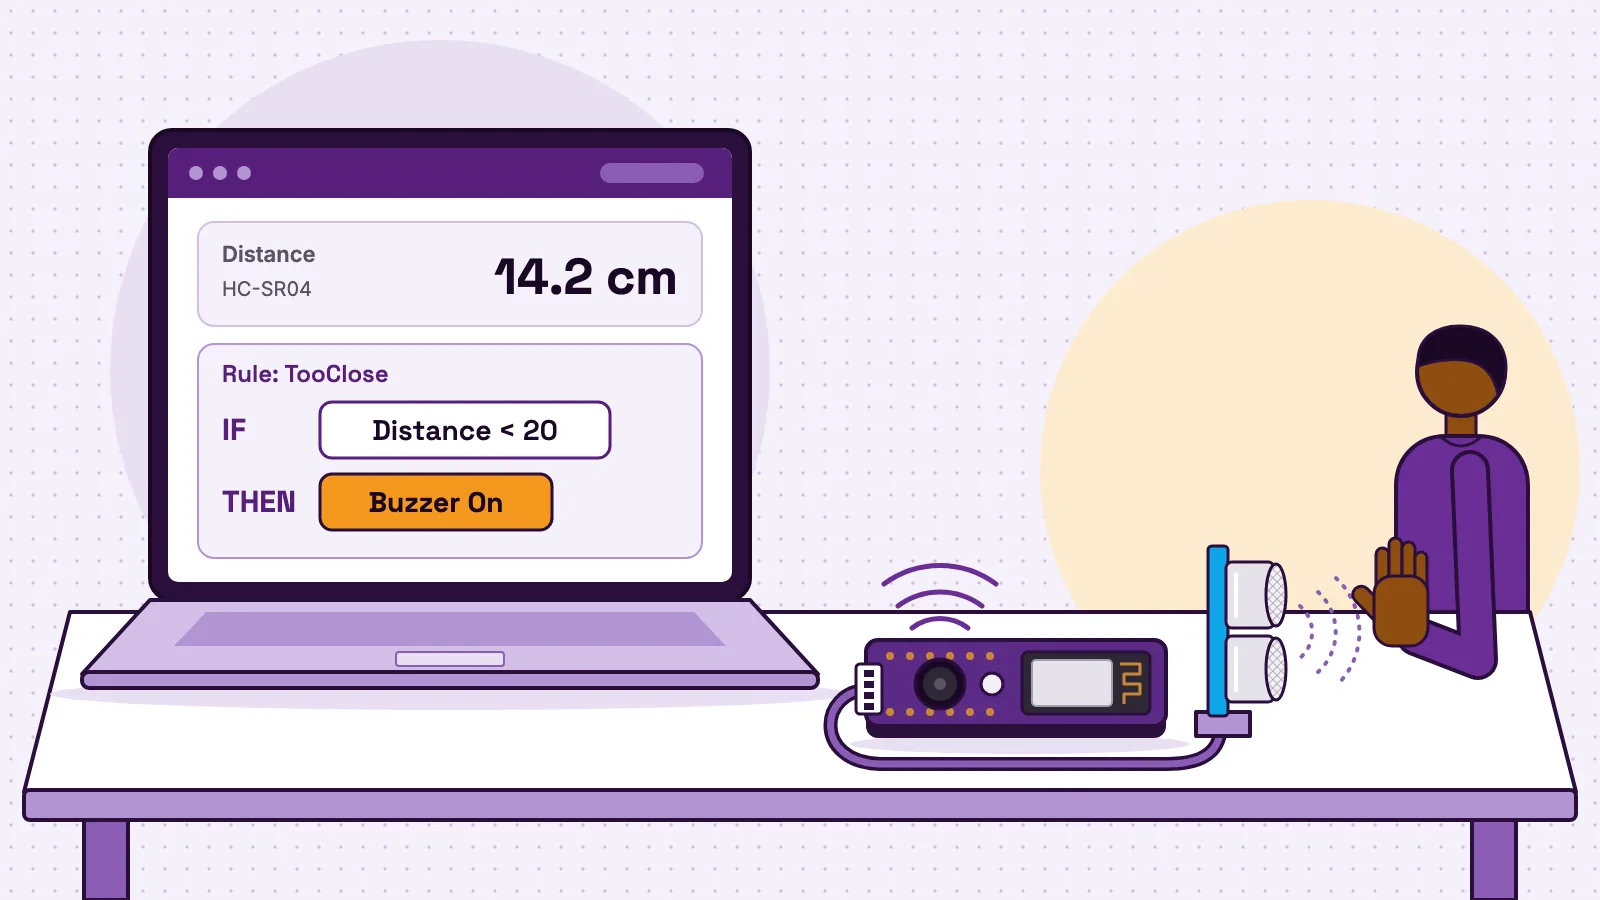
A visual programming language lets you build a program by arranging shapes on a screen instead of typing text. You snap blocks together, wire boxes into a flow, or fill in a rule that says "when this happens, do that". Scratch, Microsoft MakeCode, Node-RED and smart-home rule editors are all examples. The computer still follows exact instructions. Only the way you write them changes.
That is why visual programming is more than a toy. Order, decisions, repetition and AND/OR tests work the same way in blocks as in C++ or Python. A student who builds a working rule has written a real program without typing a semicolon.
This guide compares the main kinds of visual programming, then builds a no-code security light from two rules on the MakerBuddy board, and the same light in Arduino code.
What a visual programming language is, and what "no code" means
In a text language, you type words and symbols in a strict grammar called syntax. Miss one bracket and the program will not run. In a visual language, the pieces are shapes, and the shape shows what fits where.
Weintrop and Wilensky describe how this works in their study of block-based and text-based programming (opens in a new tab). Students drag blocks into a scripting area and snap them together. If two blocks cannot form a valid statement, the editor will not let them snap, so syntax errors cannot happen. The logic still has to be right.
"No code" means the same for automation tools. You still decide what to watch, what to compare it with, what to do, and in what order. Get the logic wrong and the light stays on all night, just as it would in C++. No-code tools remove the typing, not the thinking.
Types of visual programming: blocks, flows and rules
Visual tools come in three main families: blocks snap into stacks, flows wire boxes together, and rules fill in a "when, if, then" form.
| Family | What you arrange | Example tool | Built for |
|---|---|---|---|
| Blocks | Puzzle-shaped blocks that snap into a stack | Scratch, where kids animate a story or design a game (opens in a new tab) | Learning to code on screen |
| Blocks with a text view | Blocks that map to real lines of code | Microsoft MakeCode (opens in a new tab), with a board simulator | Learning to code on small boards |
| Block library | Blocks for variables, logic and loops | Blockly (opens in a new tab), which developers add to their apps | Putting a block editor inside a product |
| Flows | Nodes wired together in a browser editor | Node-RED (opens in a new tab), on a Raspberry Pi or in the cloud | Joining events and data into flows |
| Graphical engineering code | Diagrams in G, a graphical language | LabVIEW (opens in a new tab), for automated test systems | Test and measurement |
| Rules | A trigger, a condition and an action | Home Assistant automations (opens in a new tab) | Smart homes |
| Rule chains | Rule nodes joined into a graph on a canvas | ThingsBoard's rule engine (opens in a new tab) | Processing messages from many IoT devices |
| Rules on the device | A loop mode, sensor tests and up to 10 steps | The MakerBuddy rule engine | Students learning automation on real hardware |
- Family
- Blocks
- What you arrange
- Puzzle-shaped blocks that snap into a stack
- Example tool
- Scratch, where kids animate a story or design a game (opens in a new tab)
- Built for
- Learning to code on screen
- Family
- Blocks with a text view
- What you arrange
- Blocks that map to real lines of code
- Example tool
- Microsoft MakeCode (opens in a new tab), with a board simulator
- Built for
- Learning to code on small boards
- Family
- Block library
- What you arrange
- Blocks for variables, logic and loops
- Example tool
- Blockly (opens in a new tab), which developers add to their apps
- Built for
- Putting a block editor inside a product
- Family
- Flows
- What you arrange
- Nodes wired together in a browser editor
- Example tool
- Node-RED (opens in a new tab), on a Raspberry Pi or in the cloud
- Built for
- Joining events and data into flows
- Family
- Graphical engineering code
- What you arrange
- Diagrams in G, a graphical language
- Example tool
- LabVIEW (opens in a new tab), for automated test systems
- Built for
- Test and measurement
- Family
- Rules
- What you arrange
- A trigger, a condition and an action
- Example tool
- Home Assistant automations (opens in a new tab)
- Built for
- Smart homes
- Family
- Rule chains
- What you arrange
- Rule nodes joined into a graph on a canvas
- Example tool
- ThingsBoard's rule engine (opens in a new tab)
- Built for
- Processing messages from many IoT devices
- Family
- Rules on the device
- What you arrange
- A loop mode, sensor tests and up to 10 steps
- Example tool
- The MakerBuddy rule engine
- Built for
- Students learning automation on real hardware
Blocks suit a first coding lesson. The MakeCode for micro:bit block reference (opens in a new tab) shows the key idea: a block is either an event, such as a button press, or it snaps inside one. A sensor rule works the same way.
Rules suit automation. Home Assistant's automation basics (opens in a new tab) split every automation into a trigger that starts it, a condition that must also be true, and an action: when a person comes home and it is after sunset, turn on the living room lights. Its automation editor (opens in a new tab) builds these without writing any YAML.
So what is a no-code IoT platform? It is a rule or flow tool joined to real sensors and outputs. ThingsBoard (opens in a new tab), for example, passes each device message along a chain of rule nodes that filter, change or act on it.
The programming ideas every visual language teaches
School standards name the same core ideas, whatever tool a class uses. The US CSTA K–12 Computer Science Standards (opens in a new tab) ask students in grades 3 to 5 (ages 8 to 11) to create programs with sequences, events, loops and conditionals. In grades 6 to 8 (ages 11 to 14) they add flowcharts and compound conditionals. A rule that joins two sensor tests with AND is a compound conditional.
England's national curriculum for computing (opens in a new tab) asks for sequence, selection and repetition at key stage 2. Key stage 3 adds Boolean logic, such as AND, OR and NOT, and at least two languages, one of them textual.
Read across a row of this table and you see the same thought written three ways.
| Programming idea | Block editor (Scratch, MakeCode) | MakerBuddy rule | Arduino C++ |
|---|---|---|---|
| Sequence | Blocks stacked top to bottom | Steps 1 to 10, run in order | Lines run top to bottom |
| Waiting | A wait or pause block | Each step's Delay, which comes after its action | delay(1000) or a millis() check |
| Selection (if) | An if-then block | A Condition rule's sensor test | if (light < 40) { ... } |
| Selection (else) | An if-then-else block | No ELSE: a second rule with the opposite test | else { ... } |
| Repeat forever | A forever block | Forever loop mode | loop() runs again and again |
| Repeat on a schedule | A forever block with a wait | Timer loop mode | A millis() timer |
| Events | A button-press event block | A Condition on Push Button or Motion equal to True | Reading a pin, or an interrupt |
| Boolean logic | And, or, not blocks | AND or OR between two tests or two sensors | && for AND, ! for NOT, two bars for OR |
| Variables | A make-a-variable block | None: sensor readings are the only values | int count = 0; |
- Programming idea
- Sequence
- Block editor (Scratch, MakeCode)
- Blocks stacked top to bottom
- MakerBuddy rule
- Steps 1 to 10, run in order
- Arduino C++
- Lines run top to bottom
- Programming idea
- Waiting
- Block editor (Scratch, MakeCode)
- A wait or pause block
- MakerBuddy rule
- Each step's Delay, which comes after its action
- Arduino C++
delay(1000)or amillis()check
- Programming idea
- Selection (if)
- Block editor (Scratch, MakeCode)
- An if-then block
- MakerBuddy rule
- A Condition rule's sensor test
- Arduino C++
if (light < 40) { ... }
- Programming idea
- Selection (else)
- Block editor (Scratch, MakeCode)
- An if-then-else block
- MakerBuddy rule
- No ELSE: a second rule with the opposite test
- Arduino C++
else { ... }
- Programming idea
- Repeat forever
- Block editor (Scratch, MakeCode)
- A forever block
- MakerBuddy rule
- Forever loop mode
- Arduino C++
loop()runs again and again
- Programming idea
- Repeat on a schedule
- Block editor (Scratch, MakeCode)
- A forever block with a wait
- MakerBuddy rule
- Timer loop mode
- Arduino C++
- A
millis()timer
- Programming idea
- Events
- Block editor (Scratch, MakeCode)
- A button-press event block
- MakerBuddy rule
- A Condition on Push Button or Motion equal to True
- Arduino C++
- Reading a pin, or an interrupt
- Programming idea
- Boolean logic
- Block editor (Scratch, MakeCode)
- And, or, not blocks
- MakerBuddy rule
- AND or OR between two tests or two sensors
- Arduino C++
&&for AND,!for NOT, two bars for OR
- Programming idea
- Variables
- Block editor (Scratch, MakeCode)
- A make-a-variable block
- MakerBuddy rule
- None: sensor readings are the only values
- Arduino C++
int count = 0;
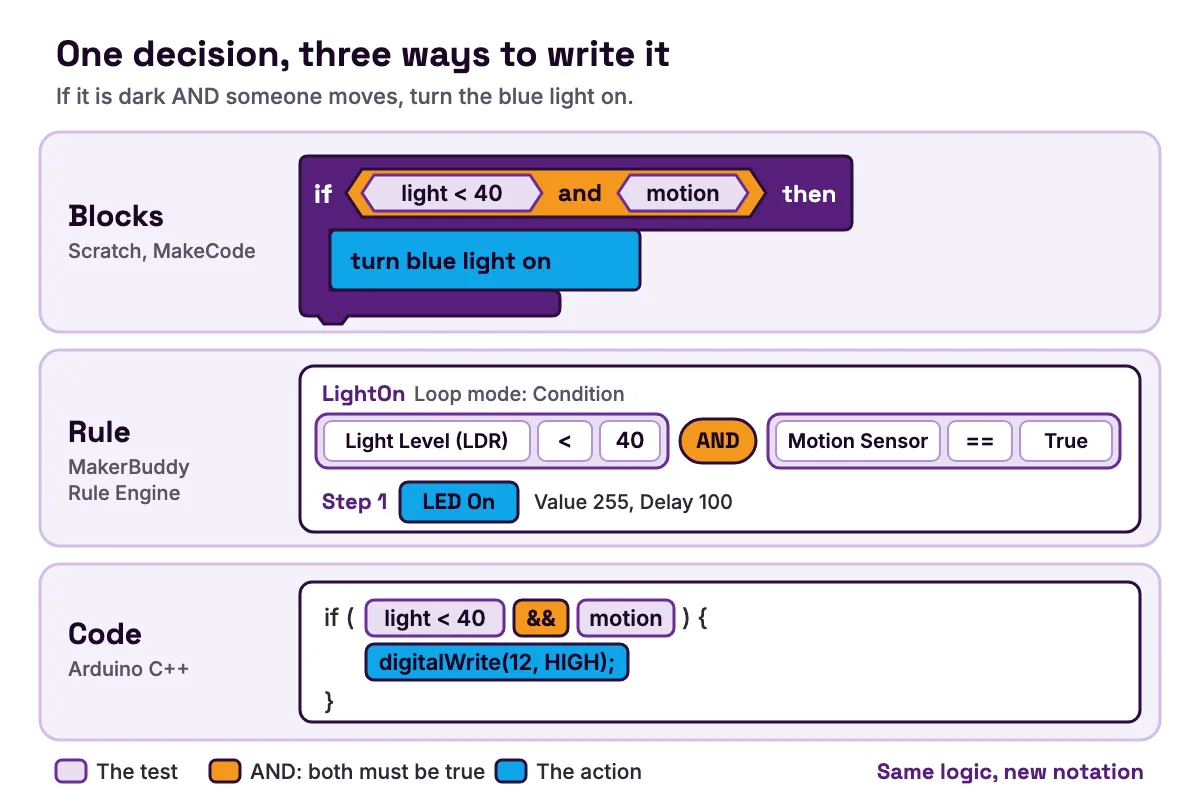
Two rows matter most. The missing ELSE makes students state the opposite case as its own rule, and the missing variables show where rules end and text code begins. Our guides to if-then statements explained with real sensors and forever, timed and conditional loops go deeper.
How no-code rules and loop modes work on a real board
MakerBuddy is a learning board built around an ESP32, a small computer with Wi-Fi. Its browser dashboard shows live readings, switches outputs by hand and holds the Rule Engine. According to how rules run, the board stores up to 10 rules, each with up to 10 steps. Rules are saved on the board and keep running with the dashboard closed. No account is needed, and readings stay on your local network.
- Steps: switch or dim the blue light, set the colour light, switch the buzzer or relay, move the servo, or show text on the screen. Each step can wait up to 1 hour before the next.
- Sensor tests: one of ten sensors, an operator (>, <, >=, <= or equal, which means within 0.1) and a threshold. Motion and the push button are True or False.
- Joining tests: a rule can test one sensor twice, and add a second sensor, each joined by AND or OR.
- Timing: the board reads its sensors once a second, and a condition must hold for 0.3 seconds before a rule starts.
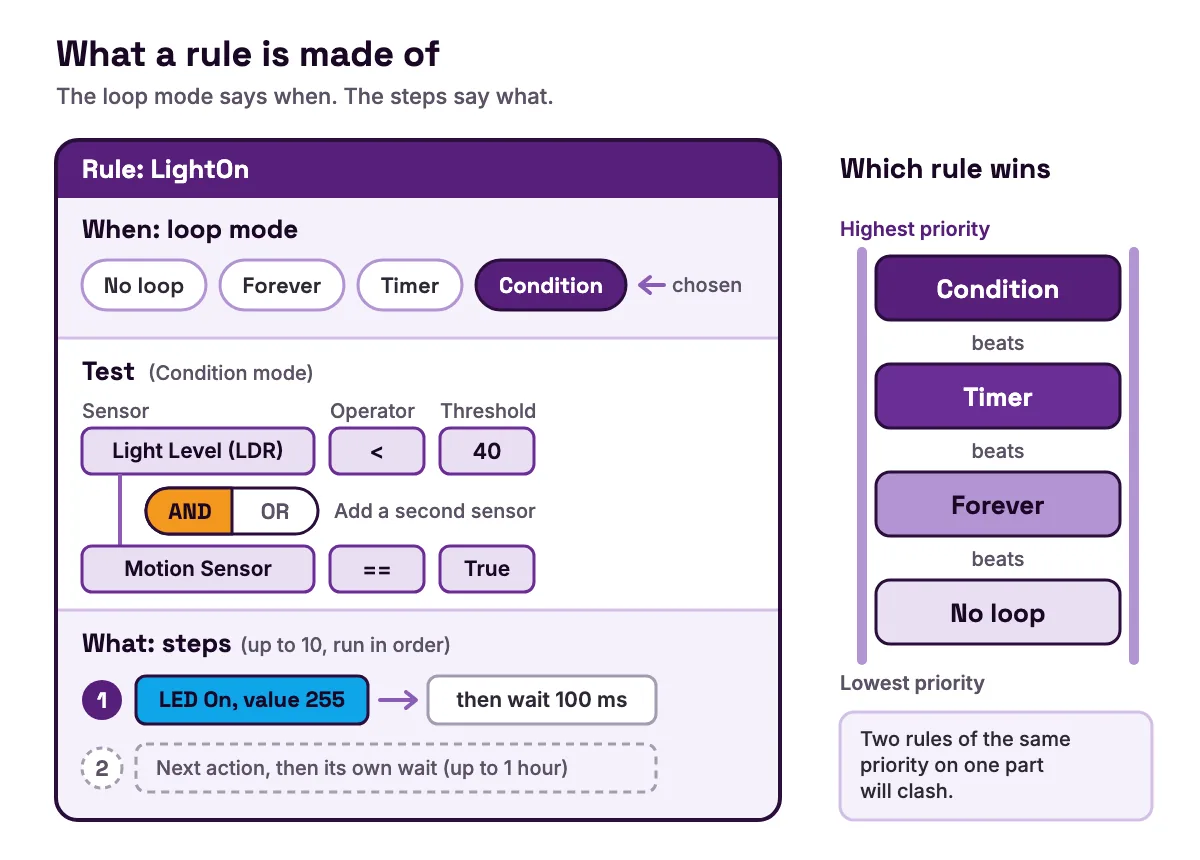
Lesson 21 sums up every rule in two parts: the loop mode says when, and the steps say what.
| Loop mode | What it does | The code idea | Lesson |
|---|---|---|---|
| No loop | Runs its steps once, then stops | Code that runs once, like setup() | Lesson 22: a welcome sequence |
| Forever | Jumps back to step 1 as soon as the last step's wait ends | An endless loop, like loop() | Lesson 23: a blinking beacon |
| Timer | Runs, waits a set interval after it finishes, then runs again | A scheduled task | Lesson 25: a hazard light |
| Condition | Repeats while a sensor test is true | An if, checked again and again | Lesson 26: a nightlight |
- Loop mode
- No loop
- What it does
- Runs its steps once, then stops
- The code idea
- Code that runs once, like
setup() - Lesson
- Lesson 22: a welcome sequence
- Loop mode
- Forever
- What it does
- Jumps back to step 1 as soon as the last step's wait ends
- The code idea
- An endless loop, like
loop() - Lesson
- Lesson 23: a blinking beacon
- Loop mode
- Timer
- What it does
- Runs, waits a set interval after it finishes, then runs again
- The code idea
- A scheduled task
- Lesson
- Lesson 25: a hazard light
- Loop mode
- Condition
- What it does
- Repeats while a sensor test is true
- The code idea
- An if, checked again and again
- Lesson
- Lesson 26: a nightlight
Three details make these modes real logic. First, a step's delay comes after its action: "Buzzer On, wait 1000 ms" starts the buzzer, then waits a second, like a line of code followed by delay(1000). Second, a Timer's interval counts from the end of each run. In Lesson 25, a rule whose steps take 2 seconds, with a 10-second interval, repeats every 12 seconds.
Third, rules have a priority order: Condition beats Timer, Timer beats Forever, and Forever beats No loop. Two rules of the same priority that switch the same light, buzzer or relay will clash. Engineers call that a race condition, and Lesson 23 lets students hear one on the buzzer.
The full formats are in the automation rules documentation, and our guide to how a rule engine decides what to do goes beyond this one board.
Worked example: a no-code security light from two rules
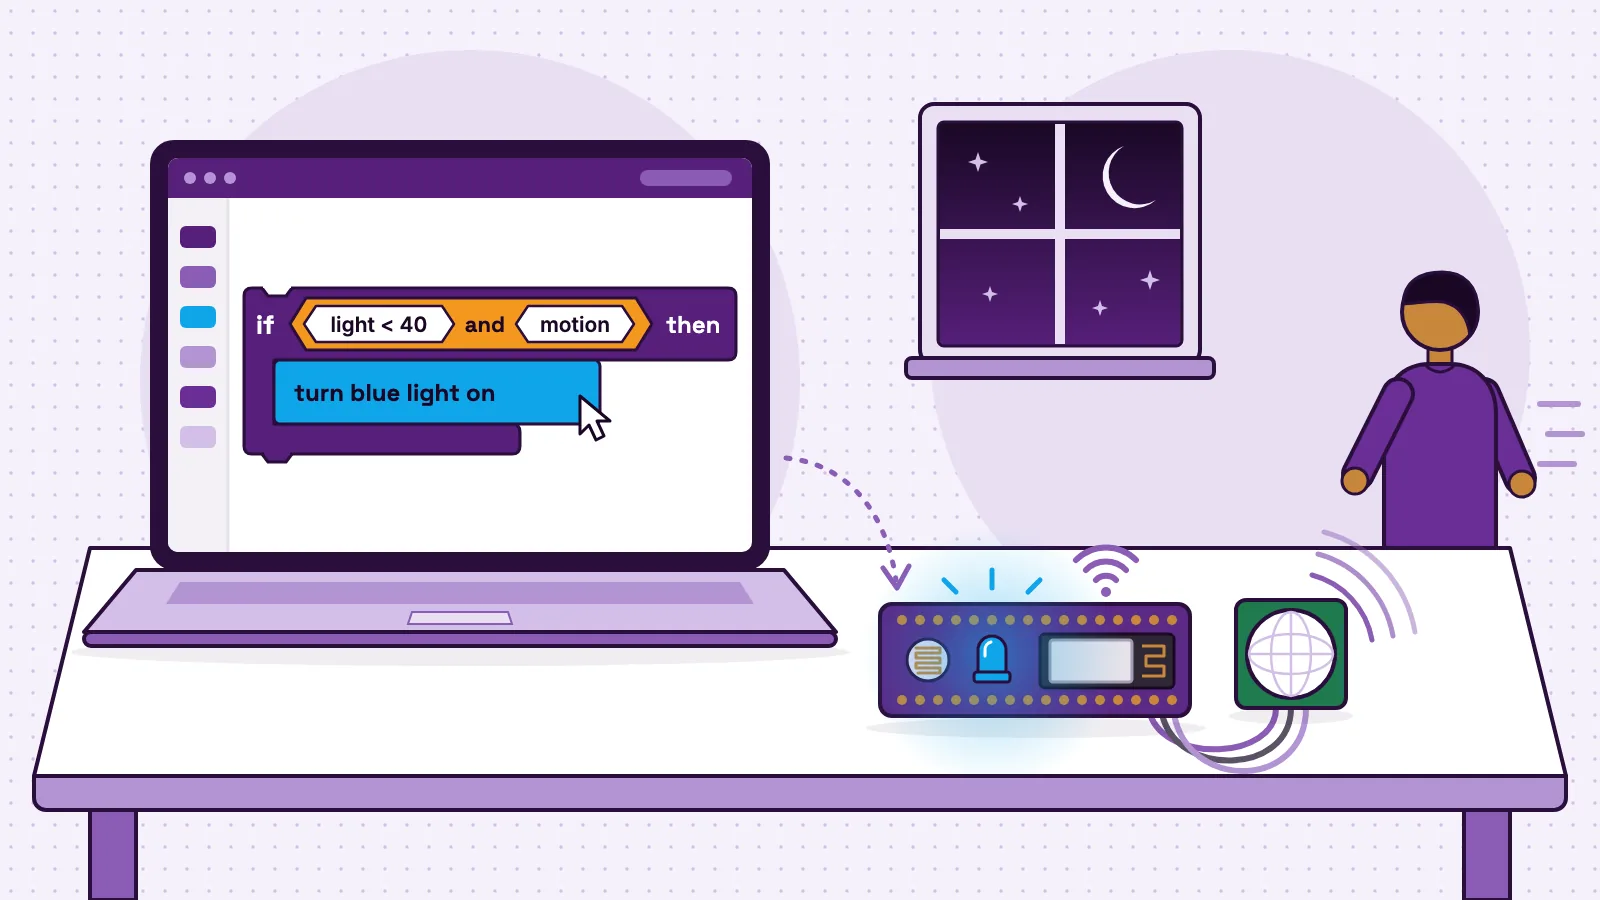
The light should come on only when it is dark and someone moves. You need the built-in light sensor (GPIO 35), the built-in blue light (GPIO 12) and the HC-SR501 motion sensor, which plugs into the socket marked 18.
Step 1: plan it as logic first
Write the plan in plain words before you open the dashboard. Lesson 20 does this with flowcharts.
Every second:
  IF  light < 40   AND  motion is true   →  blue light on    (Rule 1)
  IF  light >= 40  OR   motion is false  →  blue light off   (Rule 2)
A MakerBuddy rule has no ELSE box, so "otherwise, turn it off" becomes its own rule with the opposite test.
Step 2: work out the opposite test
The opposite of "dark AND motion" is not "bright AND no motion". It is "bright OR no motion": the light should go off if the room is bright, or if nobody moves. Either reason is enough.
This swap is De Morgan's law: NOT (A AND B) is the same as (NOT A) OR (NOT B). Students meet it here as common sense, long before a textbook.
Step 3: find your threshold
- 1
With the USB cable unplugged, plug the motion sensor into the socket marked 18. Then plug the cable back in.
- 2
Read the Light Level card in your normal room, for example 70.
- 3
Cover the light sensor with your hand and read it again, for example 15.
- 4
Pick a number about halfway. This example uses 40.
Step 4: build Rule 1
- 1
Open the Rule Engine tab and name the rule
LightOn. - 2
Choose the Condition loop mode.
- 3
Set Sensor to Light Level (LDR), Operator to Less than (<) and Threshold to 40.
- 4
Tick Add a second sensor and choose AND, both must be true.
- 5
Set the second sensor to Motion Sensor. The operator switches to Equal to (==); choose True.
- 6
Add one step: LED On (the blue light), Value 255, Delay 100. Save the rule.
Step 5: build Rule 2
- 1
Add a second Condition rule called
LightOff. - 2
Set Light Level, Greater or equal (>=), 40.
- 3
Tick Add a second sensor and choose OR, either can be true.
- 4
Set Motion Sensor, equal to False.
- 5
Add one step: LED Off, Delay 100. Save.
Step 6: test every case
There are four possible situations. Check each one.
| Room | Motion? | Rule 1: dark AND motion | Rule 2: bright OR no motion | Blue light |
|---|---|---|---|---|
| Bright (70) | No | False | True | Off |
| Bright (70) | Yes | False | True | Off |
| Dark (15) | No | False | True | Off |
| Dark (15) | Yes | True | False | On |
- Room
- Bright (70)
- Motion?
- No
- Rule 1: dark AND motion
- False
- Rule 2: bright OR no motion
- True
- Blue light
- Off
- Room
- Bright (70)
- Motion?
- Yes
- Rule 1: dark AND motion
- False
- Rule 2: bright OR no motion
- True
- Blue light
- Off
- Room
- Dark (15)
- Motion?
- No
- Rule 1: dark AND motion
- False
- Rule 2: bright OR no motion
- True
- Blue light
- Off
- Room
- Dark (15)
- Motion?
- Yes
- Rule 1: dark AND motion
- True
- Rule 2: bright OR no motion
- False
- Blue light
- On
In every row exactly one rule is true. That is what if-else does in code, built from two rules. Because the tests never overlap, the rules never fight over the light.
Step 7: stop the flicker with a gap
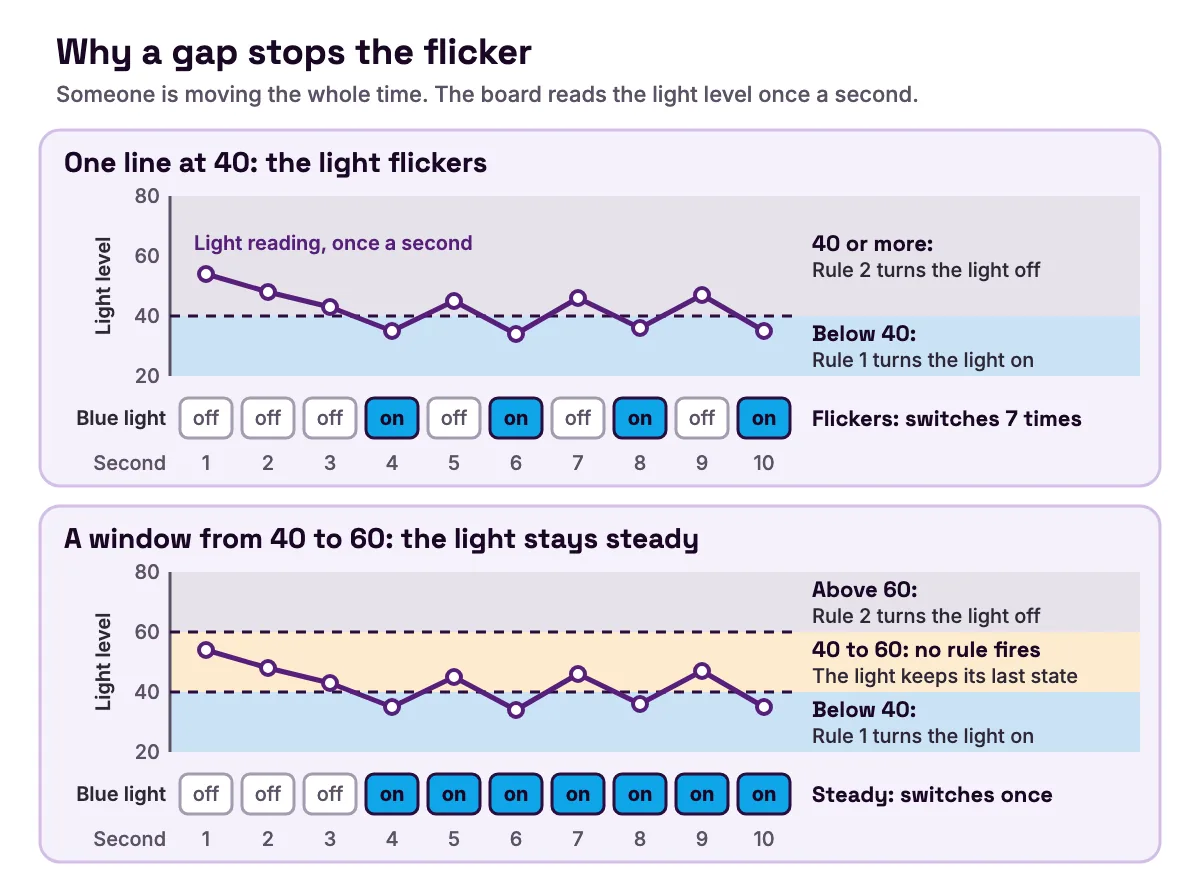
If the reading hovers around 40 while someone moves, it wobbles across the line, and the light may flick on and off every second. The fix is a gap: change Rule 2's light test to Greater than (>) 60.
Now, while someone moves and the reading sits between 40 and 60, neither rule is true, so the light keeps its last state. If nobody moves, Rule 2 still switches it off. Lesson 27 calls this a threshold window. Engineers call it hysteresis, which our guide to why your fan keeps switching on and off explains.
The same security light in Arduino code
Here is the window version in Arduino C++. Every line has a twin in the rules you just built.
In the Arduino IDE, choose "ESP32 Dev Module" from "esp32 by Espressif Systems" version 3.x; we compiled this sketch with core 3.3.7. The Arduino development notes list the firmware's own setup, and our guide to programming an ESP32 with the Arduino IDE walks through the install.
// MakerBuddy security light: the two rules from this post, written as Arduino code.
// Board: "ESP32 Dev Module" with "esp32 by Espressif Systems" 3.x.
// Uploading this sketch replaces the MakerBuddy firmware until you upload it again.

const int LDR_PIN = 35;   // built-in light sensor
const int PIR_PIN = 18;   // motion sensor socket
const int LED_PIN = 12;   // built-in blue light

const int DARK_BELOW = 40;     // Rule 1 needs a light level below this
const int BRIGHT_ABOVE = 60;   // Rule 2 fires above this light level
const unsigned long CHECK_EVERY_MS = 1000;   // read the sensors once a second

unsigned long lastCheck = 0;

// Light level from 0 to 100, on the same scale as the dashboard card.
int readLightLevel() {
  int sum = 0;
  for (int i = 0; i < 4; i++) {
    sum += analogRead(LDR_PIN);   // 0 to 4095 on the ESP32
  }
  return map(sum / 4, 0, 4095, 0, 100);
}

void setup() {
  Serial.begin(115200);
  pinMode(PIR_PIN, INPUT);
  pinMode(LED_PIN, OUTPUT);
  digitalWrite(LED_PIN, LOW);   // start with the light off
}

void loop() {
  if (millis() - lastCheck < CHECK_EVERY_MS) {
    return;   // not time to check yet
  }
  lastCheck = millis();

  int light = readLightLevel();
  bool motion = digitalRead(PIR_PIN) == HIGH;

  if (light < DARK_BELOW && motion) {             // Rule 1: dark AND motion
    digitalWrite(LED_PIN, HIGH);
  } else if (light > BRIGHT_ABOVE || !motion) {   // Rule 2: bright OR no motion
    digitalWrite(LED_PIN, LOW);
  }
  // Neither test true: the light keeps its last state, like two rules that both wait.

  Serial.print("light=");
  Serial.print(light);
  Serial.print(" motion=");
  Serial.println(motion ? "yes" : "no");
}
How the code lines up with the rules:
- 1
readLightLevel()averages four readings and scales them from 0–4095 to 0–100. Espressif's ADC reference for Arduino-ESP32 (opens in a new tab) confirms that
analogReadreturns 12-bit values from 0 to 4095 by default. The firmware scales the same way, so 40 means the same in both versions. - 2
The
millis()checkmakes the loop act once a second, like the board's sensor reading.
- 3
&&is AND,||is OR and!is NOT."Motion equal to False" became
!motion. - 4
else ifis the second rule.Code lets else stand for the opposite test; with rules, you worked it out with De Morgan's law.
- 5
The empty case at the bottom
is the threshold window: nothing runs and the light holds its state.
Notice what the rule engine did for you. It read the sensors on a schedule, waited 0.3 seconds before trusting a condition, kept the rules through power cuts, locked the LED card against a clash, and showed every reading live. The sketch does only the first. That gap is what a good no-code tool gives a beginner.
What research says about block-based and text-based programming
Visual programming has fans and critics. In a 2017 study by Weintrop and Wilensky (opens in a new tab), two high school classes of 30 students took the same 5-week course with the same teacher. One used blocks, the other text, in versions of one tool with the same features. Both classes improved. The blocks class showed greater learning gains and more interest in further computing courses. The text class felt their work was closer to what professional programmers do. Confidence and enjoyment did not differ.
In an earlier study of how students see blocks-based programming (opens in a new tab), high school students said blocks were easy because of their plain-language labels, drag-and-drop building and easy browsing. They also said blocks felt less authentic and less powerful than text.
The honest case against staying visual too long:
- Standards expect text in the end. England's curriculum (opens in a new tab) asks for a textual language by key stage 3.
- Big programs get messy as pictures. Students in the 2015 study (opens in a new tab) found longer block programs hard to manage.
- Some ideas need text. Counting, remembering a value or doing maths on a reading needs variables, and MakerBuddy rules do not have them.
So the answer is blocks or rules first, then text, with a bridge like the security light above. Our guide on when students should switch from block coding to text coding covers the timing.
Where no-code automation stops: limits to plan around
Knowing a tool's edges before you plan a project saves a lesson. These are the MakerBuddy rule engine's:
| Limit | What it means in practice | What to do instead |
|---|---|---|
| No ELSE | A rule only acts when its test is true | Write a second rule with the opposite test |
| No variables | A rule cannot count visitors or remember a value | Move to Arduino or MicroPython code |
| No clock | Timer means "every 2 hours", never "at 8 am" | Use an interval, or a sensor such as light |
| Once-a-second readings | Rules react in about a second | Fine for rooms and plants, too slow for reaction games |
| 10 rules, 10 steps each | Big projects need planning | One rule per output; combine steps |
| Low-voltage relay only | Never mains electricity | Never connect anything that plugs into a wall socket |
| Gas sensor builds | Learning models only | Never use one as a real gas or smoke alarm |
- Limit
- No ELSE
- What it means in practice
- A rule only acts when its test is true
- What to do instead
- Write a second rule with the opposite test
- Limit
- No variables
- What it means in practice
- A rule cannot count visitors or remember a value
- What to do instead
- Move to Arduino or MicroPython code
- Limit
- No clock
- What it means in practice
- Timer means "every 2 hours", never "at 8 am"
- What to do instead
- Use an interval, or a sensor such as light
- Limit
- Once-a-second readings
- What it means in practice
- Rules react in about a second
- What to do instead
- Fine for rooms and plants, too slow for reaction games
- Limit
- 10 rules, 10 steps each
- What it means in practice
- Big projects need planning
- What to do instead
- One rule per output; combine steps
- Limit
- Low-voltage relay only
- What it means in practice
- Never mains electricity
- What to do instead
- Never connect anything that plugs into a wall socket
- Limit
- Gas sensor builds
- What it means in practice
- Learning models only
- What to do instead
- Never use one as a real gas or smoke alarm
The board needs 2.4 GHz Wi-Fi (a phone hotspot works). Its local web connection has no password, so use a trusted network and never expose it to the internet. Laptops, iPhones and iPads can run the dashboard; Android phones cannot control the board yet.
One more surprise: stopping a rule never switches anything off. Teach that on purpose: a program that stops is not a program that cleans up.
Teaching visual programming: a path from flowchart to code
The MakerBuddy curriculum has 32 free lessons for ages 10 and up, each 45 to 60 minutes, across four terms. Rules come in terms three and four, after students have tested every part by hand.
- 1
Flowcharts.
Lesson 20: act out a human algorithm, then draw if-then-else flowcharts for a smart fan and a security light.
- 2
Tour the engine.
Lesson 21: explore the four loop modes without saving anything.
- 3
One shot.
Lesson 22: a welcome sequence that shows a delay comes after its action.
- 4
Forever.
Lesson 23: a beacon, then a clash between two same-priority rules.
- 5
Timer.
Lesson 25: step delays versus the loop interval.
- 6
Condition.
Lesson 26: a nightlight and a smart fan.
- 7
AND, OR and windows.
Lesson 27: the two-sensor security light, and a fix for jitter.
Three habits make the logic stick: predict before pressing Save, fill in a truth table for every two-sensor rule, and make "one part, one rule" a class motto. The MakerBuddy guide for teachers shows how a first class runs and what to check before students arrive.
For projects, the project ideas library has 50 ideas, and its "No code only" filter shows the 43 that need no code. See also our ESP32 and Arduino project ideas for students and the visual guide to sensors a rule can watch.
Common mistakes when building no-code rules
The light turns on but never turns off
Cause: A Condition rule leaves every output the way its last step set it. When its test turns false, the rule finishes its round and stops, but nothing switches off.
Fix: Add a second rule with the opposite test and an off step, as in the security light.
The output stutters while two rules run
Cause: Two rules of the same priority drive one part at once, such as a Forever rule that switches the buzzer on and another that switches it off.
Fix: Give each part one rule. For two behaviours, use two steps in one rule.
The dashboard switch for the light will not move
Cause: A running rule, or a Condition rule that is watching, owns that output. The card says the control is used by the Rule Engine.
Fix: Press Stop on the rule's row. The output stays as it was, but the switch works again.
A two-sensor rule fires when only one thing happens
Cause: The rule uses OR, either can be true, where it needed AND, both must be true.
Fix: Say the rule out loud, then check that the choice under Add a second sensor matches what you said.
FAQ
What is a visual programming language?
A visual programming language is one where you build a program from shapes, such as blocks, wired boxes or rule cards, instead of typing text. The editor only lets pieces join in valid ways, so, as research on block editors (opens in a new tab) explains, you cannot make a syntax error. The program still needs correct logic to work.
What is visual programming with an example?
A nightlight rule is a good example. You pick Light Level from a list, choose "less than", type 40 and add one step: LED On. In Arduino code the same idea is if (light < 40) digitalWrite(12, HIGH);.
What are some examples of visual programming languages?
Scratch (opens in a new tab) and Microsoft MakeCode (opens in a new tab) are block-based tools for learning to code. Node-RED (opens in a new tab) wires nodes into flows, LabVIEW (opens in a new tab) uses a graphical language called G, and Home Assistant builds smart-home rules in a visual editor (opens in a new tab). The MakerBuddy rule engine runs rules on a student board.
Is Visual Basic a visual programming language?
No. Despite its name, Visual Basic is a text language. Microsoft's Visual Basic documentation (opens in a new tab) describes it as an object-oriented programming language for building .NET apps. Its guide to the structure of a Visual Basic program (opens in a new tab) shows that you write it as statements in source files, in a code editor. In a visual language, the program itself is blocks, nodes or rule cards.
Is visual programming real programming?
Yes. A visual program still has sequence, decisions, loops and logic, and a wrong one still does the wrong thing. The editor only handles the syntax.
What is the best visual programming language for beginners?
It depends on the goal. Scratch (opens in a new tab) is used for on-screen stories and games. For hardware, pick a tool whose blocks or rules control real sensors and outputs, and one that leads on to matching text code.
Can you program an ESP32 or Arduino without code?
Yes, with the right firmware. MakerBuddy's firmware understands rules, so students build automations in a browser dashboard with no code. Their own Arduino sketch later replaces that firmware until it is uploaded again.
What is a no-code IoT platform?
It is a tool that connects sensors and outputs to a dashboard and lets you automate them with rules or flows instead of code. Some run on a separate computer: Node-RED (opens in a new tab) runs on a Raspberry Pi or in the cloud. MakerBuddy rules run on the board itself, on your local Wi-Fi, with no account.
When should students switch from blocks to text code?
Switch when a project needs something rules or blocks cannot do, such as counting or remembering a value. Bridge the move by rewriting a project they already built visually, like the security light here. More guides like this are on the MakerBuddy blog.
Sources
- Weintrop and Wilensky (2017): Comparing Block-Based and Text-Based Programming in High School Computer Science Classrooms, ACM Transactions on Computing Education (opens in a new tab)
- Weintrop and Wilensky (2015): To Block or Not to Block, That is the Question: Students' Perceptions of Blocks-based Programming, IDC 2015 (opens in a new tab)
- CSTA: K–12 Computer Science Standards, revised 2017 (opens in a new tab)
- GOV.UK: National curriculum in England, computing programmes of study (opens in a new tab)
- Scratch Foundation: Learn (opens in a new tab)
- Microsoft MakeCode: About (opens in a new tab)
- Microsoft MakeCode for micro:bit: Blocks (opens in a new tab)
- Blockly: What is Blockly? (opens in a new tab)
- Node-RED: About (opens in a new tab)
- NI: LabVIEW (opens in a new tab)
- Home Assistant: Automation basics (opens in a new tab)
- Home Assistant: Automation editor (opens in a new tab)
- ThingsBoard: Rule engine overview (opens in a new tab)
- Espressif: Arduino-ESP32 ADC API reference (opens in a new tab)
- Microsoft Learn: Visual Basic documentation (opens in a new tab)
- Microsoft Learn: Structure of a Visual Basic program (opens in a new tab)