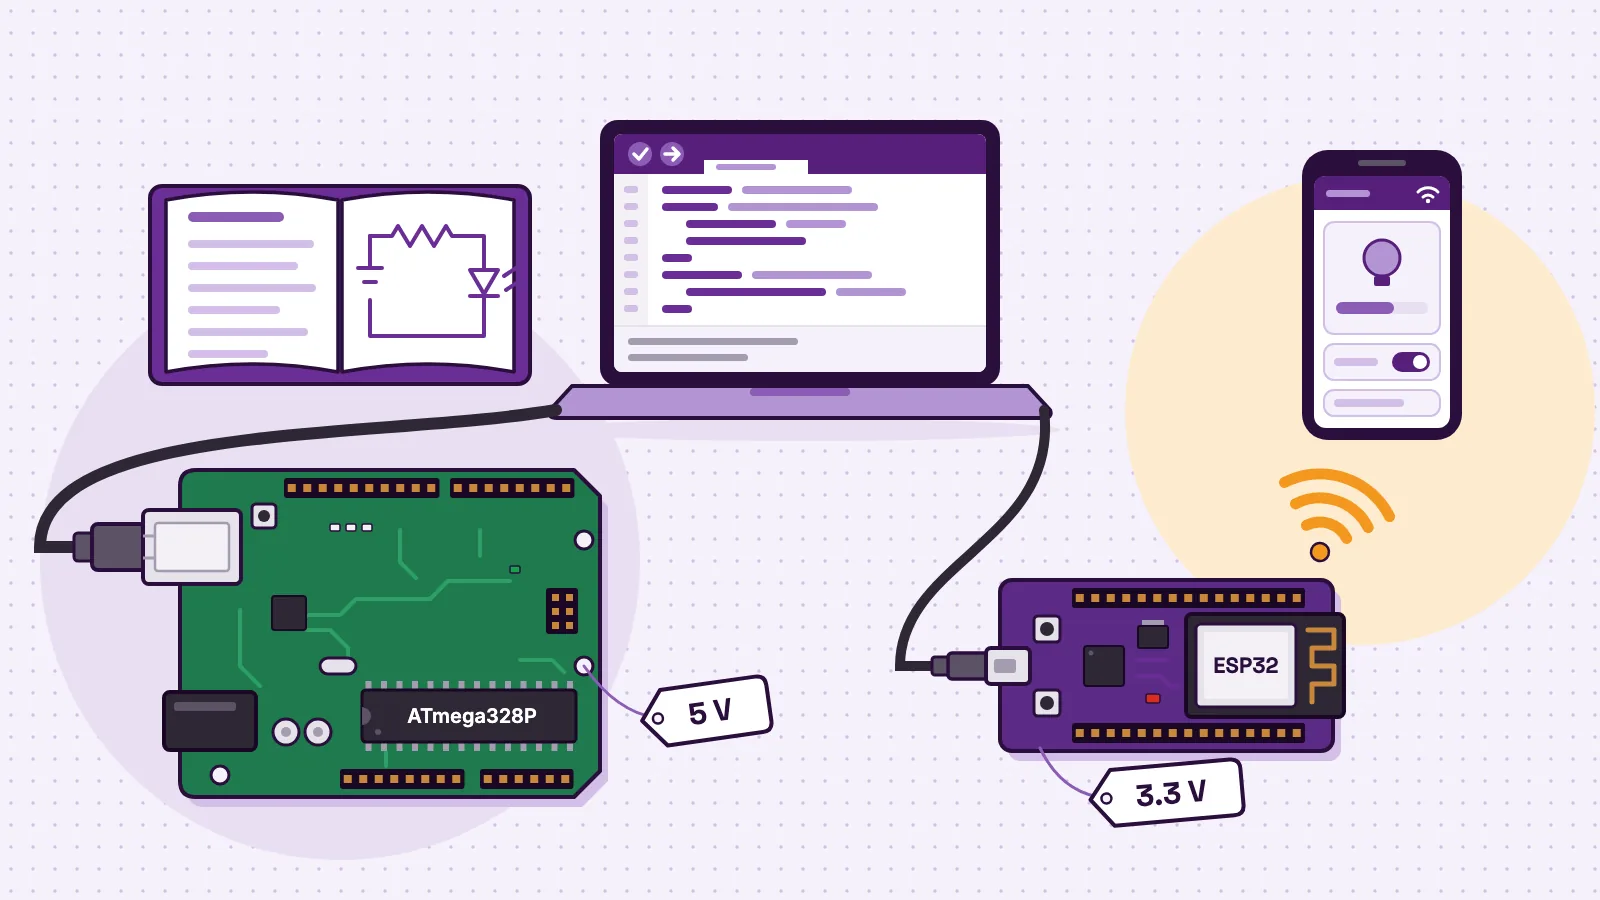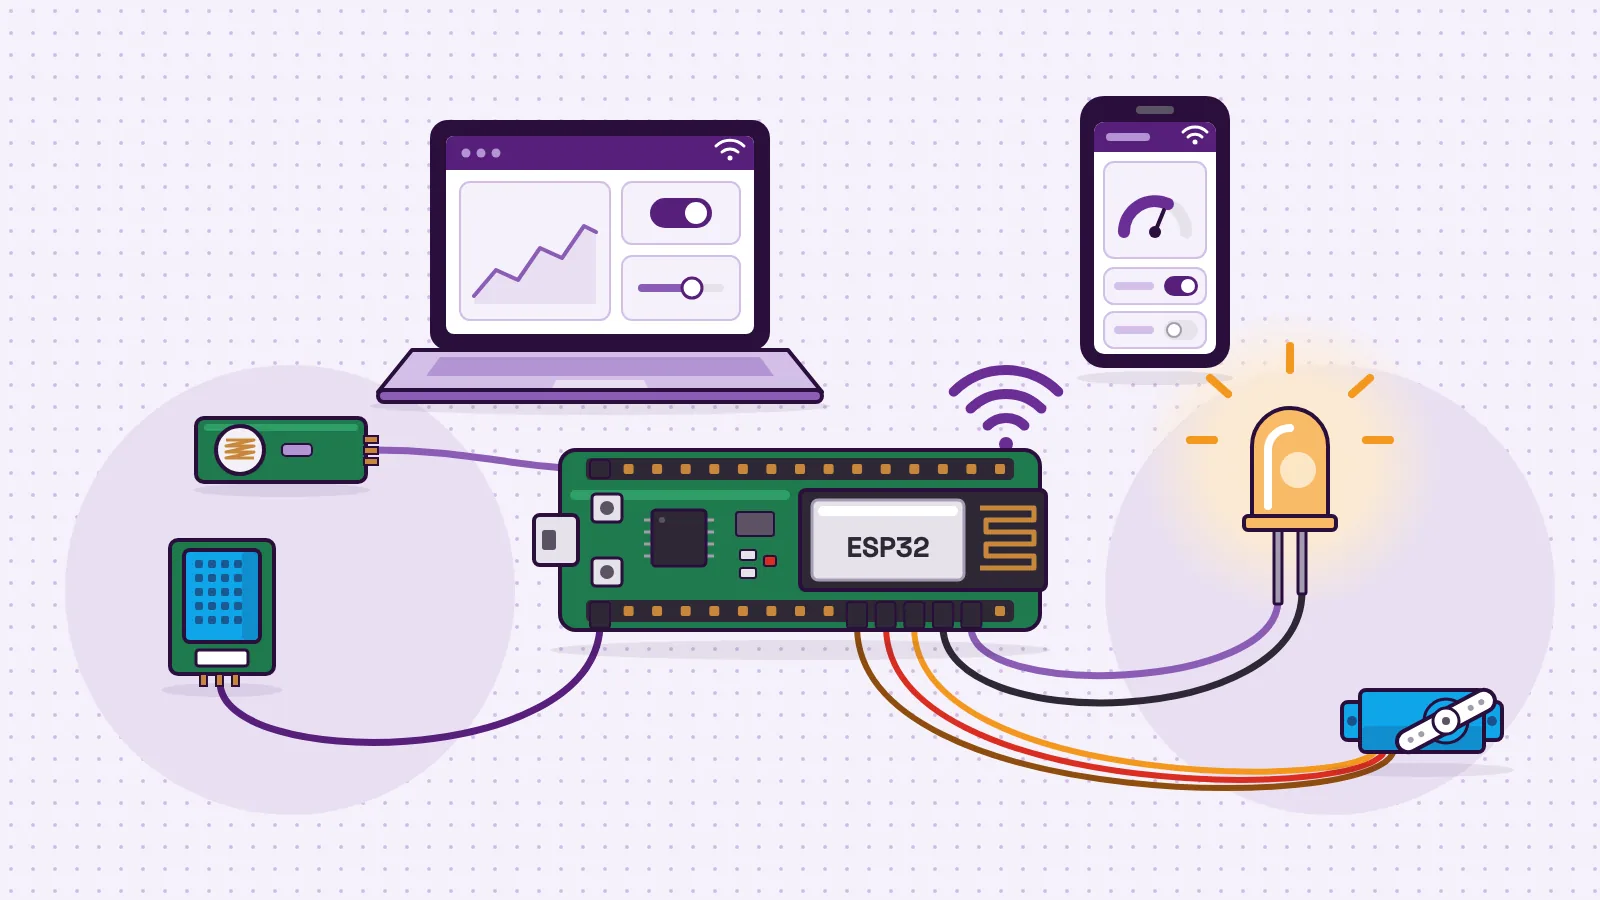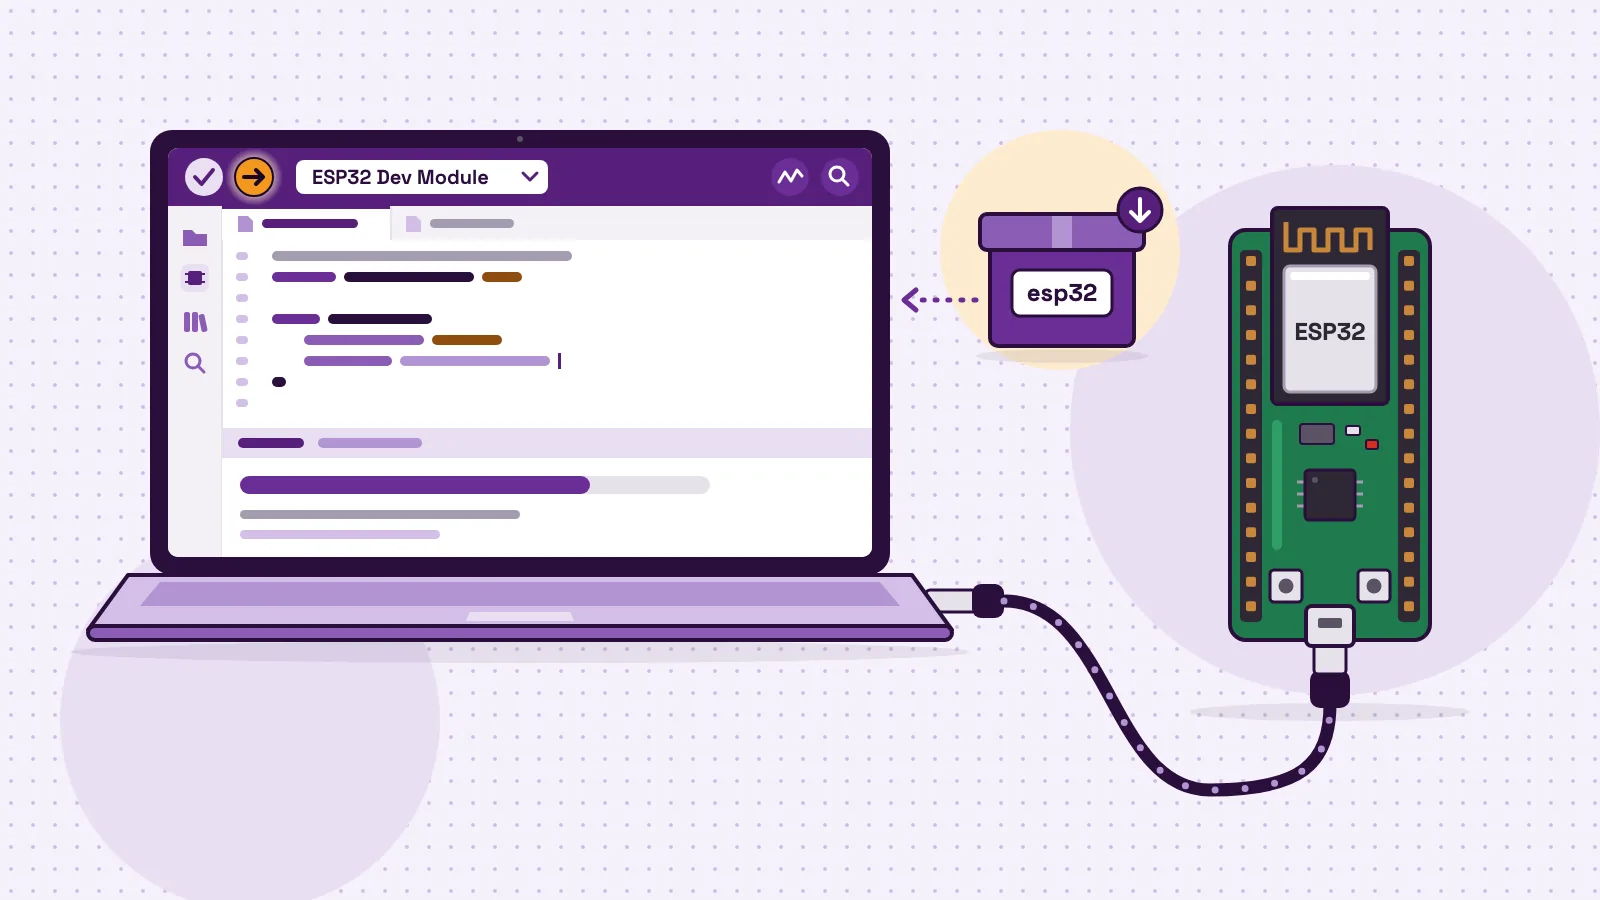
ESP32 Arduino IDE setup takes six steps. Install the free Arduino IDE. Paste Espressif's board address into Preferences. Install "esp32 by Espressif Systems" from the Boards Manager. Plug in the board with a USB cable that carries data, then choose ESP32 Dev Module and its port. Click Verify, then Upload. Finally, open the Serial Monitor at 115200 baud to read what your program prints. Espressif, the company that makes the chip, documents the same route on its Arduino-ESP32 install page (opens in a new tab).
The example board is the MakerBuddy IoT Kit V1.0, which carries a classic 30-pin ESP32 DevKit, so the steps suit most DevKits. After the setup you will upload a first sketch, read the upload output, fix the usual errors and put the open-source MakerBuddy firmware back from GitHub.
What you need before you start
| You need | Details | Why it matters |
|---|---|---|
| A computer | Windows 10 or newer, macOS 10.15 Catalina or newer, or Linux, all 64-bit | These are the requirements for the Arduino IDE 2 |
| The Arduino IDE | Version 2, free from the Arduino software page | Espressif supports IDE 1.8 or later. This guide uses IDE 2 |
| An ESP32 board | A classic ESP32 DevKit, like the one on the MakerBuddy board | Newer chips such as the ESP32-S3 need a different board choice |
| A data USB cable | Micro-USB on many classic DevKits, including the MakerBuddy one | A charge-only cable powers the board, but no port appears |
| Internet access | For the IDE, the ESP32 package and any libraries | The ESP32 package is a big download, as the next section shows |
- You need
- A computer
- Details
- Windows 10 or newer, macOS 10.15 Catalina or newer, or Linux, all 64-bit
- Why it matters
- These are the requirements for the Arduino IDE 2
- You need
- The Arduino IDE
- Details
- Version 2, free from the Arduino software page
- Why it matters
- Espressif supports IDE 1.8 or later. This guide uses IDE 2
- You need
- An ESP32 board
- Details
- A classic ESP32 DevKit, like the one on the MakerBuddy board
- Why it matters
- Newer chips such as the ESP32-S3 need a different board choice
- You need
- A data USB cable
- Details
- Micro-USB on many classic DevKits, including the MakerBuddy one
- Why it matters
- A charge-only cable powers the board, but no port appears
- You need
- Internet access
- Details
- For the IDE, the ESP32 package and any libraries
- Why it matters
- The ESP32 package is a big download, as the next section shows
The computer requirements come from Arduino's guide to downloading and installing the IDE 2 (opens in a new tab). The IDE version comes from Espressif's install page (opens in a new tab).
How big is the ESP32 download?
About 1.76 GB. The package brings compilers and support files for every chip in the ESP32 family, not only yours. We added up the sizes listed in Espressif's package index (opens in a new tab) for version 3.3.7 on 64-bit Windows.
| Part of the package | Download size |
|---|---|
| Compiler for Xtensa chips (ESP32, S2, S3) | about 396 MB |
| Compiler for RISC-V chips (C3, C5, C6, H2, P4) | about 698 MB |
| Support libraries for nine chip variants | about 510 MB |
| esptool, two debuggers, the core and small tools | about 159 MB |
| Total | about 1.76 GB |
- Part of the package
- Compiler for Xtensa chips (ESP32, S2, S3)
- Download size
- about 396 MB
- Part of the package
- Compiler for RISC-V chips (C3, C5, C6, H2, P4)
- Download size
- about 698 MB
- Part of the package
- Support libraries for nine chip variants
- Download size
- about 510 MB
- Part of the package
- esptool, two debuggers, the core and small tools
- Download size
- about 159 MB
- Part of the package
- Total
- Download size
- about 1.76 GB
Sizes summed from the archive sizes in Espressif's package index (opens in a new tab) on 28 October 2026. Mac and Linux downloads differ a little.
For a school lab it adds up: 20 computers × 1.76 GB is about 35 GB through the school's connection. Install the package the day before class, not during it.
How to program an ESP32 with the Arduino IDE in six steps
- 1
Install the Arduino IDE.
Download version 2 from the Arduino software page and install it like any other program.
- 2
Add the ESP32 board address.
Open File > Preferences, or press Ctrl and comma (Cmd and comma on a Mac). Paste the address below into "Additional boards manager URLs" and click OK.
- 3
Install the ESP32 package.
Click the board icon in the left sidebar, or choose Tools > Board > Boards Manager. Search for esp32 and install "esp32 by Espressif Systems".
- 4
Connect the board and choose it.
Plug it in with a data cable. Choose Tools > Board > esp32 > ESP32 Dev Module, then the new port under Tools > Port.
- 5
Verify.
Open a sketch and click the tick. The IDE compiles it and reports its size.
- 6
Upload and watch.
Click the arrow. When the upload finishes, open Tools > Serial Monitor and set it to 115200 baud.
The board address for step 2:
https://espressif.github.io/arduino-esp32/package_esp32_index.json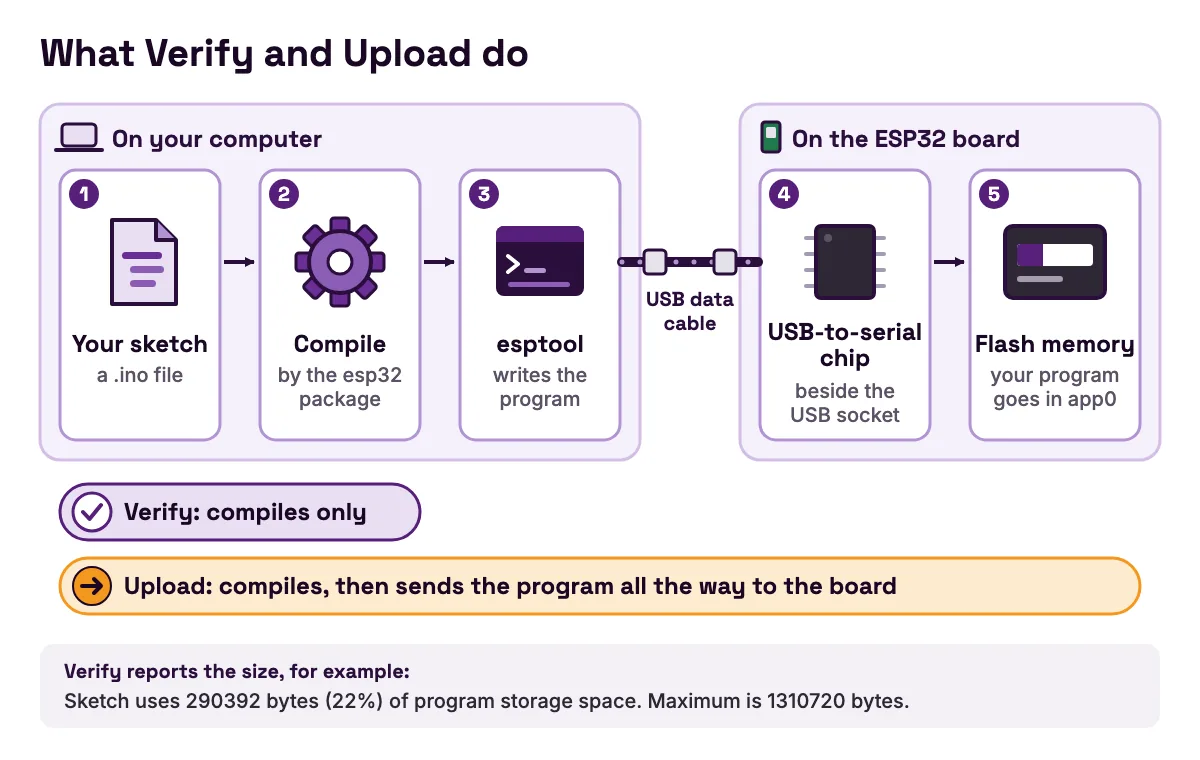
Steps 1 and 2: the IDE and the board address
Get the IDE from the Arduino software page (opens in a new tab). On Linux it is an AppImage that you mark as executable, as Arduino's install guide (opens in a new tab) explains.
The IDE knows Arduino's own boards. For other boards, it reads a list from a web address you give it. Espressif's install page (opens in a new tab) lists the stable address above and a separate one for development releases. Use the stable one.
Older tutorials, and the MakerBuddy Install by USB steps, use an address on raw.githubusercontent.com instead. We downloaded both files on 28 October 2026 and they were identical, so either works.
Arduino's own main package index (opens in a new tab) now lists "esp32" from Espressif Systems too, so a current IDE may find it with no address at all. Add the address anyway: it is the route Espressif documents.
Step 3: install the esp32 package
A search for esp32 can show two packages. "Arduino ESP32 Boards" is Arduino's package for its own Nano ESP32. For a DevKit, install "esp32 by Espressif Systems".
Each package has a version drop-down, as Arduino's Boards Manager guide (opens in a new tab) shows. For your own sketches, the newest 3.x is fine. To rebuild the MakerBuddy firmware exactly as it was checked, choose 3.3.7, the version named in the Arduino development notes.
Steps 4 to 6: the port, Verify and Upload
Port names differ on each system. Espressif's serial connection guide (opens in a new tab) gives examples: COM3 on Windows, /dev/ttyUSB0 on Linux and names such as /dev/cu.usbserial-1401 on a Mac. Not sure which port is the ESP32? Unplug it and see which one disappears.
Verify only compiles. Upload compiles and then sends the result to the board. Arduino's upload guide (opens in a new tab) recommends verifying first, because it catches mistakes before you touch the board. In IDE 2 the Serial Monitor is a tab in the bottom panel, with the baud rate setting beside it, as Arduino's Serial Monitor guide (opens in a new tab) shows.
Which board to select for ESP32 in the Arduino IDE
The 3.3.7 package lists 374 boards in its boards.txt file (opens in a new tab), so the menu is long. Choose by the chip on your board, not the brand on the box.
| Your board | Choose under Tools > Board > esp32 |
|---|---|
| A classic ESP32 DevKit, including the 30-pin DevKit on the MakerBuddy board | ESP32 Dev Module |
| A DOIT ESP32 DevKit V1 | DOIT ESP32 DEVKIT V1 |
| A board with an ESP32-S3 chip | ESP32S3 Dev Module |
| A board with an ESP32-C3 chip | ESP32C3 Dev Module |
| A board with an ESP32-S2 chip | ESP32S2 Dev Module |
- Your board
- A classic ESP32 DevKit, including the 30-pin DevKit on the MakerBuddy board
- Choose under Tools > Board > esp32
- ESP32 Dev Module
- Your board
- A DOIT ESP32 DevKit V1
- Choose under Tools > Board > esp32
- DOIT ESP32 DEVKIT V1
- Your board
- A board with an ESP32-S3 chip
- Choose under Tools > Board > esp32
- ESP32S3 Dev Module
- Your board
- A board with an ESP32-C3 chip
- Choose under Tools > Board > esp32
- ESP32C3 Dev Module
- Your board
- A board with an ESP32-S2 chip
- Choose under Tools > Board > esp32
- ESP32S2 Dev Module
Board names as they appear in boards.txt for version 3.3.7 (opens in a new tab). If you are unsure, read the name printed on the module's metal cover.
Choosing a board also fills the Tools menu with its settings. These are the defaults for ESP32 Dev Module, and when to change them.
| Tools menu setting | Default | Change it when |
|---|---|---|
| Upload Speed | 921600 | Uploads fail partway. Try 115200, which the MakerBuddy steps use |
| CPU Frequency | 240MHz (WiFi/BT) | Rarely. Lower speeds save power |
| Flash Size | 4MB (32Mb) | Your module has a bigger flash chip |
| Partition Scheme | Default 4MB with spiffs (1.2MB APP/1.5MB SPIFFS) | A big program needs a bigger program slot. Some schemes, such as Huge APP, drop updates over Wi-Fi |
| Core Debug Level | None | You want the core's own log messages in the Serial Monitor |
| Erase All Flash Before Sketch Upload | Disabled | You want a completely clean board, saved settings included |
- Tools menu setting
- Upload Speed
- Default
- 921600
- Change it when
- Uploads fail partway. Try 115200, which the MakerBuddy steps use
- Tools menu setting
- CPU Frequency
- Default
- 240MHz (WiFi/BT)
- Change it when
- Rarely. Lower speeds save power
- Tools menu setting
- Flash Size
- Default
- 4MB (32Mb)
- Change it when
- Your module has a bigger flash chip
- Tools menu setting
- Partition Scheme
- Default
- Default 4MB with spiffs (1.2MB APP/1.5MB SPIFFS)
- Change it when
- A big program needs a bigger program slot. Some schemes, such as Huge APP, drop updates over Wi-Fi
- Tools menu setting
- Core Debug Level
- Default
- None
- Change it when
- You want the core's own log messages in the Serial Monitor
- Tools menu setting
- Erase All Flash Before Sketch Upload
- Default
- Disabled
- Change it when
- You want a completely clean board, saved settings included
Defaults as reported by arduino-cli board details for esp32:esp32:esp32 with esp32 3.3.7. The options are defined in the package's boards.txt (opens in a new tab).
Our guides to ESP32 development boards and to ESP32, ESP8266, S3 and C3 boards help you work out which chip you have.
Your first ESP32 sketch: a setup check
Many first tutorials blink pin 2. On the MakerBuddy board, GPIO 2 is the distance sensor's echo pin, so this sketch blinks the blue light on GPIO 12 instead. It checks the whole chain at once: it prints facts about the chip, blinks a light and reads a sensor. If all three work, your IDE, package, cable, port and board are fine.
// ESP32 setup check: prints chip facts, blinks a light, reads a sensor.
// Board: "ESP32 Dev Module" with "esp32 by Espressif Systems" 3.x.
// On a MakerBuddy board this replaces the MakerBuddy firmware until you upload it again.

const int LED_PIN = 12;    // MakerBuddy blue light. On another board, use a pin with an LED on it.
const int LIGHT_PIN = 35;  // MakerBuddy light sensor (LDR) on an ADC1 pin

void setup() {
  Serial.begin(115200);    // must match the Serial Monitor's baud setting
  delay(1000);             // a moment for the Serial Monitor to connect

  Serial.println();
  Serial.println("ESP32 setup check");
  Serial.printf("Chip model: %s, revision %u\n", ESP.getChipModel(), (unsigned)ESP.getChipRevision());
  Serial.printf("Cores: %u, CPU speed: %u MHz\n", (unsigned)ESP.getChipCores(), (unsigned)ESP.getCpuFreqMHz());
  Serial.printf("Flash size: %u bytes\n", (unsigned)ESP.getFlashChipSize());
  Serial.printf("This sketch: %u bytes\n", (unsigned)ESP.getSketchSize());

  pinMode(LED_PIN, OUTPUT);
}

void loop() {
  digitalWrite(LED_PIN, HIGH);   // light on
  delay(500);
  digitalWrite(LED_PIN, LOW);    // light off
  delay(500);

  int light = analogRead(LIGHT_PIN);   // 0 to 4095
  Serial.printf("Light sensor: %d of 4095\n", light);
}
What each part does
- 1
Serial.begin(115200)starts the serial link at 115,200 baud. The Serial Monitor must match, or you see gibberish. Espressif's serial connection guide (opens in a new tab) gives 115200 as the ESP32's default console speed too.
- 2
delay(1000)gives the Serial Monitor time to reconnect, because the board restarts after every upload.
- 3
The
ESP.linesask the chip for its model, revision, cores, CPU speed and flash size.
- 4
digitalWrite(LED_PIN, HIGH)turns the blue light on, and
LOWturns it off. - 5
analogRead(LIGHT_PIN)reads the light sensor as a number from 0 to 4095, the default 12-bit range in Espressif's ADC reference (opens in a new tab). GPIO 35 is an ADC1 pin, and Espressif's GPIO reference (opens in a new tab) explains why that matters: "ADC2 pins cannot be used when Wi-Fi is used."
What you should see
Click Verify first. When we compiled this sketch with esp32 3.3.7, the IDE reported "Sketch uses 290392 bytes (22%) of program storage space. Maximum is 1310720 bytes." Another package version gives a slightly different number.
Then click Upload and open the Serial Monitor at 115200 baud. You should see "ESP32 setup check", a chip model that starts with ESP32, a CPU speed of 240 MHz (the default in the CPU Frequency menu) and then one light reading a second. Cover the light sensor with your hand and watch the number change.
If the light blinks but nothing prints, check the baud rate. If nothing happens at all, the upload failed: read its log, then the mistakes section below.
Lesson 4 on PWM dimming controls the same blue light from the dashboard with no code, and Lesson 7 on light sensing explores the light sensor. Our guide to ESP32 PWM with LEDC takes the blink further, to smooth dimming.
How to read the size report and the upload log
Two messages tell you most of what is going on: the size report after Verify, and the log during Upload.
The size report, worked through
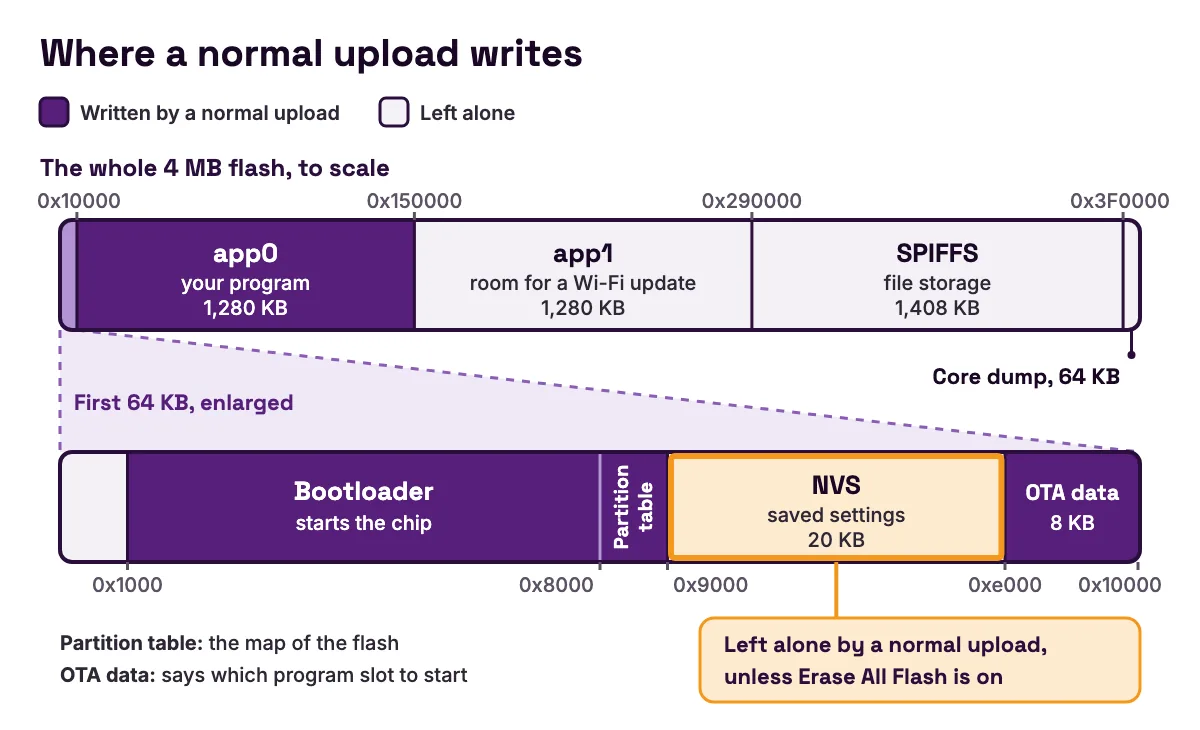
The maximum in the size report, 1,310,720 bytes, is not the whole flash chip. It is one program slot, called app0, which is 0x140000 bytes in Espressif's default partition table (opens in a new tab). Here are two real reports side by side.
| Sketch | Bytes used | Share of 1,310,720 | Room left |
|---|---|---|---|
| The setup check above | 290,392 | 22.2% | 1,020,328 bytes |
| MakerBuddy firmware 2.10 | 1,284,130 | 97.97% | 26,590 bytes |
- Sketch
- The setup check above
- Bytes used
- 290,392
- Share of 1,310,720
- 22.2%
- Room left
- 1,020,328 bytes
- Sketch
- MakerBuddy firmware 2.10
- Bytes used
- 1,284,130
- Share of 1,310,720
- 97.97%
- Room left
- 26,590 bytes
Both from our compiles on 28 October 2026 with esp32 3.3.7. The maximum matches esp32.upload.maximum_size in boards.txt (opens in a new tab).
The IDE shows the firmware as 97% because it drops the decimals. Either way, about 26 KB is left, which is why the Arduino development notes warn there is little room for extra code. And most of the setup check's 290,392 bytes is the ESP32 core, not your thirty lines.
What an upload writes
Upload runs Espressif's esptool. The upload command in the package's platform.txt (opens in a new tab) writes four pieces to fixed places in the flash and leaves the rest alone.
| Address | What is there | Written by a normal upload? |
|---|---|---|
| 0x1000 | Bootloader, which starts the chip | Yes |
| 0x8000 | Partition table, the map of the flash | Yes |
| 0x9000 | NVS, the 20 KB saved-settings area | No |
| 0xe000 | OTA data, which says which program slot to start (8 KB) | Yes, set to start app0 |
| 0x10000 | app0, your program (1,280 KB) | Yes |
| 0x150000 | app1, room for an update over Wi-Fi (1,280 KB) | No |
| 0x290000 | SPIFFS file storage (1,408 KB) | No |
| 0x3F0000 | Core dump area (64 KB) | No |
- Address
- 0x1000
- What is there
- Bootloader, which starts the chip
- Written by a normal upload?
- Yes
- Address
- 0x8000
- What is there
- Partition table, the map of the flash
- Written by a normal upload?
- Yes
- Address
- 0x9000
- What is there
- NVS, the 20 KB saved-settings area
- Written by a normal upload?
- No
- Address
- 0xe000
- What is there
- OTA data, which says which program slot to start (8 KB)
- Written by a normal upload?
- Yes, set to start app0
- Address
- 0x10000
- What is there
- app0, your program (1,280 KB)
- Written by a normal upload?
- Yes
- Address
- 0x150000
- What is there
- app1, room for an update over Wi-Fi (1,280 KB)
- Written by a normal upload?
- No
- Address
- 0x290000
- What is there
- SPIFFS file storage (1,408 KB)
- Written by a normal upload?
- No
- Address
- 0x3F0000
- What is there
- Core dump area (64 KB)
- Written by a normal upload?
- No
Addresses and sizes from default.csv (opens in a new tab) and the upload command in platform.txt (opens in a new tab), esp32 3.3.7, ESP32 Dev Module with the default partition scheme.
So a normal upload leaves the saved-settings area alone. Espressif's partition table tutorial (opens in a new tab) explains that NVS holds Wi-Fi data and small settings. Those can survive from one program to the next, unless the new program changes them or you enable Erase All Flash Before Sketch Upload.
The log shows "Connecting...", then progress as each piece is written, then a reset.
How to put the MakerBuddy firmware back from GitHub
The MakerBuddy firmware is open source under GPL-3.0, in the public repository MakerBuddy/MakerBuddy-V1 (opens in a new tab) on GitHub. You need these steps after uploading your own sketch, and to install firmware 2.10. The dashboards only install updates over Wi-Fi from plain http:// links, and the 2.10 file sits behind https://, so they ask for a manual install through the Arduino IDE. The notes on updating the firmware explain why.
1. Install the eight libraries
Open Sketch > Include Library > Manage Libraries, search for each name and click Install. These are the versions we built firmware 2.10 with on 28 October 2026.
| Library Manager name | Author shown | Version we used | What the firmware uses it for |
|---|---|---|---|
| ESP Async WebServer | ESP32Async | 3.6.0 | The web and WebSocket server |
| Async TCP | ESP32Async | 3.3.2 | The network layer under the web server |
| ArduinoJson | Benoit Blanchon | 7.4.2 | REST and WebSocket messages |
| DHT sensor library | Adafruit | 1.4.6 | The DHT11 temperature and humidity sensor |
| Adafruit Unified Sensor | Adafruit | 1.1.15 | Needed by the DHT library |
| OneWire | Jim Studt and others | 2.3.8 | The DS18B20 probe's one-wire bus |
| DallasTemperature | Miles Burton and others | 4.0.5 | Reading the DS18B20 probe |
| LiquidCrystal I2C | Frank de Brabander | 1.1.2 | The 16×2 text screen |
- Library Manager name
- ESP Async WebServer
- Author shown
- ESP32Async
- Version we used
- 3.6.0
- What the firmware uses it for
- The web and WebSocket server
- Library Manager name
- Async TCP
- Author shown
- ESP32Async
- Version we used
- 3.3.2
- What the firmware uses it for
- The network layer under the web server
- Library Manager name
- ArduinoJson
- Author shown
- Benoit Blanchon
- Version we used
- 7.4.2
- What the firmware uses it for
- REST and WebSocket messages
- Library Manager name
- DHT sensor library
- Author shown
- Adafruit
- Version we used
- 1.4.6
- What the firmware uses it for
- The DHT11 temperature and humidity sensor
- Library Manager name
- Adafruit Unified Sensor
- Author shown
- Adafruit
- Version we used
- 1.1.15
- What the firmware uses it for
- Needed by the DHT library
- Library Manager name
- OneWire
- Author shown
- Jim Studt and others
- Version we used
- 2.3.8
- What the firmware uses it for
- The DS18B20 probe's one-wire bus
- Library Manager name
- DallasTemperature
- Author shown
- Miles Burton and others
- Version we used
- 4.0.5
- What the firmware uses it for
- Reading the DS18B20 probe
- Library Manager name
- LiquidCrystal I2C
- Author shown
- Frank de Brabander
- Version we used
- 1.1.2
- What the firmware uses it for
- The 16×2 text screen
Library Manager also lists look-alike names from other authors, such as "ESPAsyncWebServer" and "AsyncTCP" written without spaces. The build we checked used the ESP32Async ones. You do not need ESP32Servo: the firmware drives the servo itself.
2. Download and open the firmware
On the GitHub page, choose Code > Download ZIP, then unzip it. Open Arduino Code/MakerBuddy/MakerBuddy.ino. Its second file, MakerBuddyTypes.h, opens as a tab beside it. Install firmware only from this repository: the board does not check where an update comes from, as the safety notes warn.
3. Choose the board and settings
Choose ESP32 Dev Module and the board's port. Set Tools > Upload Speed to 115200, as the Install by USB steps say. Leave the Partition Scheme on the default, the layout the size report above was measured against. Updates over Wi-Fi also need its second program slot.
4. Verify, then upload
Click Verify. A correct setup reports "Sketch uses 1284130 bytes (97%) of program storage space." You will also see a warning that LiquidCrystal I2C "claims to run on avr architecture(s)". It is harmless here: the library's own description lists only AVR boards, and the firmware is built with it all the same. Then click Upload and wait for the board to restart.
5. Check it in the Serial Monitor
Open the Serial Monitor at 115200 baud and press EN to restart the board. Either of these results is normal.
| You see | It means | Do this |
|---|---|---|
A line starting WiFi connected successfully, then an IP address | The board found Wi-Fi details it had saved | Open your dashboard as before |
| "AP IP address: 192.168.4.1" and a hotspot name such as MakerBuddy_XXXX | The board is in setup mode | Join that network and follow first-time setup |
- You see
- A line starting
WiFi connected successfully, then an IP address - It means
- The board found Wi-Fi details it had saved
- Do this
- Open your dashboard as before
- You see
- "AP IP address: 192.168.4.1" and a hotspot name such as MakerBuddy_XXXX
- It means
- The board is in setup mode
- Do this
- Join that network and follow first-time setup
Messages from the firmware 2.10 source in the public repository (opens in a new tab).
To confirm the version, open http://makerbuddy-01.local/api/firmware in a browser on the same Wi-Fi, with your board's name in place of makerbuddy-01, or its IP address. The fv field should read 2.10.
Code without replacing the firmware
Uploading a sketch is not the only way to program a MakerBuddy board. To write your own code and keep the dashboards and rules, talk to the board over Wi-Fi instead.
| Dashboard and rules | Your own program over Wi-Fi | Your own Arduino sketch | |
|---|---|---|---|
| What you write | Nothing: you pick from menus | Code on a laptop that calls the board's web API | C++ in the Arduino IDE |
| MakerBuddy firmware | Stays | Stays | Replaced until you upload it again |
| Good for | Ages 10 and up, and the 32 lessons | Logging readings and linking the board to other software | Learning Arduino code and using the pins your own way |
| Where to start | The curriculum | REST API | This guide |
- What you write
- Dashboard and rules
- Nothing: you pick from menus
- Your own program over Wi-Fi
- Code on a laptop that calls the board's web API
- Your own Arduino sketch
- C++ in the Arduino IDE
- MakerBuddy firmware
- Dashboard and rules
- Stays
- Your own program over Wi-Fi
- Stays
- Your own Arduino sketch
- Replaced until you upload it again
- Good for
- Dashboard and rules
- Ages 10 and up, and the 32 lessons
- Your own program over Wi-Fi
- Logging readings and linking the board to other software
- Your own Arduino sketch
- Learning Arduino code and using the pins your own way
- Where to start
- Dashboard and rules
- The curriculum
- Your own program over Wi-Fi
- REST API
- Your own Arduino sketch
- This guide
The three routes follow the coding options for students on our site.
Here is a one-line test from a laptop on the same Wi-Fi. It returns the current readings as compact JSON.
curl http://makerbuddy-01.local/api/sensorsThe board's web API has no login and no encryption, so use it only on Wi-Fi you trust and never open it to the internet. The security notes list every limit. Our guide to building an ESP32 web server shows the other side: writing the server yourself.
Common ESP32 upload mistakes, with fixes
No port appears under Tools > Port
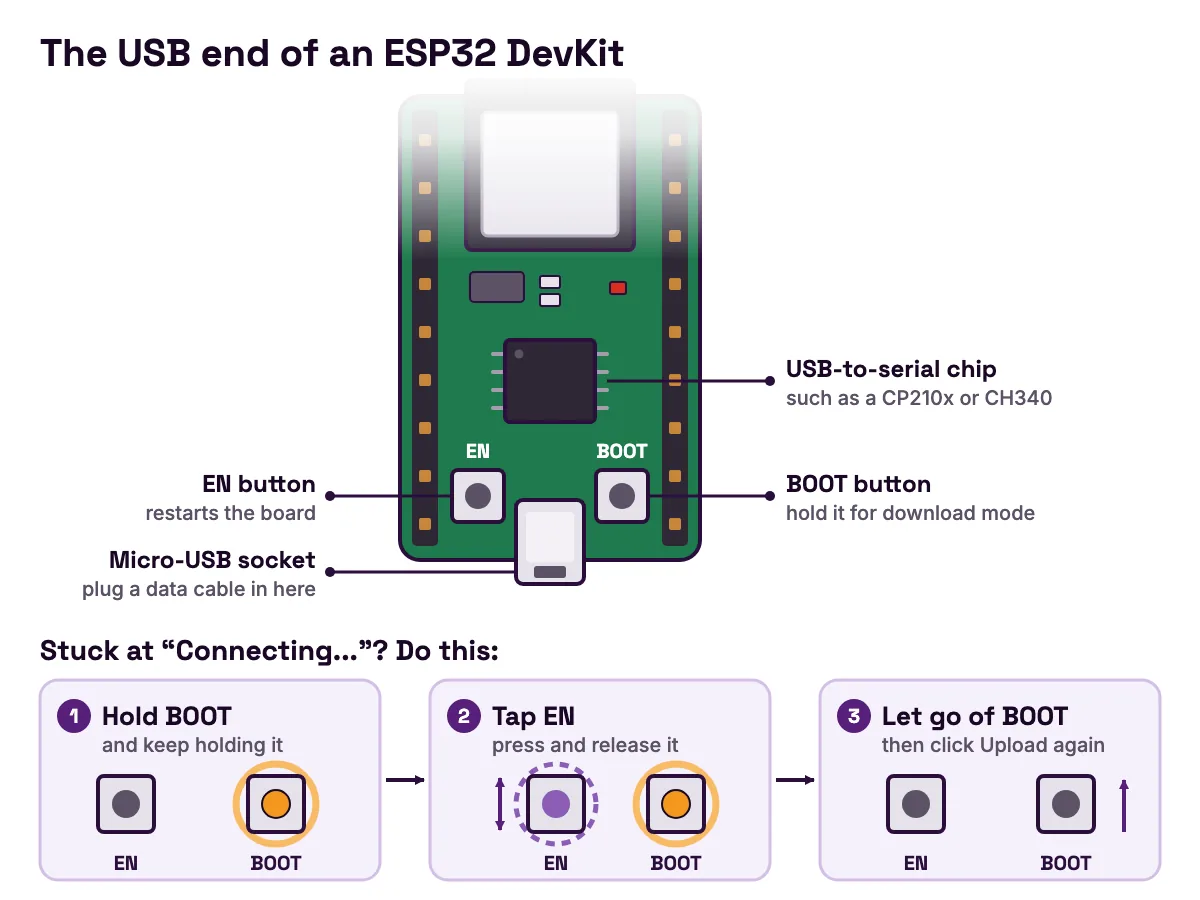
Symptom: Nothing new appears when you plug the board in. Cause: A charge-only cable, or no driver for the board's USB-to-serial chip. Fix: Try a cable you know carries data and another USB port. Then read the small chip beside the USB socket. Espressif's serial connection guide (opens in a new tab) links drivers for CP210x and FTDI chips and says to check your board's user guide for the chip it uses. It does not cover CH340 chips, so for one of those use the driver your board's seller names.
The upload stops at "Connecting..."
Symptom: Dots appear after "Connecting", then the upload fails. Cause: The chip is not entering its download mode. Espressif's esptool troubleshooting guide (opens in a new tab) gives that as the usual reason for "Failed to connect". Fix: Hold BOOT, press and release EN, release BOOT, then click Upload again. Espressif's install page also notes you may need to hold BOOT while uploading.
The upload fails partway with random errors
Symptom: Writing starts, then stops with an error. Cause: The connection cannot keep up with 921600 baud. Fix: Set Tools > Upload Speed to 115200. The esptool guide's advice for random errors partway through is to retry with a lower baud rate.
"'ledcSetup' was not declared in this scope"
Symptom: A sketch from an older tutorial will not compile. Cause: Espressif's migration guide from 2.x to 3.0 (opens in a new tab) removed ledcSetup and ledcAttachPin and merged them into ledcAttach. Fix: Use ledcAttach(pin, frequency, resolution) and pass the pin to ledcWrite.
"Sketch too big"
Symptom: Verify stops with "Sketch too big" and "text section exceeds available space in board". Cause: The program is larger than its slot, for example because a different board or a small partition scheme is selected. Fix: Choose ESP32 Dev Module with the default partition scheme. If your own program really is that big, pick a scheme with a bigger program slot, and check whether it keeps updates over Wi-Fi.
The Serial Monitor shows gibberish or nothing
Symptom: Strange characters, or a blank monitor. Cause: The baud rate does not match Serial.begin, or the board printed its message before the monitor opened. Fix: Set the monitor to 115200, then press EN to restart the board while the monitor is open.
Linux says "Permission denied"
Symptom: The port shows, but the upload is refused. Cause: Your user cannot open serial ports. Fix: Add yourself to the dialout group with sudo usermod -a -G dialout $USER, then log out and back in, as Espressif's serial connection guide and Arduino's upload guide both explain.
The dashboard stopped working after an upload
Symptom: The dashboard cannot find the board. Cause: Your sketch replaced the MakerBuddy firmware. Fix: Follow the steps above to put it back.
Next steps: lessons, guides and the kit
New to the chip itself? Our ESP32 beginner's guide explains what it can do and lists every MakerBuddy pin. Our upcoming guide to ESP32 boards that are not detected or will not upload goes deeper into drivers and download mode. If you are deciding between Arduino code and Python, read MicroPython vs Arduino C on the ESP32.
On a MakerBuddy board you can also start with no code at all. Lesson 3 on powering up and connectivity covers setup, and the whole MakerBuddy curriculum has 32 free lessons for ages 10 and up. If you want a board with its sensors already on labelled sockets, you can order the MakerBuddy IoT kit: Pakistan orders online at PKR 40,000 per kit, and every other region gets a written quote. More ESP32 guides are on the MakerBuddy blog.
FAQ
Which board do I select for ESP32 in Arduino IDE?
For a classic ESP32 DevKit, including the MakerBuddy board, choose ESP32 Dev Module under Tools > Board > esp32. Newer chips have their own entries, such as ESP32S3 Dev Module or ESP32C3 Dev Module.
What is the ESP32 board manager URL?
Espressif's install page (opens in a new tab) gives the stable address as https://espressif.github.io/arduino-esp32/package_esp32_index.json. The older address on raw.githubusercontent.com served an identical file when we compared them in October 2026. Paste either into "Additional boards manager URLs" in File > Preferences.
Why is my ESP32 not showing up in the Arduino IDE?
It is usually the cable or the driver. Try a cable you know carries data and another USB port. If no port appears, install the driver for the USB-to-serial chip beside the board's USB socket, such as a CP210x or CH340.
Do I need to press the BOOT button to upload to an ESP32?
Usually not. Boards with an automatic reset circuit enter download mode by themselves. If the upload sits at "Connecting...", hold BOOT, tap EN, release BOOT and upload again, as Espressif's esptool troubleshooting guide (opens in a new tab) describes.
Can I use Arduino IDE 1.8 with the ESP32?
Yes. Espressif's install page (opens in a new tab) supports the Arduino IDE from version 1.8. The steps are the same, but the Boards Manager sits under Tools > Board and the Serial Monitor opens in its own window.
Is ESP32 code the same as Arduino code?
Mostly. The esp32 package translates standard Arduino functions such as digitalWrite and analogRead for the ESP32, the job Arduino's Boards Manager guide (opens in a new tab) describes for every board package, so simple sketches move across with pin changes. The ESP32 adds its own functions for Wi-Fi, Bluetooth and LEDC dimming, and its pins work at 3.3 V, the level its datasheet (opens in a new tab) is written for.
Can I program an ESP32 without the Arduino IDE?
Yes. You can use MicroPython, Espressif's ESP-IDF framework, or the Arduino core from the command line with arduino-cli. On a MakerBuddy board you can also skip code and build rules from the dashboard.
Does uploading a sketch erase everything on the ESP32?
No. A normal upload writes the bootloader, the partition table, a small start-up record and your program. The saved-settings area (NVS) is left alone unless you enable Erase All Flash Before Sketch Upload.
How do I get the MakerBuddy firmware back after uploading my own sketch?
Install the eight libraries, download the firmware from the MakerBuddy-V1 repository on GitHub and open MakerBuddy.ino. Choose ESP32 Dev Module, set Upload Speed to 115200 and click Upload. The full steps are in the Install by USB guide.
Sources
- Espressif: Installing Arduino-ESP32 (opens in a new tab)
- Espressif: Arduino-ESP32 board package index (opens in a new tab)
- Arduino: main board package index (opens in a new tab)
- Espressif: arduino-esp32 3.3.7 boards.txt (opens in a new tab)
- Espressif: arduino-esp32 3.3.7 platform.txt (opens in a new tab)
- Espressif: arduino-esp32 3.3.7 default partition table (opens in a new tab)
- Espressif: Arduino-ESP32 partition table tutorial (opens in a new tab)
- Espressif: Arduino-ESP32 ADC API reference (opens in a new tab)
- Espressif: Arduino-ESP32 migration guide from 2.x to 3.0 (opens in a new tab)
- Espressif: ESP32 datasheet (opens in a new tab)
- Espressif ESP-IDF: GPIO and RTC GPIO reference for the ESP32 (opens in a new tab)
- Espressif ESP-IDF: Establish serial connection with the ESP32 (opens in a new tab)
- Espressif: esptool troubleshooting for the ESP32 (opens in a new tab)
- Arduino: Downloading and installing the Arduino IDE 2 (opens in a new tab)
- Arduino: Installing a board package in the IDE 2 (opens in a new tab)
- Arduino: How to upload a sketch with the Arduino IDE 2 (opens in a new tab)
- Arduino: Using the Serial Monitor tool (opens in a new tab)
- Arduino: Software downloads (opens in a new tab)
- MakerBuddy: MakerBuddy-V1 public source on GitHub (opens in a new tab)