
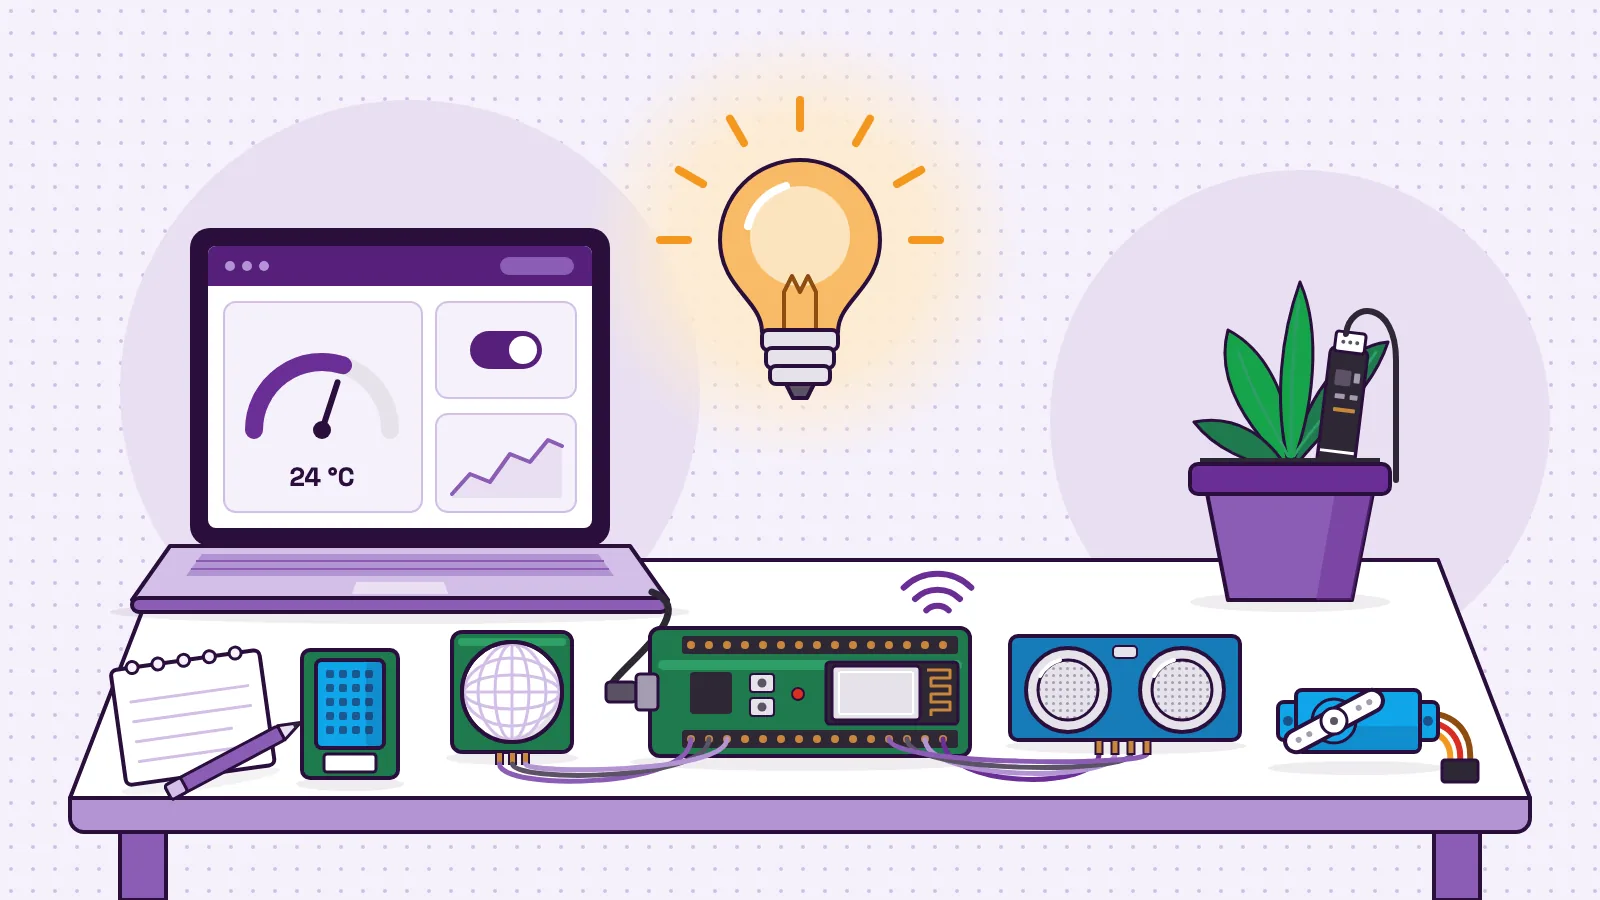
The best ESP32 projects for students pair one sensor with one output. A light switches on when the room gets dark. A fan starts when the room gets warm. A buzzer warns when something comes too close. Below are 30 ESP32 project ideas, grouped by the sensor they use and sorted by difficulty. Each one lists its parts, a rough time for a first build and what it teaches.
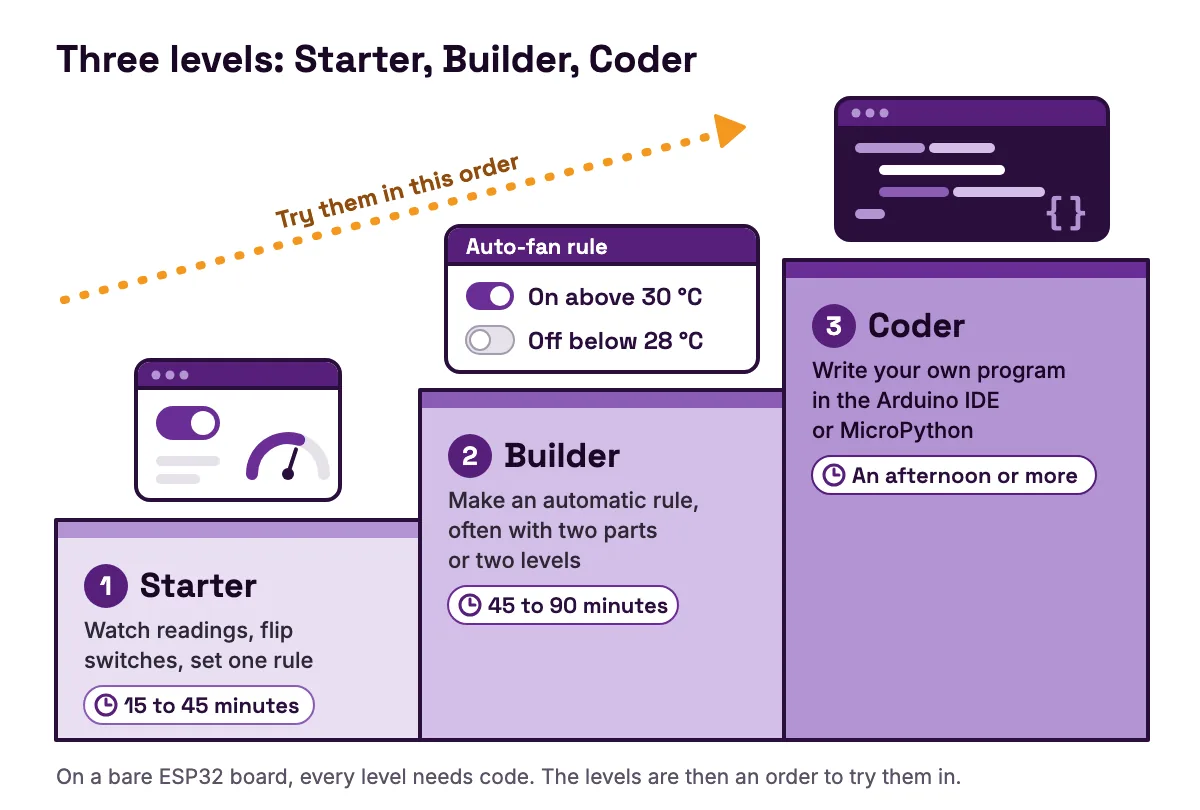
There are three levels. Starter projects need no code. Builder projects use an automatic rule. Coder projects need your own Arduino or MicroPython program. Every idea can also be built on a plain ESP32 with a breadboard and your own code. On the MakerBuddy kit, the parts plug into labelled sockets instead, and the first projects run from a browser dashboard.
How the difficulty levels work
The level tells you what kind of thinking a project needs, not how impressive it looks. A Starter project can still win a science fair if the question behind it is good.
| Level | What you do | Rough time | Good for |
|---|---|---|---|
| Starter | Watch live readings, flip switches or set one simple rule in a browser dashboard | 15 to 45 minutes | A first session, ages 10 and up |
| Builder | Make an automatic rule, often with two parts or two levels | 45 to 90 minutes | After the first few lessons |
| Coder | Write your own program in the Arduino IDE or MicroPython, or a script that reads the board over Wi-Fi | An afternoon or more | Older students, clubs and science fairs |
- Level
- Starter
- What you do
- Watch live readings, flip switches or set one simple rule in a browser dashboard
- Rough time
- 15 to 45 minutes
- Good for
- A first session, ages 10 and up
- Level
- Builder
- What you do
- Make an automatic rule, often with two parts or two levels
- Rough time
- 45 to 90 minutes
- Good for
- After the first few lessons
- Level
- Coder
- What you do
- Write your own program in the Arduino IDE or MicroPython, or a script that reads the board over Wi-Fi
- Rough time
- An afternoon or more
- Good for
- Older students, clubs and science fairs
The times are for a first attempt, including the time it takes to understand the readings. They are not speed targets.
If you use a bare ESP32 board and a breadboard, every project here needs code. Treat the levels as an order to try them in. The Starter projects then become your first sketches, and the Coder projects become your stretch goals.
The numbers in the tables run from 1 to 30, so a class can say "we did 4, 10 and 22" and everyone knows what that means. Most of these ideas, with the lessons that teach each one, are also in the MakerBuddy project idea library.
Projects with the board's built-in parts
The MakerBuddy board has six parts built in: a blue light, a colour-changing light, a push button, a light sensor, a buzzer and a turning knob. That is enough for a whole first week of projects, with nothing to plug in.
| Project | Level | Parts | Time | What it teaches |
|---|---|---|---|---|
| 1. Smart night light | Starter | Light sensor, blue light | 20 min | A threshold: "when the light drops below this, do that" |
| 2. Knob dimmer | Starter | Knob, blue light | 15 min | How a board dims a light by switching it on and off very fast |
| 3. Colour mixer | Starter | Colour light | 15 min | Mixing red, green and blue light into new colours |
| 4. Doorbell | Starter | Button, buzzer | 20 min | Digital inputs: a button is either pressed or not |
| 5. Pedestrian crossing light | Builder | Colour light, buzzer | 45 min | Steps and timing in a sequence |
| 6. Shadow detector | Builder | Light sensor, buzzer | 30 min | Sampling: why a quick shadow can be missed |
| 7. Reaction timer | Coder | Button, blue light | 1 to 2 h | Timing in milliseconds and filtering a bouncing button |
- Project
- 1. Smart night light
- Level
- Starter
- Parts
- Light sensor, blue light
- Time
- 20 min
- What it teaches
- A threshold: "when the light drops below this, do that"
- Project
- 2. Knob dimmer
- Level
- Starter
- Parts
- Knob, blue light
- Time
- 15 min
- What it teaches
- How a board dims a light by switching it on and off very fast
- Project
- 3. Colour mixer
- Level
- Starter
- Parts
- Colour light
- Time
- 15 min
- What it teaches
- Mixing red, green and blue light into new colours
- Project
- 4. Doorbell
- Level
- Starter
- Parts
- Button, buzzer
- Time
- 20 min
- What it teaches
- Digital inputs: a button is either pressed or not
- Project
- 5. Pedestrian crossing light
- Level
- Builder
- Parts
- Colour light, buzzer
- Time
- 45 min
- What it teaches
- Steps and timing in a sequence
- Project
- 6. Shadow detector
- Level
- Builder
- Parts
- Light sensor, buzzer
- Time
- 30 min
- What it teaches
- Sampling: why a quick shadow can be missed
- Project
- 7. Reaction timer
- Level
- Coder
- Parts
- Button, blue light
- Time
- 1 to 2 h
- What it teaches
- Timing in milliseconds and filtering a bouncing button
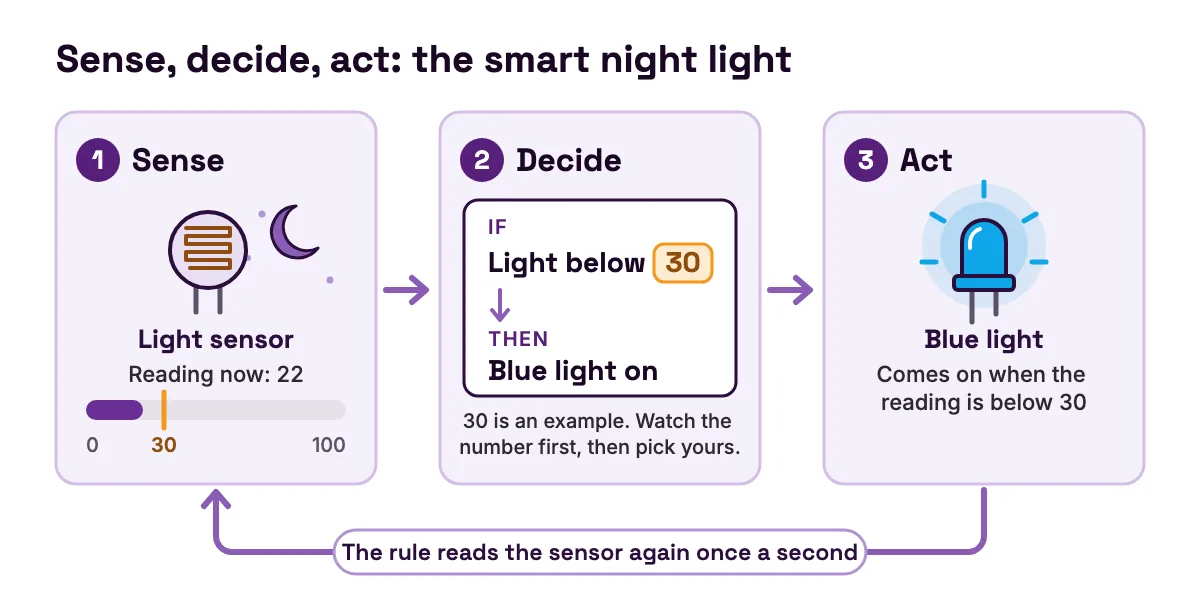
Start the night light by watching the light number before you set a level. On the MakerBuddy dashboard the light sensor reads from 0 to 100. A bright classroom and a dim bedroom give very different numbers, so a level that works in one room fails in the other. That surprise is the lesson. The light sensing lesson walks through it.
The shadow detector and the reaction timer teach something less obvious. The MakerBuddy dashboard and its rules read the sensors once a second. A shadow that passes in a quarter of a second can fall between two readings and never be seen. A reaction timer needs to measure in milliseconds, which is why it is a Coder project: your own sketch can check the button thousands of times a second with millis().
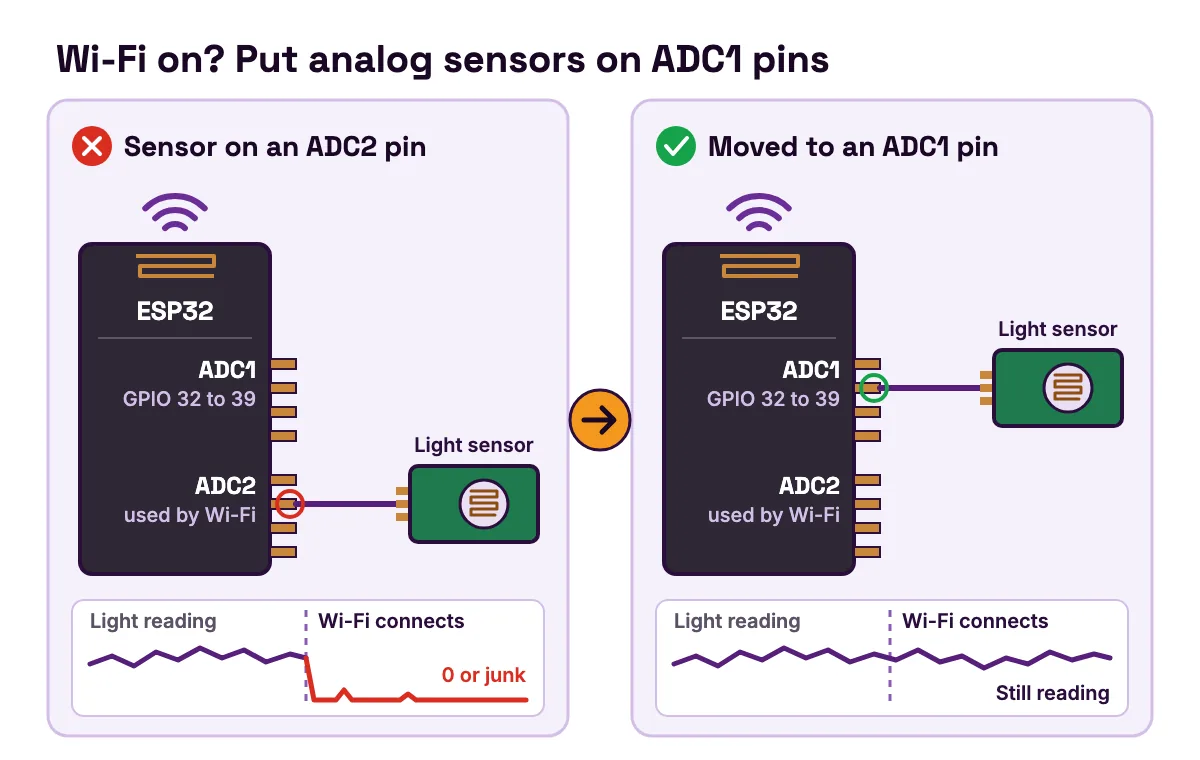
On a bare ESP32, wire a light-dependent resistor as a voltage divider into an analog pin. Pick one of the ADC1 pins (GPIO 32 to 39). Espressif's documentation says that ADC2 pins cannot be used when Wi-Fi is used (opens in a new tab), so a sensor on an ADC2 pin stops working the moment your project connects to Wi-Fi.
Temperature and humidity projects
Temperature projects are the easiest way into real data. The readings change slowly, they mean something to everyone, and they make good graphs.
| Project | Level | Parts | Time | What it teaches |
|---|---|---|---|---|
| 8. Room thermometer and diary | Starter | DHT11 | 30 min, then a day of readings | Recording data and drawing a trend |
| 9. Temperature screen | Starter | DHT11, text screen | 20 min | Showing a live value without a laptop |
| 10. Auto-fan | Builder | DHT11, relay, small fan | 1 h | Two rules with a gap between them, so the fan does not flicker |
| 11. Insulation tester | Builder | Waterproof probe (DS18B20) | 1 to 2 h | A fair test: change one thing at a time |
| 12. Needle thermometer | Starter | DHT11 or waterproof probe, servo | 30 min | Mapping one range (degrees) onto another (an angle) |
| 13. Room monitor sketch | Coder | DHT11, text screen, blue light | 1 h | Using a sensor library and handling a failed reading |
- Project
- 8. Room thermometer and diary
- Level
- Starter
- Parts
- DHT11
- Time
- 30 min, then a day of readings
- What it teaches
- Recording data and drawing a trend
- Project
- 9. Temperature screen
- Level
- Starter
- Parts
- DHT11, text screen
- Time
- 20 min
- What it teaches
- Showing a live value without a laptop
- Project
- 10. Auto-fan
- Level
- Builder
- Parts
- DHT11, relay, small fan
- Time
- 1 h
- What it teaches
- Two rules with a gap between them, so the fan does not flicker
- Project
- 11. Insulation tester
- Level
- Builder
- Parts
- Waterproof probe (DS18B20)
- Time
- 1 to 2 h
- What it teaches
- A fair test: change one thing at a time
- Project
- 12. Needle thermometer
- Level
- Starter
- Parts
- DHT11 or waterproof probe, servo
- Time
- 30 min
- What it teaches
- Mapping one range (degrees) onto another (an angle)
- Project
- 13. Room monitor sketch
- Level
- Coder
- Parts
- DHT11, text screen, blue light
- Time
- 1 h
- What it teaches
- Using a sensor library and handling a failed reading
Know what your sensor can do before you trust a decimal point. Adafruit's guide to the DHT sensors lists the DHT11 as good for 0 to 50 °C with ±2 °C accuracy, and no more than one reading a second (opens in a new tab). So a DHT11 can tell a warm room from a cool one. It cannot tell 21.3 °C from 21.8 °C in any meaningful way.
The waterproof DS18B20 probe is the better tool for the insulation tester. Adafruit lists it as usable from -55 to 125 °C, with ±0.5 °C accuracy from -10 to 85 °C (opens in a new tab). You can drop it into a cup of warm water, wrap the cup in foil, wool or paper, and see which material keeps the water warm longest. Use warm water, not hot.
The auto-fan is where students meet hysteresis without the word. One rule turns the fan on above 30 °C. A second rule turns it off below 28 °C. If both levels were the same, the fan would click on and off every time the reading wobbled across the line.
The needle thermometer uses the MakerBuddy board's servo mapping. You pick a temperature as the input, and the board turns it into a 0 to 180° servo angle. With the DHT11, its 0 to 50 °C range fills the whole swing. Glue a craft stick to the servo horn, draw a dial behind it, and you have a gauge. The DIY Analog Temperature Gauge guide on Hackster (opens in a new tab) shows a finished one built with the waterproof probe. Project 13 is the full sketch further down this page.
Distance and motion projects
The distance sensor and the motion sensor make projects that react to people. That makes them the most fun to demonstrate, and the easiest to get wrong.
| Project | Level | Parts | Time | What it teaches |
|---|---|---|---|---|
| 14. Distance warning | Builder | HC-SR04, buzzer | 45 min | One rule for each distance band |
| 15. Garage park assist | Builder | HC-SR04, colour light | 1 h | Range logic: green, then yellow, then red |
| 16. Height measure | Starter | HC-SR04, text screen | 30 min | Measuring with sound instead of a ruler |
| 17. Motion alarm | Starter | PIR motion sensor, buzzer, blue light | 30 min | A sensor that only says yes or no |
| 18. Room mapping | Builder | Servo, HC-SR04 | 1 to 2 h | Plotting points from an angle and a distance |
| 19. Visitor counter | Coder | PIR motion sensor, text screen | 1 to 2 h | Counting events in code, and why movements are not people |
| 20. Motion email alert | Coder | PIR motion sensor, a computer on the same Wi-Fi | 2 h | Reading the board over the network with its REST API |
- Project
- 14. Distance warning
- Level
- Builder
- Parts
- HC-SR04, buzzer
- Time
- 45 min
- What it teaches
- One rule for each distance band
- Project
- 15. Garage park assist
- Level
- Builder
- Parts
- HC-SR04, colour light
- Time
- 1 h
- What it teaches
- Range logic: green, then yellow, then red
- Project
- 16. Height measure
- Level
- Starter
- Parts
- HC-SR04, text screen
- Time
- 30 min
- What it teaches
- Measuring with sound instead of a ruler
- Project
- 17. Motion alarm
- Level
- Starter
- Parts
- PIR motion sensor, buzzer, blue light
- Time
- 30 min
- What it teaches
- A sensor that only says yes or no
- Project
- 18. Room mapping
- Level
- Builder
- Parts
- Servo, HC-SR04
- Time
- 1 to 2 h
- What it teaches
- Plotting points from an angle and a distance
- Project
- 19. Visitor counter
- Level
- Coder
- Parts
- PIR motion sensor, text screen
- Time
- 1 to 2 h
- What it teaches
- Counting events in code, and why movements are not people
- Project
- 20. Motion email alert
- Level
- Coder
- Parts
- PIR motion sensor, a computer on the same Wi-Fi
- Time
- 2 h
- What it teaches
- Reading the board over the network with its REST API
The HC-SR04 sends a burst of sound and times the echo. Its datasheet gives a range of 2 cm to 400 cm and a 5 V supply (opens in a new tab). In practice soft things like curtains and jumpers absorb the sound, so test on a hard wall first. The distance lesson covers why.
The garage park assist is the classic range-logic build. The colour light is green when the car is far away, yellow as it gets close and red when it should stop. Each colour is its own rule with its own distance band, which is what the range logic lesson teaches. There is a full Smart Car Parking Garage guide on Hackster (opens in a new tab), and the height measure has its own DIY Vernier Caliper guide (opens in a new tab).
The PIR motion sensor sees changes in heat, not shapes. It cannot count people. Two friends walking past together are one movement. That is why the visitor counter is a Coder project: you write the counting logic yourself, then test how often it is wrong. It is a good lesson in what a sensor really measures.
The motion email alert is a Coder project of a different kind. The board itself cannot send email. A small program on a computer reads the motion sensor from the board over Wi-Fi and sends the email for you. The board's REST endpoints are listed in the MakerBuddy documentation. The board's web connection has no password, so only do this on a Wi-Fi network you trust, and never open the board to the internet.
Soil and air projects
Soil and air sensors turn a classroom into a small lab. They also teach the hardest lesson in measurement: a number on a screen is not the same thing as the truth.
| Project | Level | Parts | Time | What it teaches |
|---|---|---|---|---|
| 21. Plant thirst tracker | Starter | Soil sensor, blue light, buzzer | 30 min, plus calibration | Calibrating "dry" and "wet" before trusting a percentage |
| 22. Wet or dry lab | Starter | Soil sensor | 45 min | Comparing materials and ranking results |
| 23. Garden auto-waterer | Builder | Soil sensor, relay, a small low-voltage pump (not in the kit) | 1 to 2 h | Feedback: the action changes the reading |
| 24. Gas traffic light | Builder | MQ-2 gas sensor, colour light | 1 h | Choosing levels from what you observed |
| 25. Air quality lab | Starter | MQ-2 gas sensor | 45 min | What a low-cost sensor can and cannot tell you |
| 26. Compost monitor | Builder | Waterproof probe, soil sensor | A week of checks | Using two readings to make one decision |
- Project
- 21. Plant thirst tracker
- Level
- Starter
- Parts
- Soil sensor, blue light, buzzer
- Time
- 30 min, plus calibration
- What it teaches
- Calibrating "dry" and "wet" before trusting a percentage
- Project
- 22. Wet or dry lab
- Level
- Starter
- Parts
- Soil sensor
- Time
- 45 min
- What it teaches
- Comparing materials and ranking results
- Project
- 23. Garden auto-waterer
- Level
- Builder
- Parts
- Soil sensor, relay, a small low-voltage pump (not in the kit)
- Time
- 1 to 2 h
- What it teaches
- Feedback: the action changes the reading
- Project
- 24. Gas traffic light
- Level
- Builder
- Parts
- MQ-2 gas sensor, colour light
- Time
- 1 h
- What it teaches
- Choosing levels from what you observed
- Project
- 25. Air quality lab
- Level
- Starter
- Parts
- MQ-2 gas sensor
- Time
- 45 min
- What it teaches
- What a low-cost sensor can and cannot tell you
- Project
- 26. Compost monitor
- Level
- Builder
- Parts
- Waterproof probe, soil sensor
- Time
- A week of checks
- What it teaches
- Using two readings to make one decision
The kit's soil sensor is a capacitive blade. It has no bare metal prongs to corrode, and it has a printed line that shows how deep it can go. Push it in only up to that line. The MakerBuddy board turns the raw reading into 0 to 100% using two calibration points, "dry" and "wet". Out of the box those are set to raw readings of 3000 and 1200. Your soil is not the factory's soil, so calibrate first: hold the blade in air for "dry", then in a glass of water up to the line for "wet". The smart agriculture lesson does this step by step.
The MQ-2 needs patience. It has a small heater inside, so let it warm up for a few minutes after you power the board before you compare readings. Its datasheet goes further: the maker's sensitivity figures assume a preheat time of over 48 hours (opens in a new tab). It also reacts to several gases and smoke without telling you which one it found. So the gas traffic light and the air quality lab are about patterns, not exact amounts. Compare rooms, compare times of day, and compare the number before and after cooking.
Servo, relay and Wi-Fi projects
Some projects start from the output instead of the sensor. You decide what should move, light up or switch, and then work out what should trigger it.
| Project | Level | Parts | Time | What it teaches |
|---|---|---|---|---|
| 27. Servo wiper | Starter | Servo | 20 min | Angles from 0 to 180° and how fast a servo moves |
| 28. Pet feeder | Builder | Servo, PIR motion sensor (optional) | 1 h | Timer rules, and why a board without a clock cannot feed at 8 am |
| 29. Holiday light show | Builder | Colour light, relay, small bulb | 1 h | A sequence of up to 10 steps |
| 30. Phone light switch | Starter | Blue light or relay, a phone or laptop on the same Wi-Fi | 15 min | Controlling hardware over a local network |
- Project
- 27. Servo wiper
- Level
- Starter
- Parts
- Servo
- Time
- 20 min
- What it teaches
- Angles from 0 to 180° and how fast a servo moves
- Project
- 28. Pet feeder
- Level
- Builder
- Parts
- Servo, PIR motion sensor (optional)
- Time
- 1 h
- What it teaches
- Timer rules, and why a board without a clock cannot feed at 8 am
- Project
- 29. Holiday light show
- Level
- Builder
- Parts
- Colour light, relay, small bulb
- Time
- 1 h
- What it teaches
- A sequence of up to 10 steps
- Project
- 30. Phone light switch
- Level
- Starter
- Parts
- Blue light or relay, a phone or laptop on the same Wi-Fi
- Time
- 15 min
- What it teaches
- Controlling hardware over a local network
The pet feeder is a good lesson in what a project can't do. The MakerBuddy board has no clock, so it cannot open the flap at exactly 8 am. It can open it every few hours with a Timer rule, or when the motion sensor sees your pet, as in the Smart Pet Feeder guide on Hackster (opens in a new tab). How the servo, relay and the other outputs work is explained in what an actuator is and how motors, relays and buzzers work.
The relay switches small low-voltage things, like a small bulb or fan. Ask us which of these extras come with your order. The relay is for low-voltage things only.
The phone light switch is the project that makes ESP32 feel different from older boards, because the board is on Wi-Fi. On an iPhone or iPad, open the MakerBuddy web app in Safari. On a laptop, use Chrome, Edge or Firefox with the free MakerBuddy extension. Android phones cannot control the board yet, so use a laptop there.
A complete starter sketch: DHT11 room monitor
This is project 13 in full. It reads the DHT11, shows the temperature and humidity on the 16 × 2 text screen, and turns the blue light on when the room passes 30 °C. The pins match the MakerBuddy board. On a bare ESP32, wire the DHT11 data pin to GPIO 25 and the screen's SDA and SCL to GPIO 21 and GPIO 22.
// Room monitor for the MakerBuddy board (or any ESP32).
// DHT11 temperature and humidity on a 16x2 I2C text screen,
// plus a warning light above a set temperature.
#include <DHT.h>                 // "DHT sensor library" by Adafruit
#include <Wire.h>
#include <LiquidCrystal_I2C.h>   // "LiquidCrystal I2C" by Frank de Brabander

const int DHT_PIN = 25;          // DHT11 data pin on the MakerBuddy board
const int LED_PIN = 12;          // built-in blue light
const float HOT_C = 30.0;        // the light comes on above this

DHT dht(DHT_PIN, DHT11);
LiquidCrystal_I2C lcd(0x27, 16, 2);   // I2C address 0x27, 16 columns, 2 rows

void setup() {
  Serial.begin(115200);
  pinMode(LED_PIN, OUTPUT);
  dht.begin();
  lcd.init();
  lcd.backlight();
}

void loop() {
  float tempC = dht.readTemperature();   // degrees Celsius
  float humidity = dht.readHumidity();   // percent

  // A failed read returns NaN ("not a number"). Show it instead of a fake 0.
  if (isnan(tempC) || isnan(humidity)) {
    lcd.setCursor(0, 0);
    lcd.print("Sensor error    ");
    delay(2000);
    return;
  }

  lcd.setCursor(0, 0);
  lcd.printf("Temp: %4.1f C   ", tempC);
  lcd.setCursor(0, 1);
  lcd.printf("Humidity: %3.0f%% ", humidity);

  digitalWrite(LED_PIN, tempC > HOT_C ? HIGH : LOW);
  Serial.printf("%.1f C, %.0f %%\n", tempC, humidity);

  delay(2000);   // the DHT11 gives at most one new reading a second
}
What each part is doing:
- The two libraries. The DHT library handles the sensor's timing-sensitive signal, and the LiquidCrystal I2C library talks to the screen over two wires. Install both from the Arduino IDE's Library Manager. The DHT library asks to install "Adafruit Unified Sensor" too; say yes.
- 0x27. This is the screen's I2C address, the number the board uses to find it on the two-wire bus. The MakerBuddy firmware uses the same address. If your own screen stays blank, a different address is the usual cause.
- The NaN check. A DHT11 sometimes fails a read. Printing a failed read as 0 °C looks like a real temperature, and it is not one. Showing "Sensor error" is honest, and it is the habit to build early.
- The trailing spaces. The screen does not clear old characters. Printing a fixed width overwrites the last value completely, so when the humidity drops from 100 to 99, no stray 0 is left at the end.
- The 2-second delay. Reading faster than the sensor updates gives you the same number twice, or a failed read.
To upload it, add ESP32 support to the Arduino IDE first. In File > Preferences, add Espressif's board address, https://espressif.github.io/arduino-esp32/package_esp32_index.json, to "Additional Board Manager URLs". Then install "esp32 by Espressif Systems" from the Boards Manager, as Espressif's installation guide (opens in a new tab) describes. Choose Tools > Board > ESP32 Dev Module and the board's port, then upload.
To make it harder, add the waterproof probe and show both temperatures, one per line. Then write the readings to the serial monitor every minute and paste a day of them into a spreadsheet.
ESP32 or Arduino Uno for student projects?
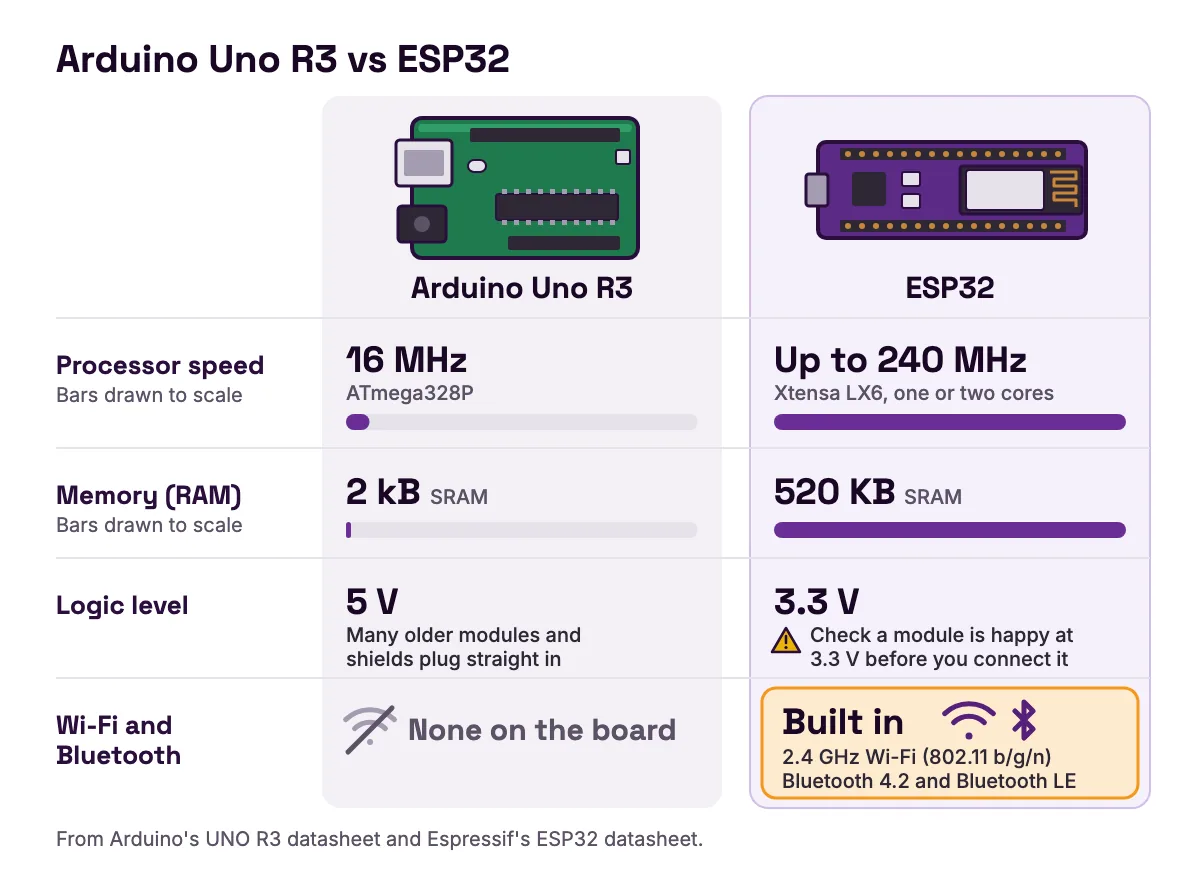
Most "Arduino projects for beginners" lists assume an Arduino Uno. Every idea on this page also works on an Uno, except the ones that need Wi-Fi. Here is how the two boards compare on the things that matter for a student project.
| Arduino Uno R3 | ESP32 | |
|---|---|---|
| Processor | ATmega328P at 16 MHz | Xtensa LX6, one or two cores, up to 240 MHz |
| Memory (RAM) | 2 kB SRAM | 520 KB SRAM |
| Logic level | 5 V | 3.3 V |
| Wi-Fi and Bluetooth | None on the board | 2.4 GHz Wi-Fi (802.11 b/g/n), Bluetooth 4.2 and Bluetooth LE |
| Pins | 14 digital, 6 analog inputs | More pins, but only the ADC1 pins read analog while Wi-Fi is on |
| Programming | Arduino IDE (C++) | Arduino IDE (C++), Espressif's ESP-IDF (C), MicroPython |
- Processor
- Arduino Uno R3
- ATmega328P at 16 MHz
- ESP32
- Xtensa LX6, one or two cores, up to 240 MHz
- Memory (RAM)
- Arduino Uno R3
- 2 kB SRAM
- ESP32
- 520 KB SRAM
- Logic level
- Arduino Uno R3
- 5 V
- ESP32
- 3.3 V
- Wi-Fi and Bluetooth
- Arduino Uno R3
- None on the board
- ESP32
- 2.4 GHz Wi-Fi (802.11 b/g/n), Bluetooth 4.2 and Bluetooth LE
- Pins
- Arduino Uno R3
- 14 digital, 6 analog inputs
- ESP32
- More pins, but only the ADC1 pins read analog while Wi-Fi is on
- Programming
- Arduino Uno R3
- Arduino IDE (C++)
- ESP32
- Arduino IDE (C++), Espressif's ESP-IDF (C), MicroPython
The Uno figures come from Arduino's UNO R3 datasheet (opens in a new tab), which lists a 16 MHz AVR CPU, 2 kB of SRAM and digital logic referenced to 5 V, and from the UNO R3 hardware page (opens in a new tab) for the pin counts. The ESP32 figures come from Espressif's ESP32 datasheet (opens in a new tab), which lists 520 KB of SRAM, 802.11 b/g/n Wi-Fi, Bluetooth v4.2 with Bluetooth LE, and electrical characteristics at 3.3 V.
The case for the Uno is real. Its pins work at 5 V, so many older modules and shields plug straight in. Many beginner tutorials are written for it. And it does one thing at a time, which makes it easier to reason about.
The case for the ESP32 is Wi-Fi. A project that shows its readings on a phone, or that someone can switch from across the room, is far more engaging for a 12-year-old than one that only blinks. The ESP32 runs its pins at 3.3 V, so check that a module is happy at 3.3 V before you connect it directly. For a deeper look at the sensors themselves, read the types of sensors used in student projects.
Common mistakes in ESP32 projects, and how to fix them
| Symptom | Cause | Fix |
|---|---|---|
| An analog sensor reads 0 or junk once Wi-Fi connects | It is on an ADC2 pin, which Wi-Fi takes over | Move it to an ADC1 pin, GPIO 32 to 39 |
| A pin you set as an output does nothing | GPIO 34 to 39 are input only | Use another pin for outputs |
| Upload fails with "Failed to connect" | The board did not enter its bootloader | Hold the BOOT button and press EN as the upload starts; if uploads still fail, try another USB cable |
| The DHT11 shows NaN or the same value every time | It is read more than once a second, or the pin or sensor type in the code is wrong | Wait 2 seconds between reads; check DHT11 and the pin number |
| The gas number keeps drifting after you power the board | The MQ-2's heater has not warmed the sensor up yet | Wait a few minutes before comparing readings, and compare patterns rather than exact values |
| A fan or light clicks on and off near the level | One level for both on and off | Use two levels with a gap, as in the auto-fan |
| The dashboard misses a quick button press | The dashboard and rules read sensors once a second | Hold the button for about a second, or move to your own code |
- Symptom
- An analog sensor reads 0 or junk once Wi-Fi connects
- Cause
- It is on an ADC2 pin, which Wi-Fi takes over
- Fix
- Move it to an ADC1 pin, GPIO 32 to 39
- Symptom
- A pin you set as an output does nothing
- Cause
- GPIO 34 to 39 are input only
- Fix
- Use another pin for outputs
- Symptom
- Upload fails with "Failed to connect"
- Cause
- The board did not enter its bootloader
- Fix
- Hold the BOOT button and press EN as the upload starts; if uploads still fail, try another USB cable
- Symptom
- The DHT11 shows NaN or the same value every time
- Cause
- It is read more than once a second, or the pin or sensor type in the code is wrong
- Fix
- Wait 2 seconds between reads; check
DHT11and the pin number
- Symptom
- The gas number keeps drifting after you power the board
- Cause
- The MQ-2's heater has not warmed the sensor up yet
- Fix
- Wait a few minutes before comparing readings, and compare patterns rather than exact values
- Symptom
- A fan or light clicks on and off near the level
- Cause
- One level for both on and off
- Fix
- Use two levels with a gap, as in the auto-fan
- Symptom
- The dashboard misses a quick button press
- Cause
- The dashboard and rules read sensors once a second
- Fix
- Hold the button for about a second, or move to your own code
The first two rows come straight from Espressif's GPIO documentation (opens in a new tab), which says GPIO34 to 39 "can only be set as input mode". The upload fix is in Espressif's esptool troubleshooting guide (opens in a new tab), which describes this manual download mode and lists a poor quality USB cable among the causes of other upload errors.
Turning a project into a class unit or science fair entry
A project idea becomes a lesson when it has a question. "Make a night light" is a build. "At what light level should a night light switch on, and is it the same in every room?" is an investigation. The second one has a hypothesis, a variable you change and a result you can measure.
Good science fair candidates from this list are the insulation tester (11), the wet or dry lab (22), the air quality lab (25) and the room thermometer diary (8). Each one changes one thing, measures one number and produces a table.
For a class, pick projects by the lessons they need. In the MakerBuddy curriculum, sensor-based rules arrive in the sensor-based control lesson, and range logic follows a lesson later. The capstone project lesson asks students to list every rule before they build anything, which is the habit that makes multi-sensor projects work. The year ends with the MakerBuddy expo, where these builds get shown off. Teachers can find the planning side on the page for teachers.
If your school wants the parts for this list in one box, the MakerBuddy kit has the board, sensors and outputs for every idea here, with free lessons for each part. The water pump is extra, and you can ask which small extras, such as the bulb and fan, come with your order. It can be ordered online in Pakistan, and schools in the US and Canada can ask for a quote. The full specifications are on the technical details page, and more guides like this one are on the MakerBuddy blog.
FAQ
What can I make with an ESP32?
Almost any project that senses something and reacts: a night light, a thermometer with a screen, a parking sensor, a plant watering reminder or a motion alarm. Because the ESP32 has Wi-Fi and Bluetooth built in, it can also show readings on a phone or be switched from another room. The 30 ideas above are sorted from easiest to hardest.
Is ESP32 better than Arduino for beginners?
It depends on the project. The ESP32 is much faster and has Wi-Fi, so connected projects are easier. The Arduino Uno works at 5 V, as its UNO R3 datasheet (opens in a new tab) shows, and many beginner tutorials are written for it, so simple wired projects can be easier on it. Both are programmed from the same Arduino IDE.
Does ESP32 use C++ or Python?
Both. In the Arduino IDE you write C++, and that is what most tutorials use. Espressif's own ESP-IDF framework uses C. MicroPython runs on the ESP32 (opens in a new tab) too, if you prefer Python.
Is ESP32 faster than Raspberry Pi?
No. A Raspberry Pi 5 has a 2.4 GHz quad-core Arm Cortex-A76 processor (opens in a new tab) and runs a full operating system. The ESP32 runs at up to 240 MHz, according to Espressif's ESP32 datasheet (opens in a new tab). They do different jobs: the Pi is a small computer, while the ESP32 is a microcontroller that starts in moments and runs one program that talks directly to sensors.
Why is ESP32 so cheap?
The processor, the Wi-Fi radio and Bluetooth are all on a single chip, so a board needs very few extra parts. That keeps development boards inexpensive compared with boards that need a separate Wi-Fi module.
Can I do ESP32 projects without coding?
Yes, if the board runs firmware made for it. On the MakerBuddy kit, 43 of the 50 ideas in the project library are built in a browser dashboard with simple rules. Code comes later, when you want something the rules cannot do, such as counting events or timing in milliseconds.
What age are these ESP32 projects for?
The Starter projects work from about age 10 with an adult nearby. Builder projects come next, once a student has done a few Starters. The Coder projects suit secondary school students and older hobbyists. The MakerBuddy curriculum is written for ages 10 and up.
Do ESP32 projects need the internet?
Only if the project uses an online service. The MakerBuddy board works on your own Wi-Fi network, with no accounts. It needs a 2.4 GHz network, and a phone hotspot works.
Sources
- Espressif: ESP32 GPIO and RTC GPIO (ADC2 and Wi-Fi, input-only pins) (opens in a new tab)
- Espressif: ESP32 Series Datasheet (opens in a new tab)
- Espressif: Installing the Arduino-ESP32 core (opens in a new tab)
- Espressif: esptool troubleshooting (opens in a new tab)
- Arduino: UNO R3 datasheet (opens in a new tab)
- Arduino: UNO R3 hardware page (opens in a new tab)
- Adafruit: DHT humidity and temperature sensors, overview (opens in a new tab)
- Adafruit: Waterproof DS18B20 digital temperature sensor (opens in a new tab)
- HC-SR04 ultrasonic ranging module datasheet (SparkFun) (opens in a new tab)
- MQ-2 semiconductor sensor for combustible gas, datasheet (Pololu) (opens in a new tab)
- MicroPython: Quick reference for the ESP32 (opens in a new tab)
- Raspberry Pi 5 product page (opens in a new tab)
- Hackster: DIY Analog Temperature Gauge using MakerBuddy (opens in a new tab)
- Hackster: Smart Car Parking Garage using MakerBuddy (opens in a new tab)
- Hackster: DIY Vernier Caliper with HC-SR04 and LCD (opens in a new tab)
- Hackster: DIY Smart Pet Feeder with motion detection (opens in a new tab)