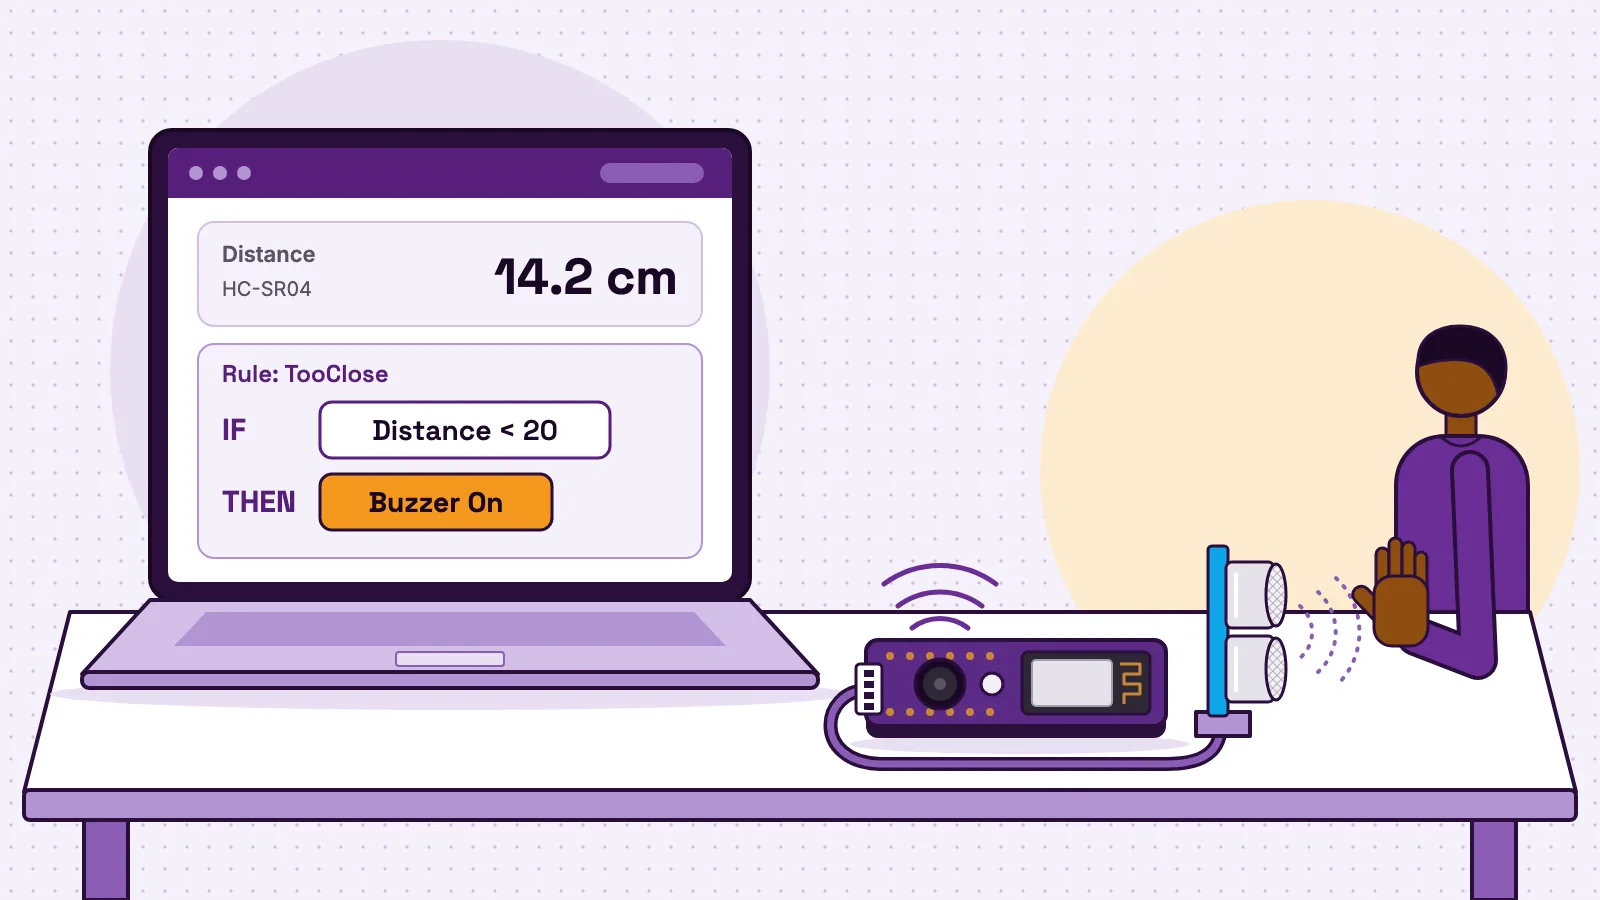
An if-then statement says that when one thing is true, another thing follows. "If something is closer than 20 cm, then the buzzer beeps." The "if" part is a test with a yes or no answer. The "then" part is the result. In maths, if then statements are also called conditional statements, and you decide whether each one is true or false. In a program, the same sentence becomes an instruction that the machine checks again and again.
This guide covers both sides with real sensors: the parts of an if-then statement, three examples, the truth table, the converse and its relatives, and if else. Then you build "IF distance < 20 THEN buzzer on" as a no-code rule on the MakerBuddy board and write the same logic in Arduino code.
What an if-then statement is: hypothesis and conclusion
OpenStax's chapter on the conditional and biconditional (opens in a new tab) defines a conditional as a statement of the form "if p, then q". The p part is the hypothesis. The q part is the conclusion. Logic writes it with an arrow: p → q.
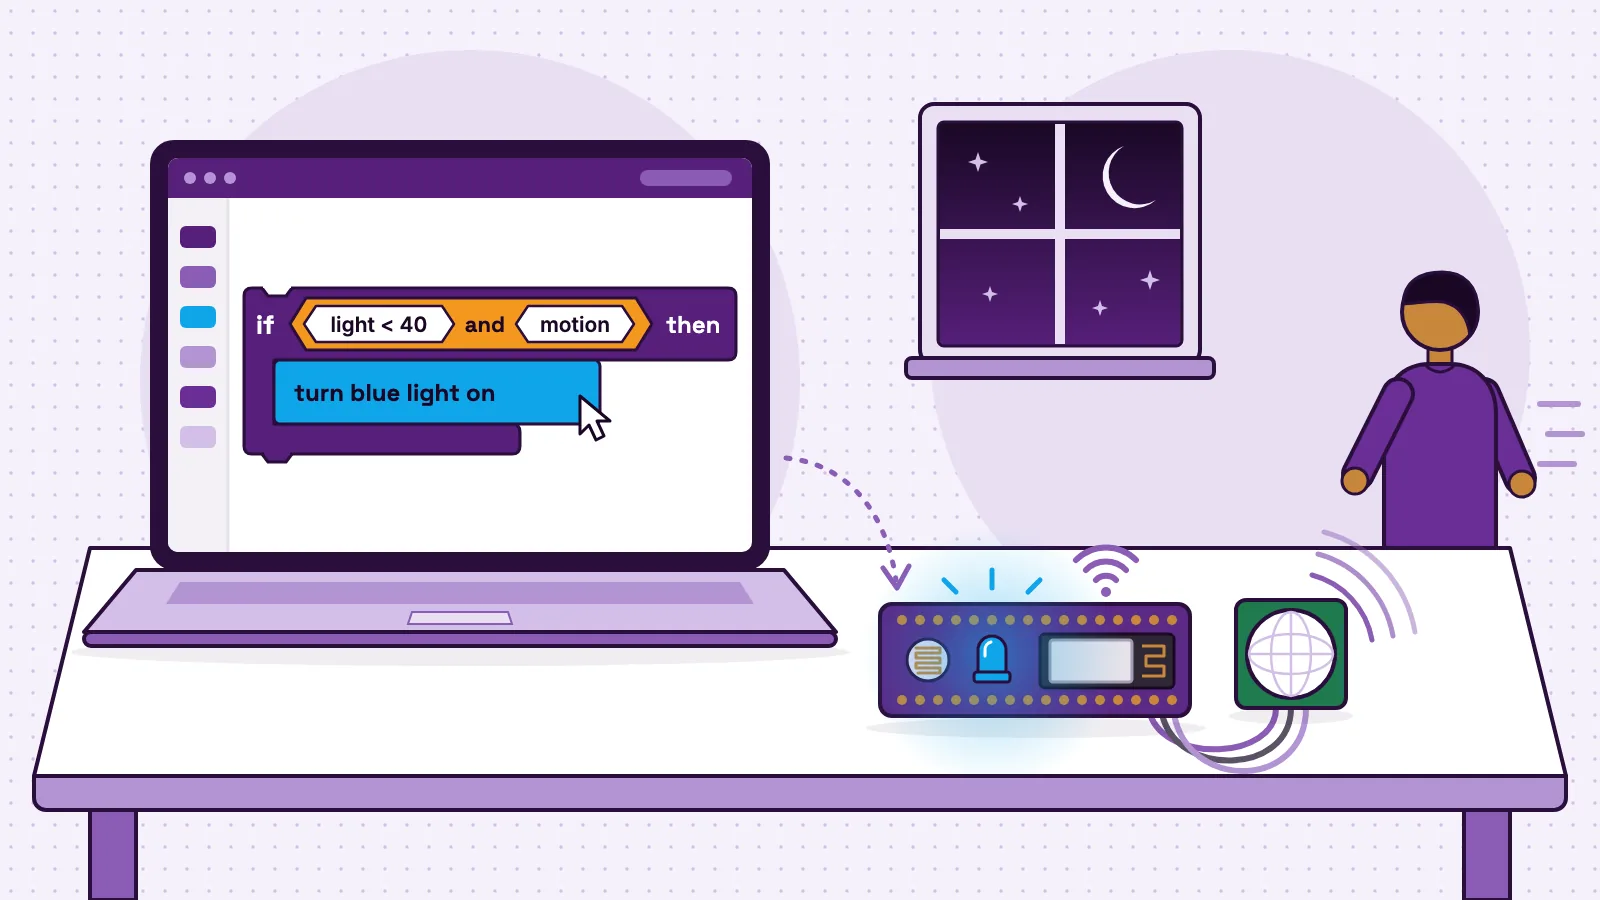
Take "If the room is dark, then the light comes on."
- Hypothesis (p): the room is dark.
- Conclusion (q): the light comes on.
The hypothesis is always a yes-or-no question: is the room dark, is the soil dry, is something close? The conclusion is what should follow when the answer is yes.
In maths, an if-then statement is a claim to judge. In a machine, it is an order. A sensor answers the question with a number, such as 14.2 cm, the machine compares it with a limit, and when the test passes, an output carries out the result.
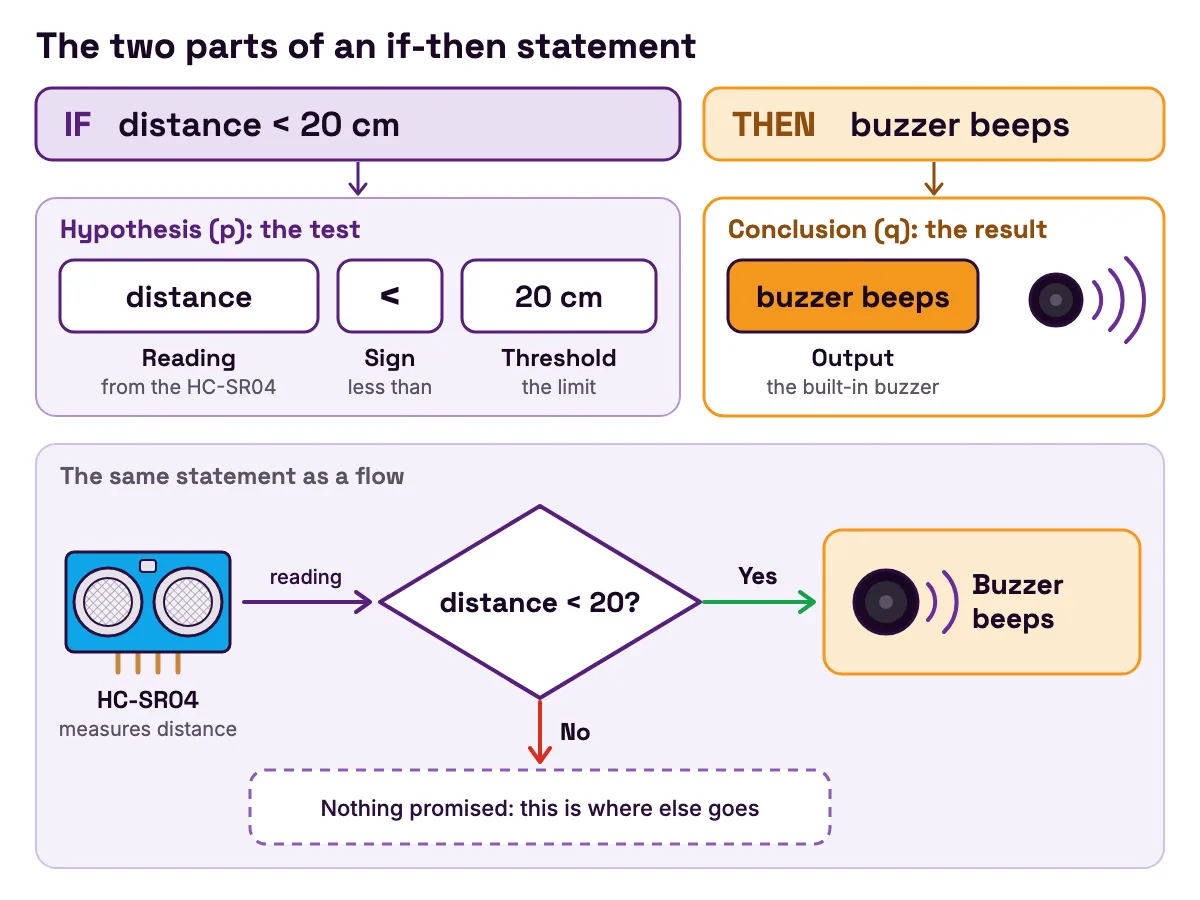
Every test on a real sensor has three parts: the reading (distance in centimetres), the sign (less than) and the threshold (20). The MakerBuddy rule form offers five signs: greater than (>), less than (<), greater or equal (>=), less or equal (<=) and equal to (==). Lesson 26 names mixing up > and < as the most common mistake, so read every test aloud before you trust it.
Three if-then examples with real sensors
Each example is one if-then statement, split into its parts and written as a test on the MakerBuddy board. The numbers are starting points, so read your own sensor first.
| If-then statement | Hypothesis (the test) | Conclusion (the action) | Parts used |
|---|---|---|---|
| If the room is dark, then the blue light comes on | Light Level less than 40 | LED On | Built-in light sensor and blue light |
| If something is closer than 20 cm, then the buzzer beeps | Distance less than 20 | Buzzer On, then Buzzer Off | HC-SR04 distance sensor and built-in buzzer |
| If the soil is dry, then the colour light turns red | Soil Moisture less than 30 | RGB Red | Capacitive soil sensor and colour light |
- If-then statement
- If the room is dark, then the blue light comes on
- Hypothesis (the test)
- Light Level less than 40
- Conclusion (the action)
- LED On
- Parts used
- Built-in light sensor and blue light
- If-then statement
- If something is closer than 20 cm, then the buzzer beeps
- Hypothesis (the test)
- Distance less than 20
- Conclusion (the action)
- Buzzer On, then Buzzer Off
- Parts used
- HC-SR04 distance sensor and built-in buzzer
- If-then statement
- If the soil is dry, then the colour light turns red
- Hypothesis (the test)
- Soil Moisture less than 30
- Conclusion (the action)
- RGB Red
- Parts used
- Capacitive soil sensor and colour light
The light and soil readings run from 0 to 100 on the board: a brighter room gives a bigger light number, and wetter soil a bigger moisture number once the sensor is calibrated. Distance is in centimetres. Our visual guide to the sensors used in student projects explains each input, and the guide to actuators such as motors, relays and buzzers covers the outputs. Choosing the threshold is a skill of its own, covered in our guide to picking the right sensor threshold.
Notice what none of them says: when the light goes off or the buzzer stops. An if-then statement only covers the yes case, and the next two sections show why that matters.
The if-then truth table: when is the promise broken?
Think of an if-then statement as a promise. "If something is closer than 20 cm, then the buzzer beeps" promises one thing only: what must happen when something is close.
OpenStax's section on truth tables for the conditional (opens in a new tab) states the rule: p → q is false only when the hypothesis is true and the conclusion is false. In every other row it is true. Here is that table with what each row looks like on a real board.
| p: something is closer than 20 cm | q: the buzzer beeps | p → q | What you see on the board |
|---|---|---|---|
| True | True | True | Your hand is close and the buzzer beeps. Promise kept |
| True | False | False | Your hand is close and the buzzer is silent. Promise broken, so look for a bug |
| False | True | True | Your hand is away and the buzzer beeps anyway. Allowed: the promise was only about close objects |
| False | False | True | Your hand is away and the buzzer is silent |
- p: something is closer than 20 cm
- True
- q: the buzzer beeps
- True
- p → q
- True
- What you see on the board
- Your hand is close and the buzzer beeps. Promise kept
- p: something is closer than 20 cm
- True
- q: the buzzer beeps
- False
- p → q
- False
- What you see on the board
- Your hand is close and the buzzer is silent. Promise broken, so look for a bug
- p: something is closer than 20 cm
- False
- q: the buzzer beeps
- True
- p → q
- True
- What you see on the board
- Your hand is away and the buzzer beeps anyway. Allowed: the promise was only about close objects
- p: something is closer than 20 cm
- False
- q: the buzzer beeps
- False
- p → q
- True
- What you see on the board
- Your hand is away and the buzzer is silent
The third row is the surprising one. Think of a friend who says, "If it rains, I will bring an umbrella." If it stays dry and they bring one anyway, they have not broken their promise.
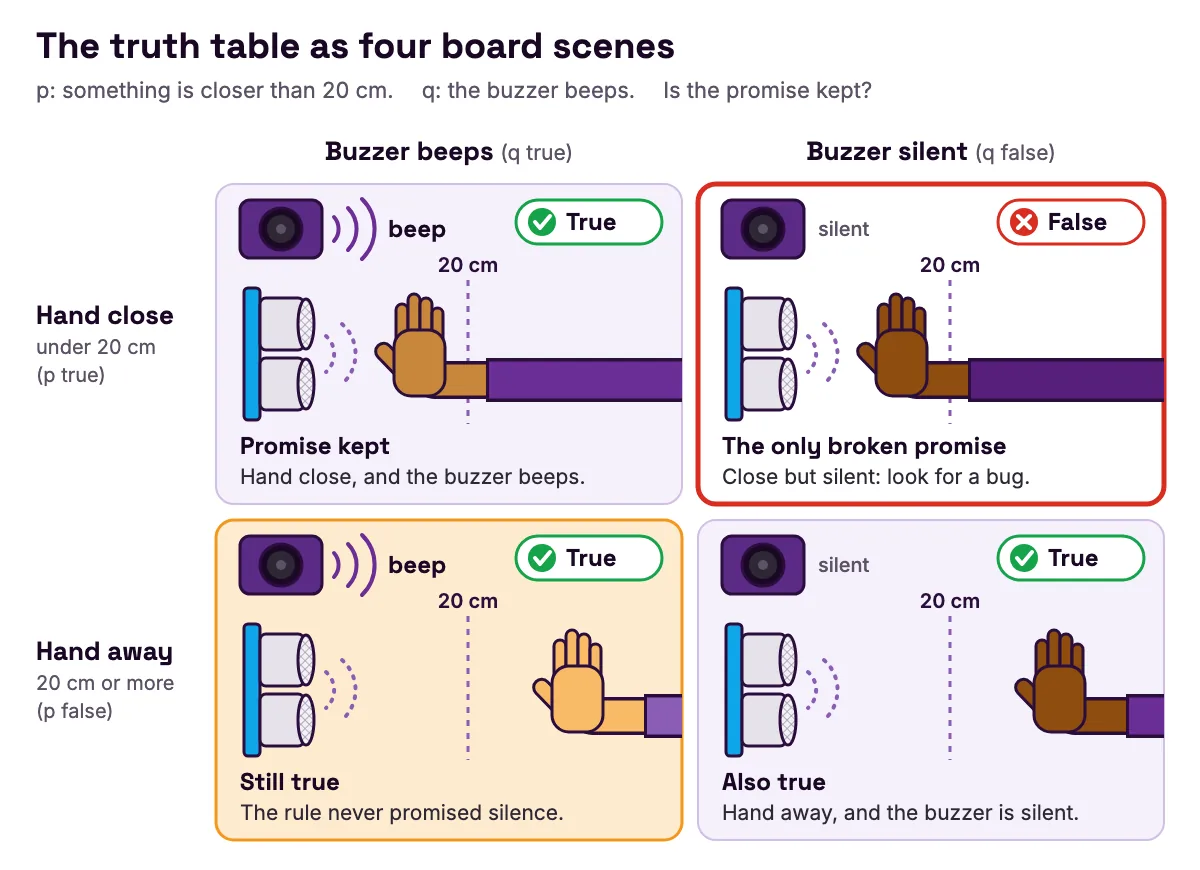
This row is also a common automation bug. A rule that only says "if close, then buzzer on" says nothing about what happens when you move away, so the buzzer may keep sounding while the rule still keeps its promise. You will meet this bug in the worked example and fix it.
Converse, inverse and contrapositive on a real board
Every if-then statement has three relatives. OpenStax's section on equivalent statements (opens in a new tab) defines them: the converse swaps the hypothesis and the conclusion, the inverse negates both, and the contrapositive swaps and negates both. Only the contrapositive is logically equivalent to the original.
| Form | How you make it | Distance example | Guaranteed by a working rule? |
|---|---|---|---|
| Conditional | If p, then q | If something is closer than 20 cm, then the buzzer beeps | Yes |
| Converse | Swap: if q, then p | If the buzzer beeps, then something is closer than 20 cm | No. A Timer rule that beeps every hour could be the cause |
| Inverse | Negate both: if not p, then not q | If nothing is closer than 20 cm, then the buzzer is silent | No. The rule says nothing about far-away objects |
| Contrapositive | Swap and negate: if not q, then not p | If the buzzer is silent, then nothing is closer than 20 cm | Yes. It always agrees with the original |
- Form
- Conditional
- How you make it
- If p, then q
- Distance example
- If something is closer than 20 cm, then the buzzer beeps
- Guaranteed by a working rule?
- Yes
- Form
- Converse
- How you make it
- Swap: if q, then p
- Distance example
- If the buzzer beeps, then something is closer than 20 cm
- Guaranteed by a working rule?
- No. A Timer rule that beeps every hour could be the cause
- Form
- Inverse
- How you make it
- Negate both: if not p, then not q
- Distance example
- If nothing is closer than 20 cm, then the buzzer is silent
- Guaranteed by a working rule?
- No. The rule says nothing about far-away objects
- Form
- Contrapositive
- How you make it
- Swap and negate: if not q, then not p
- Distance example
- If the buzzer is silent, then nothing is closer than 20 cm
- Guaranteed by a working rule?
- Yes. It always agrees with the original
The contrapositive makes a good test: if the buzzer is silent while your hand is close, the contrapositive fails, and so does the original. The converse is where people guess wrong. Hearing the buzzer does not prove something is close, because another rule might be using it.
When a statement and its converse are both true, you get a biconditional, p ↔ q, read "if and only if". OpenStax's section on the biconditional (opens in a new tab) says it is true whenever both parts have the same truth value. On the board you get close to it by giving the buzzer to one rule only, which switches it off as it ends. The catch: the board reads its sensors once a second, so the buzzer can react about a second late.
If else and else if: what happens otherwise
Most devices also need a no case, which programmers call else. Oracle's Java tutorial on if-then-else (opens in a new tab) describes it as a second path that runs when the test is false. Arduino's reference page for else (opens in a new tab) explains a longer chain: the tests run in order until one is true, its code runs and the rest are skipped, and a final else runs if none is true. Python's tutorial on if statements (opens in a new tab) calls the middle part elif, short for "else if", and says the else part is optional.
A MakerBuddy rule has no ELSE box. Lesson 20 shows the way round it: each arrow out of a decision diamond becomes its own rule. So the "otherwise" case is a second rule with the exact opposite test.
| Your if test | The exact opposite, for the else rule | Common wrong guess |
|---|---|---|
| Distance < 20 | Distance >= 20 | Distance > 20, which leaves out exactly 20 |
| Light Level > 60 | Light Level <= 60 | Light Level < 60, which leaves out exactly 60 |
| Dark AND motion | Bright OR no motion | Bright AND no motion |
- Your if test
- Distance < 20
- The exact opposite, for the else rule
- Distance >= 20
- Common wrong guess
- Distance > 20, which leaves out exactly 20
- Your if test
- Light Level > 60
- The exact opposite, for the else rule
- Light Level <= 60
- Common wrong guess
- Light Level < 60, which leaves out exactly 60
- Your if test
- Dark AND motion
- The exact opposite, for the else rule
- Bright OR no motion
- Common wrong guess
- Bright AND no motion
Less than pairs with greater or equal, and greater than pairs with less or equal, so together they cover every number exactly once. The last row is De Morgan's law, which our pillar guide on how no-code rules teach real logic works through with a security light.
Sometimes you leave a gap on purpose. A fan that turns on above 30 °C and off below 26 °C does not flick on and off around one number. Lesson 27 calls this a threshold window, and our guide to why your fan keeps switching on and off explains it as hysteresis.
Worked example: build "IF distance < 20 THEN buzzer on" with no code
This build turns the truth table into something you can hear. It matches the Distance Warning idea in the MakerBuddy project ideas library: the buzzer beeps slowly when something comes close and fast when it is too close.
You need the board, the HC-SR04 sensor and its cable, USB power, and a laptop, iPhone or iPad with the dashboard open. Android phones cannot control the board yet; choosing your dashboard explains the options. The board needs 2.4 GHz Wi-Fi (a phone hotspot works), and its local connection has no password, so use a network you trust.
Step 1: plug in and read the sensor
With the USB cable unplugged, connect the HC-SR04 to the 4-pin connector marked HC-SR04 on the left edge of the board, then plug the USB cable back in. Lesson 12 covers this sensor, and our guide to how an ultrasonic sensor measures distance with sound explains the echo.
Point the sensor at a wall about a metre away and read the Distance card. Then hold your hand about 10 cm in front and read it again. A card showing 999.0 means no echo has been heard yet, so aim at a flat surface. The HC-SR04 datasheet (opens in a new tab) gives a range of 2 to 400 cm and a measuring angle of 15 degrees.
Step 2: predict before you build
Write the plan in plain words: IF distance < 20 THEN beep. Now predict: what would happen if the rule had only one step, Buzzer On?
The answer is row three of the truth table. Buzzer On keeps the buzzer on until a Buzzer Off step runs, so it would keep sounding after your hand moved away. The rule promised to beep when something is close. It never promised silence.
Step 3: build the TooClose rule
- 1
Open the Rule Engine tab and type
TooCloseas the Rule Name. - 2
Choose the Condition loop mode.
- 3
Set Sensor to Distance (HC-SR04), Operator to Less than (<) and Threshold to 20.
- 4
Click Add Step: Action RGB Red, Delay (ms) 0.
- 5
Click Add Step: Action Buzzer On, Delay (ms) 200.
- 6
Click Add Step: Action Buzzer Off, Delay (ms) 300.
- 7
Click Save Rule.
A Condition rule repeats its steps while the test stays true, so you hear beep, gap, beep. When the test turns false, the rule finishes its current round, then stops. Because the last step is Buzzer Off, every round ends in silence: that step is your clean-up. The test must hold for 0.3 seconds before the rule starts, and the board reads sensors once a second, so expect a reaction in about a second. The automation rules documentation lists these timings.
Step 4: test every row
Hold your hand close: red light, beeping. Move it away: the beeping stops, but the light stays red, because the buzzer has an off step and the colour light does not. That is row three again, and it is why you need an else.
Step 5: add the else rule
Add a second Condition rule called Clear: Distance (HC-SR04), Greater or equal (>=), 20, with one step, RGB Green, Delay (ms) 100. Save it. Now the light is red when something is close and green when it is not. The tests are exact opposites, so exactly one rule is true at a time.
Step 6: turn it into else if
Add a middle band for slow beeps. Create a Condition rule called Close: Distance (HC-SR04), Greater or equal (>=), 20. Tick Use Range, keep Range Logic on AND, and set Operator 2 to Less than (<) and Threshold 2 to 50. Add RGB Yellow (0 ms), Buzzer On (200 ms) and Buzzer Off (800 ms). Save it, then change the threshold of Clear to 50.
| Rule | Test | Steps | Plays the part of |
|---|---|---|---|
| TooClose | Distance < 20 | RGB Red 0 ms, Buzzer On 200 ms, Buzzer Off 300 ms | if |
| Close | Distance >= 20 AND Distance < 50 | RGB Yellow 0 ms, Buzzer On 200 ms, Buzzer Off 800 ms | else if |
| Clear | Distance >= 50 | RGB Green 100 ms | else |
- Rule
- TooClose
- Test
- Distance < 20
- Steps
- RGB Red 0 ms, Buzzer On 200 ms, Buzzer Off 300 ms
- Plays the part of
- if
- Rule
- Close
- Test
- Distance >= 20 AND Distance < 50
- Steps
- RGB Yellow 0 ms, Buzzer On 200 ms, Buzzer Off 800 ms
- Plays the part of
- else if
- Rule
- Clear
- Test
- Distance >= 50
- Steps
- RGB Green 100 ms
- Plays the part of
- else
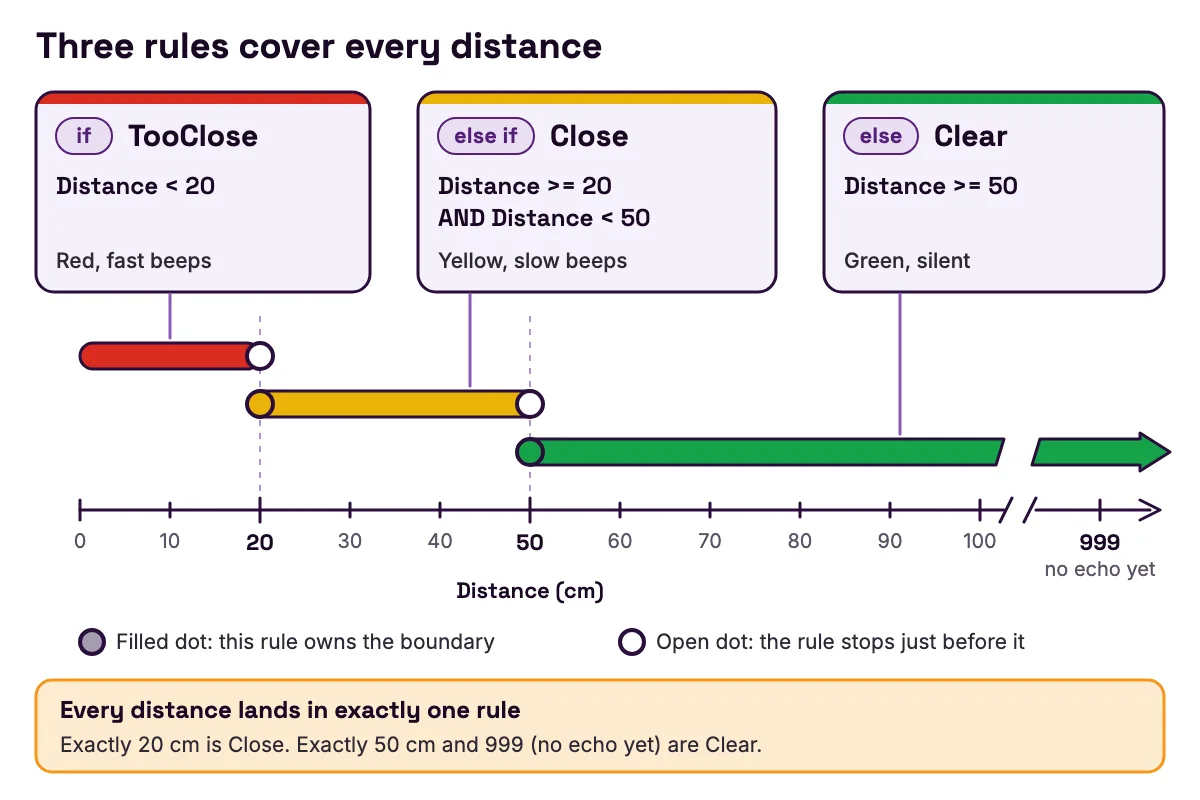
Now check every band, including the edges.
| Hand distance | TooClose | Close | Clear | You see and hear |
|---|---|---|---|---|
| 10 cm | True | False | False | Red, fast beeps |
| Exactly 20 cm | False | True | False | Yellow, slow beeps |
| Exactly 50 cm | False | False | True | Green, silent |
| No echo yet (999) | False | False | True | Green, silent |
- Hand distance
- 10 cm
- TooClose
- True
- Close
- False
- Clear
- False
- You see and hear
- Red, fast beeps
- Hand distance
- Exactly 20 cm
- TooClose
- False
- Close
- True
- Clear
- False
- You see and hear
- Yellow, slow beeps
- Hand distance
- Exactly 50 cm
- TooClose
- False
- Close
- False
- Clear
- True
- You see and hear
- Green, silent
- Hand distance
- No echo yet (999)
- TooClose
- False
- Close
- False
- Clear
- True
- You see and hear
- Green, silent
Every row has exactly one True: an if, else if, else chain built from three rules. When your hand crosses into a new band, the old rule finishes its round first, so the change can take a second or two. A board stores up to 10 rules, as how rules run explains.
The same if-then logic in Arduino code
Here is the same parking sensor in Arduino C++. Every if in it has a twin among the rules you just built.
In the Arduino IDE, choose "ESP32 Dev Module" with "esp32 by Espressif Systems" version 3.x. We compiled this sketch with core 3.3.7.
// If-then on the MakerBuddy board: the distance alarm from this post in Arduino code.
// Board: "ESP32 Dev Module" with "esp32 by Espressif Systems" 3.x.
// Uploading this sketch replaces the MakerBuddy firmware until you upload it again.

const int TRIG_PIN = 15;    // HC-SR04 trigger
const int ECHO_PIN = 2;     // HC-SR04 echo
const int BUZZER_PIN = 4;   // built-in buzzer
const int RED_PIN = 13;     // colour light, red
const int GREEN_PIN = 14;   // colour light, green
const int BLUE_PIN = 27;    // colour light, blue

const float TOO_CLOSE_CM = 20.0;   // rule TooClose: fast beeps below this
const float CLOSE_CM = 50.0;       // rule Close: slow beeps below this

float lastGoodCm = 999.0;          // 999 until the first echo, like the dashboard

float readDistanceCm() {
  digitalWrite(TRIG_PIN, LOW);
  delayMicroseconds(2);
  digitalWrite(TRIG_PIN, HIGH);
  delayMicroseconds(10);                          // a 10 microsecond pulse starts a measurement
  digitalWrite(TRIG_PIN, LOW);
  long echoUs = pulseIn(ECHO_PIN, HIGH, 24000);   // give up after 24 ms
  float cm = echoUs * 0.034 / 2.0;                // 0.034 cm per microsecond, there and back
  if (echoUs > 0 && cm >= 2.0 && cm <= 500.0) {
    lastGoodCm = cm;                              // keep believable readings only
  }
  return lastGoodCm;
}

// The colour light is common anode, so LOW switches a colour on.
void showColour(bool red, bool green) {
  digitalWrite(RED_PIN, red ? LOW : HIGH);
  digitalWrite(GREEN_PIN, green ? LOW : HIGH);
  digitalWrite(BLUE_PIN, HIGH);                   // blue stays off
}

void beep(int onMs, int offMs) {
  digitalWrite(BUZZER_PIN, HIGH);
  delay(onMs);
  digitalWrite(BUZZER_PIN, LOW);                  // every beep ends silent
  delay(offMs);
}

void setup() {
  Serial.begin(115200);
  pinMode(TRIG_PIN, OUTPUT);
  pinMode(ECHO_PIN, INPUT);
  pinMode(BUZZER_PIN, OUTPUT);
  pinMode(RED_PIN, OUTPUT);
  pinMode(GREEN_PIN, OUTPUT);
  pinMode(BLUE_PIN, OUTPUT);
  digitalWrite(BUZZER_PIN, LOW);
  showColour(false, false);
}

void loop() {
  float distance = readDistanceCm();
  Serial.print("distance=");
  Serial.println(distance);

  if (distance < TOO_CLOSE_CM) {          // IF: rule TooClose
    showColour(true, false);              // red
    beep(200, 300);
  } else if (distance < CLOSE_CM) {       // ELSE IF: rule Close
    showColour(true, true);               // red and green make yellow
    beep(200, 800);
  } else {                                // ELSE: rule Clear
    showColour(false, true);              // green
    delay(100);
  }
}
How the code lines up with the rules:
- 1
if (distance < TOO_CLOSE_CM)is TooClose. Arduino's reference page for if (opens in a new tab) says the if statement checks a condition and runs the statements that follow when it is true.
- 2
else if (distance < CLOSE_CM)is Close. It skips
distance >= 20, because the code only reaches this line when the first test was false. With rules, you wrote that part yourself. - 3
elseis Clear, and `beep()` ends with the buzzer LOW, the same clean-up as the Buzzer Off step.
- 4
lastGoodCmcopies the firmware: a reading with no echo is thrown away and the last good distance is kept.
Worked calculation: what echo time means 20 cm?
The HC-SR04 datasheet (opens in a new tab) works out range as the echo time multiplied by the speed of sound, 340 m/s, divided by two for the trip there and back. Its shortcut is microseconds divided by 58.
- 340 m/s is 34,000 cm in 1,000,000 µs, so 0.034 cm per microsecond.
- There and back: 0.034 ÷ 2 = 0.017 cm of distance per microsecond of echo.
- The threshold: 20 ÷ 0.017 ≈ 1,176 µs. The shortcut gives 20 × 58 = 1,160 µs.
So "distance < 20" really means "the echo came back in less than about 1.2 thousandths of a second". The 24,000 µs timeout in pulseIn matches about 408 cm, just past the sensor's 4 m range.
Rules or code: what changes
| Question | No-code rules | Arduino code |
|---|---|---|
| How is else written? | A second rule with the exact opposite test | The word else; the opposite is implied |
| What runs at the same time? | Up to 10 rules, side by side | One loop, one line at a time |
| Who handles timing? | The board: the 0.3 s hold, the delays and the clean-up round | You, with delay() or your own timers |
| What do you need to change it? | A browser and the dashboard | The Arduino IDE, a USB cable and an upload |
- Question
- How is else written?
- No-code rules
- A second rule with the exact opposite test
- Arduino code
- The word
else; the opposite is implied
- Question
- What runs at the same time?
- No-code rules
- Up to 10 rules, side by side
- Arduino code
- One loop, one line at a time
- Question
- Who handles timing?
- No-code rules
- The board: the 0.3 s hold, the delays and the clean-up round
- Arduino code
- You, with
delay()or your own timers
- Question
- What do you need to change it?
- No-code rules
- A browser and the dashboard
- Arduino code
- The Arduino IDE, a USB cable and an upload
delay() pauses the whole sketch, so while it beeps it does nothing else. The rule engine handles the waiting for you, which is why a class can start with rules and move to code later.
Where else you meet if-then logic
Once you can spot the hypothesis and the conclusion, you find if-then statements everywhere. The words change, but the shape stays the same.
- Block editors. The MakeCode if block reference (opens in a new tab) says the code inside the block only runs when its condition is true, with an else area for the other case.
- Spreadsheets. Microsoft's IF function page (opens in a new tab) gives the form IF(logical_test, value_if_true, [value_if_false]). The square brackets mark the optional else part, so
=IF(B2<20,"Too close","OK")labels each distance in column B. - Python.
if distance < 20:is followed byelifandelse, as the Python tutorial on if statements (opens in a new tab) shows.
If this then that logic even has a service named after it. IFTTT's guide for new users (opens in a new tab) says the name is short for If This Then That, and its automations combine triggers and actions: the trigger is the hypothesis and the action is the conclusion. Our guide to IFTTT-style automation for hardware without the cloud compares the two. MakerBuddy rules run on the board itself, on your local Wi-Fi, with no account.
One if-then the board cannot do is "if it is 8 am, then open the blinds". It has no clock, so it can wait for a set time but cannot check the time of day.
Common mistakes with if-then rules
Each heading is what you notice; below it are the cause and the fix.
The rule fires at the wrong time
Cause: The sign points the wrong way. "Distance > 20" beeps when things are far away.
Fix: Read the test aloud. Lesson 26's trick helps: the arrow always points to the smaller number.
The buzzer keeps sounding after you move away
Cause: The rule's only step is Buzzer On. A rule leaves every output the way its last step set it.
Fix: Add Buzzer Off as the last step and save. Hold your hand close for a moment, so the rule runs one more round and ends on Buzzer Off.
The rule never fires, or the beeping carries on after your hand has gone
Cause: No echo is coming back. A Distance card stuck on 999.0 has never heard one. If the sensor now points at open space beyond about 4 m, a soft surface or a steep angle, the board keeps the last good distance, which was your hand.
Fix: With the USB cable unplugged, check the sensor's connector. Then aim the sensor at a wall or a flat object within range, and read the card before you choose a threshold.
Nothing happens at the threshold, or two rules fight
Cause: The else test is not the exact opposite. "Less than 20" with "greater than 20" leaves a gap at 20. "Less or equal 20" with "greater or equal 20" overlaps, so two rules drive the same part at once, and Lesson 21 shows that rules of the same priority clash.
Fix: Pair less than with greater or equal, then test the boundary value itself.
In code, the if always runs
Cause: You wrote if (distance = 20). Arduino's reference page for if (opens in a new tab) warns that a single equals sign assigns a value instead of comparing it, so the test is always true.
Fix: Compare with ==. For readings with decimals, prefer < or >=, since a reading is rarely exactly 20.0. The rule engine's Equal to (==) treats values less than 0.1 apart as equal.
Practise and teach if-then statements
Split each statement below into its hypothesis and conclusion, then write it as a board test. Cover the right-hand columns to use it as a quiz.
| Statement | Hypothesis | Conclusion | As a board test |
|---|---|---|---|
| If motion is seen, then the light turns blue | Motion is seen | The light turns blue | Motion Sensor equal to True, step RGB Blue |
| If it is too warm, then a small low-voltage fan switches on | Temperature is above 30 °C | The fan switches on | Temperature (DHT11) > 30, step Relay On, with the fan wired through the relay (low-voltage things only, never mains) |
| If the soil is dry and it is dark, then the screen asks for water | Soil is dry AND the room is dark | The screen shows a message | Soil Moisture < 30 AND Light Level < 40, step LCD Display |
- Statement
- If motion is seen, then the light turns blue
- Hypothesis
- Motion is seen
- Conclusion
- The light turns blue
- As a board test
- Motion Sensor equal to True, step RGB Blue
- Statement
- If it is too warm, then a small low-voltage fan switches on
- Hypothesis
- Temperature is above 30 °C
- Conclusion
- The fan switches on
- As a board test
- Temperature (DHT11) > 30, step Relay On, with the fan wired through the relay (low-voltage things only, never mains)
- Statement
- If the soil is dry and it is dark, then the screen asks for water
- Hypothesis
- Soil is dry AND the room is dark
- Conclusion
- The screen shows a message
- As a board test
- Soil Moisture < 30 AND Light Level < 40, step LCD Display
For a 45-minute class with one board per group, open with a clap game: "If I clap, then you stand up." Students who stand without a clap have not broken the promise, which is row three. Spend ten minutes on the practice table, twenty building TooClose and Clear and testing every truth table row, and the last ten debating "If the buzzer beeps, is something close?" before each student writes the contrapositive.
Lesson 20 introduces IF-THEN-ELSE flowcharts, and our guide to flowcharts for planning any automation goes further. Lesson 21 tours the four loop modes and Lesson 26 builds the first Condition rules, both part of the 32-lesson MakerBuddy curriculum. Students without a kit can move a slider and watch a ready-made rule react on the MakerBuddy page for students.
For repetition, read our guide to forever, timed and conditional loops. More guides are on the MakerBuddy blog.
FAQ
What is an if-then statement?
An if-then statement links a condition to a result: if p, then q. The "if" part is the hypothesis, a test with a yes or no answer. The "then" part is the conclusion, what follows when the test is true.
What is an example of an if-then statement?
"If something is closer than 20 cm, then the buzzer beeps." The hypothesis is "something is closer than 20 cm" and the conclusion is "the buzzer beeps". On a MakerBuddy board it becomes a Condition rule: Distance less than 20, with Buzzer On and Buzzer Off steps.
What are the four types of if-then statements?
The conditional, the converse, the inverse and the contrapositive. The converse swaps the two parts, the inverse negates both, and the contrapositive does both. Only the contrapositive always agrees with the original.
What is a true conditional statement?
A conditional is true in every case except one: when the hypothesis is true and the conclusion is false. So "if something is close, the buzzer beeps" only fails when something is close and the buzzer stays silent.
How do you use if-then?
Start with the result you want, then ask what must be true first. Write the test as a reading, a sign and a threshold, such as Distance < 20. Then decide what should happen otherwise.
What are conditional statements in programming?
They are instructions that run code only when a test is true, such as if, if else and else if. Arduino C++ writes if (condition) { ... } and Python writes if condition:. A no-code rule on a board is a conditional statement too, built from boxes instead of typed words.
What is the difference between if and if else?
An if acts only when its test is true. An if else adds a second action for when the test is false, so something always happens. With MakerBuddy rules, the else is a second rule with the exact opposite test.
What does if this then that logic mean?
It means a trigger leads to an action: if this happens, then do that. IFTTT is a service named after the idea, and a sensor rule follows the same pattern, with a reading as the trigger.
Sources
- OpenStax Contemporary Mathematics: 2.4 Truth Tables for the Conditional and Biconditional (opens in a new tab)
- OpenStax Contemporary Mathematics: 2.5 Equivalent Statements (opens in a new tab)
- Oracle Java Tutorials: The if-then and if-then-else Statements (opens in a new tab)
- Arduino Language Reference: if (opens in a new tab)
- Arduino Language Reference: else (opens in a new tab)
- Python Tutorial: if Statements (opens in a new tab)
- Microsoft MakeCode for micro:bit: if (opens in a new tab)
- Microsoft Support: IF function (opens in a new tab)
- IFTTT: New to IFTTT (opens in a new tab)
- HC-SR04 Ultrasonic Ranging Module datasheet (SparkFun) (opens in a new tab)