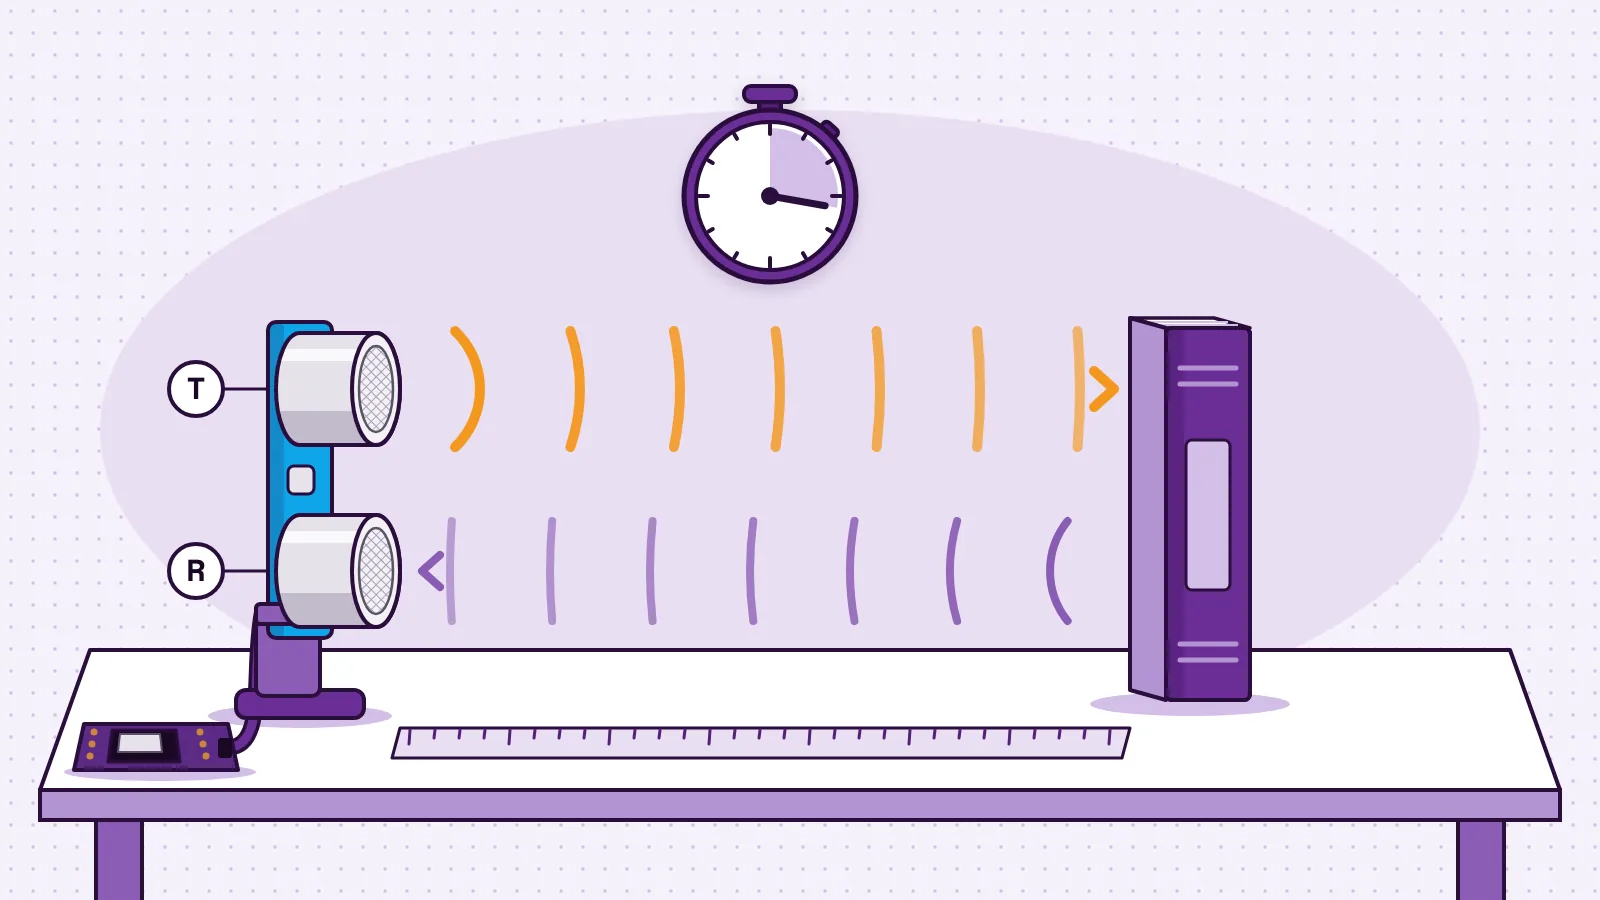
An ultrasonic sensor measures distance with sound. It sends a short burst of sound too high for people to hear, waits for the echo to bounce back from an object, and times the trip. Sound travels at a known speed, so the time gives you the distance: distance = (time × speed of sound) ÷ 2. You halve it because the sound went to the object and back.
The HC-SR04 is a four-pin ultrasonic distance sensor, and it is the one in the MakerBuddy kit. Its datasheet (opens in a new tab) gives a range of 2 cm to 400 cm.
What is an ultrasonic sensor?
Ultrasound is sound pitched too high for human ears. The Physics Classroom's page on pitch and frequency (opens in a new tab) puts human hearing at about 20 Hz to 20,000 Hz and calls anything higher ultrasound. The HC-SR04 sends sound at 40 kHz, or 40,000 vibrations a second, so you hear nothing. A dog or a cat might. The same page says dogs hear up to about 45,000 Hz and cats up to about 85,000 Hz.
Bats use the same trick to fly at night. The Physics Classroom's speed of sound page (opens in a new tab) explains that bats send short bursts of ultrasound and judge distance from the delay before the echo returns. That is echolocation: finding things by their echoes.
Inside the sensor, the sound comes from a transducer. Texas Instruments' note on ultrasonic sensing basics (opens in a new tab) describes it as piezoelectric: it turns an electrical signal into vibration, and vibration back into an electrical signal. The HC-SR04 has two round metal cans on its front. The one marked T is the transmitter, a tiny speaker. The one marked R is the receiver, a tiny microphone. A small control circuit on the back drives them and does the timing.
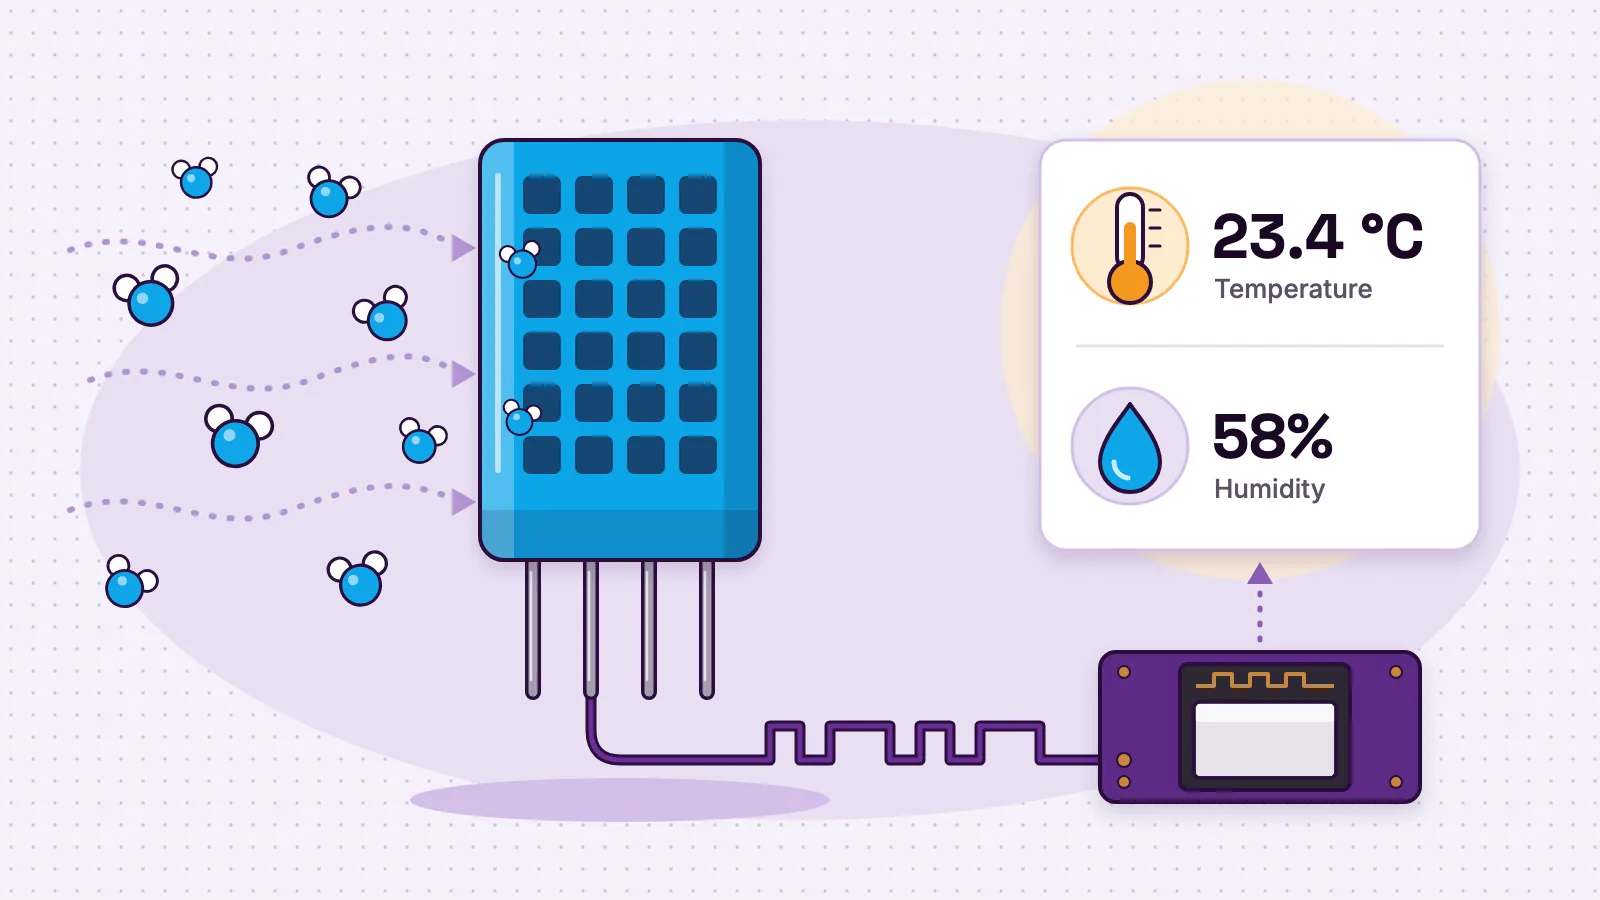
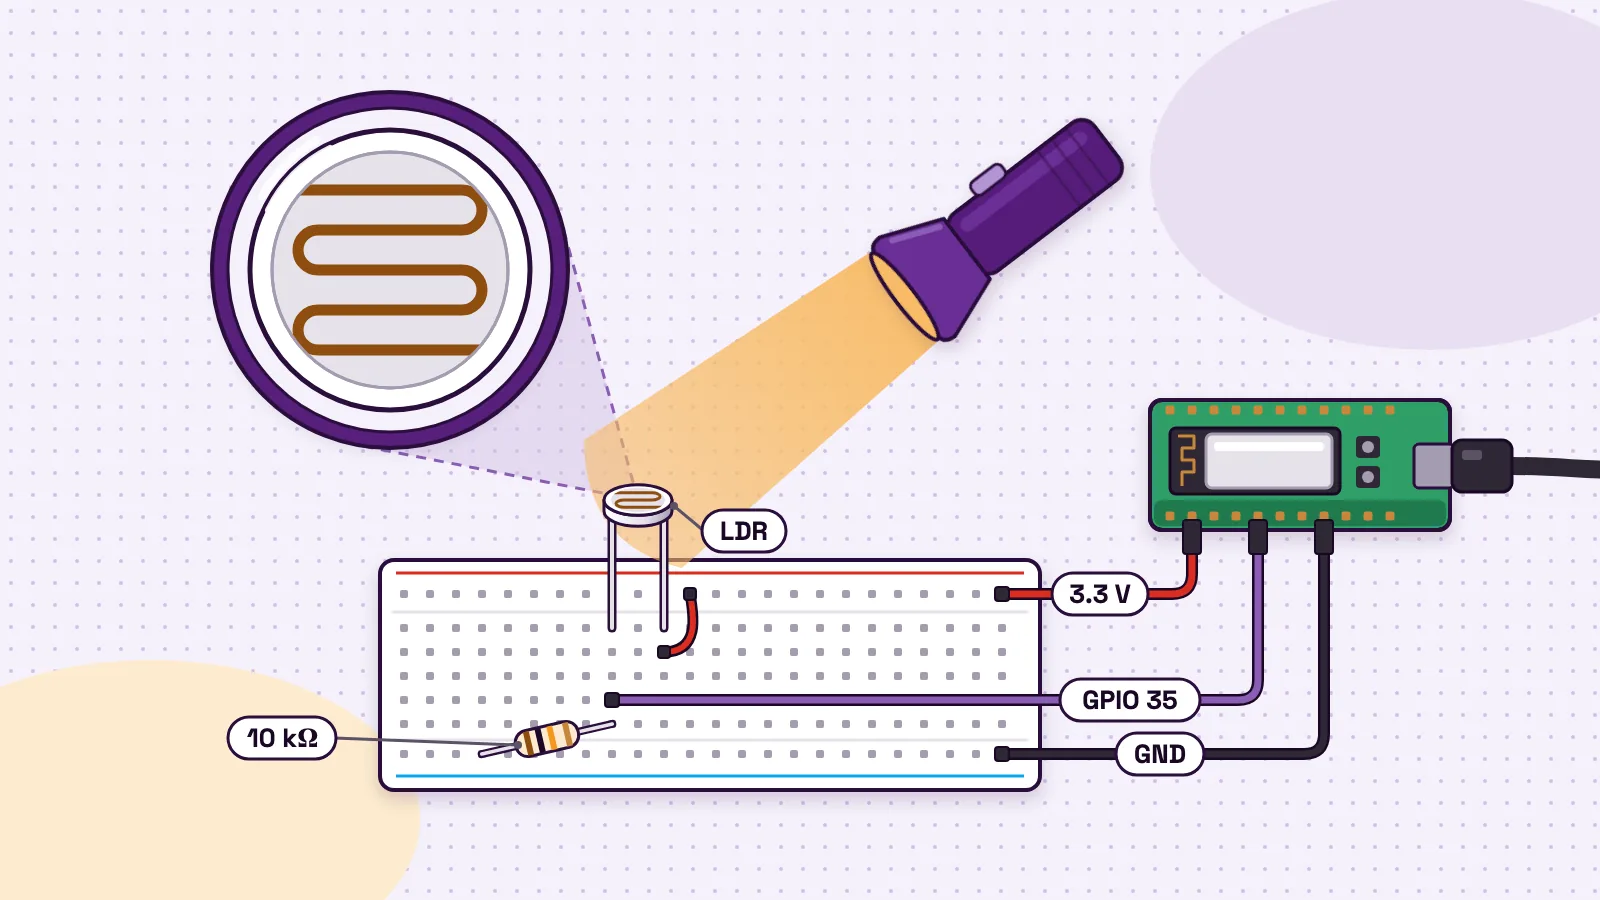
You meet the same idea in car parking sensors, robots that steer around obstacles and gauges that measure how full a tank is. TI's note (opens in a new tab) lists all three, and says a car's parking assist uses 4 to 16 ultrasonic sensors. The visual guide to the types of sensors used in student projects shows where the ultrasonic sensor sits beside light, temperature, motion and gas sensors.
How does an ultrasonic sensor work? One ping, step by step
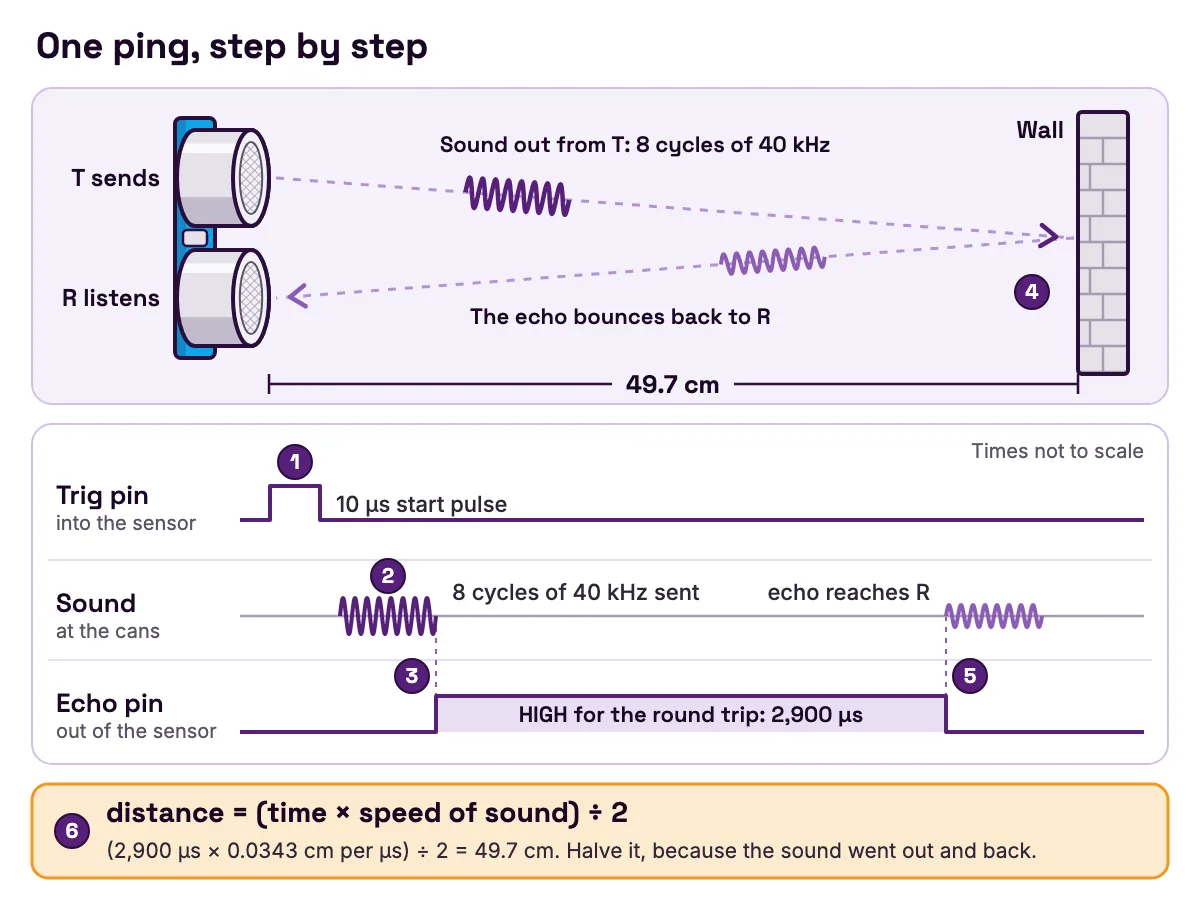
The HC-SR04 does no maths itself. It produces a pulse as long as the sound's trip, and your board does the rest. The HC-SR04 datasheet (opens in a new tab) describes one measurement like this:
- 1
The board sets the Trig pin high for at least 10 microseconds (µs). That is the signal to start.
- 2
The module sends eight cycles of 40 kHz sound from the T can.
- 3
The module raises its Echo pin to high.
- 4
The sound hits an object and bounces back to the R can.
- 5
When the echo arrives, Echo drops to low. The time it stayed high is the time of the round trip.
- 6
The board measures that time and turns it into a distance.
The datasheet (opens in a new tab) suggests a measuring cycle of more than 60 ms. Sound from one ping can still be bouncing around the room when the next one starts, and a late echo would be timed as a new one.
Why it cannot measure right up close
After a transducer sends a burst, it keeps ringing for a moment, like a bell. TI's note (opens in a new tab) calls this ringing-decay. It creates a blind zone close to any sensor that sends and listens with one transducer, because the sensor cannot hear an echo over its own ringing. Two separate transducers, one to send and one to listen, remove that problem. The HC-SR04 is built that way, with its separate T and R cans, and its datasheet minimum is 2 cm.
The ultrasonic distance formula, worked through
distance = (time × speed of sound) ÷ 2
The time is how long Echo stayed high. In dry air at 20 °C, sound travels at 343 metres per second. Both The Physics Classroom (opens in a new tab) and TI's ultrasonic sensing note (opens in a new tab) give that figure. Echo times are tiny, so convert the speed first: 343 m/s is 34,300 cm per second, which is 0.0343 cm per microsecond.
Worked example: from echo time to centimetres
Say the Echo pin stayed high for 2,900 µs.
- 1
Multiply by the speed: 2,900 × 0.0343 = 99.47 cm. That is the whole trip, out and back.
- 2
Divide by 2: 99.47 ÷ 2 = 49.7 cm. That is the distance to the object.
Check it with a ruler. The Week 12 lesson, Distance and Echolocation, asks the same question the other way round: how long does sound take to go 50 cm and back?
The divide-by-58 shortcut
The HC-SR04 datasheet (opens in a new tab) gives a quicker formula: microseconds ÷ 58 = centimetres, or microseconds ÷ 148 = inches. Here is where 58 comes from. To go 1 cm out and 1 cm back, sound covers 2 cm. At 0.0343 cm per µs, that takes 2 ÷ 0.0343 = 58.3 µs. For inches, 2 × 2.54 ÷ 0.0343 = 148.1 µs. With the shortcut, 2,900 µs gives 50.0 cm, within 3 mm of the long method.
| Distance to the object | Echo time at 20 °C | Shortcut check (µs ÷ 58) |
|---|---|---|
| 2 cm, the datasheet minimum | 117 µs | 2.0 cm |
| 10 cm | 583 µs | 10.1 cm |
| 50 cm | 2,915 µs | 50.3 cm |
| 100 cm | 5,831 µs | 100.5 cm |
| 200 cm | 11,662 µs | 201.1 cm |
| 400 cm, the datasheet maximum | 23,324 µs | 402.1 cm |
- Distance to the object
- 2 cm, the datasheet minimum
- Echo time at 20 °C
- 117 µs
- Shortcut check (µs ÷ 58)
- 2.0 cm
- Distance to the object
- 10 cm
- Echo time at 20 °C
- 583 µs
- Shortcut check (µs ÷ 58)
- 10.1 cm
- Distance to the object
- 50 cm
- Echo time at 20 °C
- 2,915 µs
- Shortcut check (µs ÷ 58)
- 50.3 cm
- Distance to the object
- 100 cm
- Echo time at 20 °C
- 5,831 µs
- Shortcut check (µs ÷ 58)
- 100.5 cm
- Distance to the object
- 200 cm
- Echo time at 20 °C
- 11,662 µs
- Shortcut check (µs ÷ 58)
- 201.1 cm
- Distance to the object
- 400 cm, the datasheet maximum
- Echo time at 20 °C
- 23,324 µs
- Shortcut check (µs ÷ 58)
- 402.1 cm
Table note: echo times use 343 m/s, the speed of sound at 20 °C from The Physics Classroom (opens in a new tab). The range limits and the ÷ 58 rule are from the HC-SR04 datasheet (opens in a new tab).
Look at the last row. Even at 4 metres, the echo is back in under 24 thousandths of a second. So a program only needs to listen for about 24 ms before it gives up.
Why the air temperature changes the answer
Sound travels faster in warm air. The Physics Classroom (opens in a new tab) gives a rule for dry air: speed = 331 m/s + 0.6 m/s for every degree Celsius, reasonably accurate from 0 °C to 100 °C. TI's note (opens in a new tab) uses the same rule. The HC-SR04 datasheet (opens in a new tab) uses 340 m/s. The MakerBuddy firmware uses 0.034 cm per µs, the same 340 m/s, with no temperature correction. By the rule, 340 m/s is the speed at 15 °C. Here is what the board shows for an object exactly 100 cm away:
| Air temperature | Real speed of sound | Echo time for 100 cm | The board shows |
|---|---|---|---|
| 0 °C | 331 m/s | 6,042 µs | 102.7 cm |
| 15 °C | 340 m/s | 5,882 µs | 100.0 cm |
| 20 °C | 343 m/s | 5,831 µs | 99.1 cm |
| 30 °C | 349 m/s | 5,731 µs | 97.4 cm |
| 40 °C | 355 m/s | 5,634 µs | 95.8 cm |
- Air temperature
- 0 °C
- Real speed of sound
- 331 m/s
- Echo time for 100 cm
- 6,042 µs
- The board shows
- 102.7 cm
- Air temperature
- 15 °C
- Real speed of sound
- 340 m/s
- Echo time for 100 cm
- 5,882 µs
- The board shows
- 100.0 cm
- Air temperature
- 20 °C
- Real speed of sound
- 343 m/s
- Echo time for 100 cm
- 5,831 µs
- The board shows
- 99.1 cm
- Air temperature
- 30 °C
- Real speed of sound
- 349 m/s
- Echo time for 100 cm
- 5,731 µs
- The board shows
- 97.4 cm
- Air temperature
- 40 °C
- Real speed of sound
- 355 m/s
- Echo time for 100 cm
- 5,634 µs
- The board shows
- 95.8 cm
Table note: real speeds from the temperature rule on The Physics Classroom's speed of sound page (opens in a new tab); board readings use the firmware's 0.034 cm per µs.
In a 40 °C summer classroom the board reads about 4 cm short at 1 metre. In a cold room it reads long. Humidity matters too, but less: The Physics Classroom (opens in a new tab) says the speed depends mostly on temperature and to a lesser degree on humidity.
HC-SR04 pinout and specifications
| Pin | Direction | What it does |
|---|---|---|
| Vcc | Power in | 5 V supply |
| Trig | Into the sensor | A high pulse of at least 10 µs starts one measurement |
| Echo | Out of the sensor | Stays high for the round-trip time of the sound |
| Gnd | Power | 0 V ground |
- Pin
- Vcc
- Direction
- Power in
- What it does
- 5 V supply
- Pin
- Trig
- Direction
- Into the sensor
- What it does
- A high pulse of at least 10 µs starts one measurement
- Pin
- Echo
- Direction
- Out of the sensor
- What it does
- Stays high for the round-trip time of the sound
- Pin
- Gnd
- Direction
- Power
- What it does
- 0 V ground
The main figures from the HC-SR04 datasheet (opens in a new tab):
| Specification | Value |
|---|---|
| Working voltage and current | 5 V DC, 15 mA |
| Sound frequency | 40 kHz |
| Range | 2 cm to 4 m |
| Measuring angle | 15 degrees |
| Best accuracy | Can reach 3 mm |
| Size | 45 × 20 × 15 mm |
- Specification
- Working voltage and current
- Value
- 5 V DC, 15 mA
- Specification
- Sound frequency
- Value
- 40 kHz
- Specification
- Range
- Value
- 2 cm to 4 m
- Specification
- Measuring angle
- Value
- 15 degrees
- Specification
- Best accuracy
- Value
- Can reach 3 mm
- Specification
- Size
- Value
- 45 × 20 × 15 mm
Table note: the datasheet's (opens in a new tab) spec table prints the frequency as "40Hz", but its text says 40 kHz twice, so 40 kHz is right.
The same datasheet (opens in a new tab) warns against connecting the module to a circuit that is already powered. If you must, connect Gnd first.
The 5 V Echo pin and 3.3 V boards
Adafruit's HC-SR04 product page (opens in a new tab) says the sensor needs 5 V power for best results. Its Trig input accepts 3 V or 5 V logic, but its Echo output is 5 V logic. Adafruit includes two 10K resistors to use as a divider, which turns the 5 V signal into a safe 2.5 V for a 3 V board. The ESP32 is a 3.3 V chip, and Espressif's ESP32 datasheet (opens in a new tab) gives its characteristics at 3.3 V. So when you wire an HC-SR04 to a bare ESP32 on a breadboard, put a divider on the Echo line. The guide to 3.3 V vs 5 V logic on the ESP32 explains why.
On the MakerBuddy board, the sensor connects to the 4-pin header marked HC-SR04 with the kit cable. You match the wires by name: VCC to VCC, GND to GND, Trig to 15 and Echo to 2. Unplug the USB cable first, as Week 12 shows.
What an ultrasonic sensor can see: range, beam and targets
The datasheet (opens in a new tab) range is 2 cm to 400 cm. Adafruit's page (opens in a new tab) says 10 cm to 250 cm gives the best results.
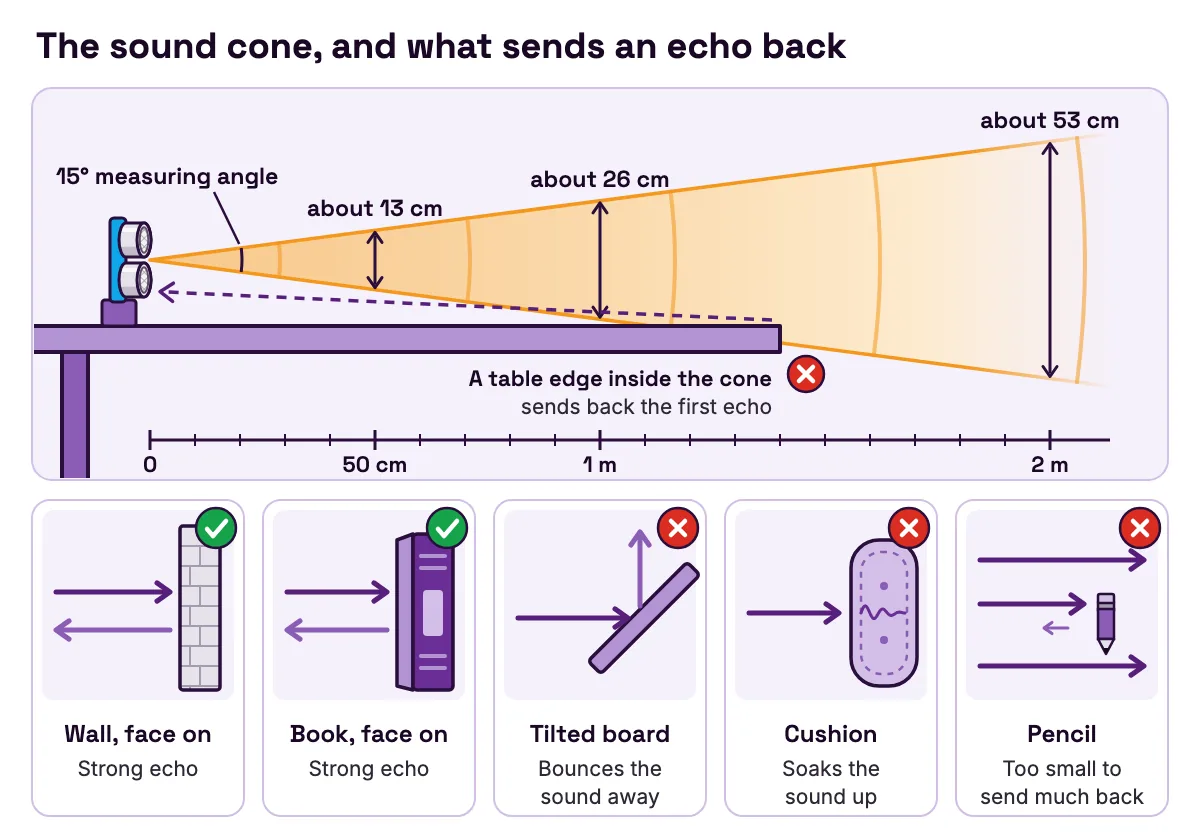
The sound spreads in a cone, and the HC-SR04 datasheet (opens in a new tab) gives a measuring angle of 15 degrees. If 15 degrees is the full width of the cone, a little trigonometry makes it about 13 cm wide at 50 cm, 26 cm wide at 1 m and 53 cm wide at 2 m. Anything inside that cone can send back the first echo, including a table edge or the floor.
The datasheet asks for a target of at least 0.5 square metres, as smooth as possible. TI's note (opens in a new tab) gives the same advice in more detail. The strongest echoes come from large, dense, flat, smooth surfaces that face the sensor square on, at 90 degrees. Angled surfaces bounce the sound away. Sponge, foam and soft clothing soak it up, and people, animals and plants send back weaker echoes. In Week 12, students test a whiteboard, a textbook, a hand, fabric and a water bottle at the same distance to see this for themselves.
Sound also has strengths that light lacks. TI's note (opens in a new tab) says an ultrasonic sensor can detect a material whatever its transparency or colour, as long as it is solid or liquid. That includes glass and water, which light passes straight through.
Ultrasonic sensor vs infrared, laser and PIR sensors
An ultrasonic sensor times an echo of sound. Light-based distance sensors use infrared or laser light instead. Here is how three distance sensors compare, plus a PIR motion sensor, which people often mix up with them.
| Sensor | How it works | Range | Good at | Weak at |
|---|---|---|---|---|
| Ultrasonic, HC-SR04 | Times an echo of 40 kHz sound | 2 cm to 4 m | Glass, water, any colour, smoky air | Soft, small or tilted targets; slower than light |
| Infrared, Sharp GP2Y0A21YK0F | Infrared light and triangulation; gives a voltage | 10 cm to 80 cm | A target's colour or shine and the air temperature barely affect it | Nothing under 10 cm or past 80 cm |
| Laser time of flight, VL53L0X | Times invisible laser light | About 3 cm to 1.2 m, up to about 2 m in long-range mode on white | A small module with quick readings | Glass and water; objects that absorb the light; smoke or fog |
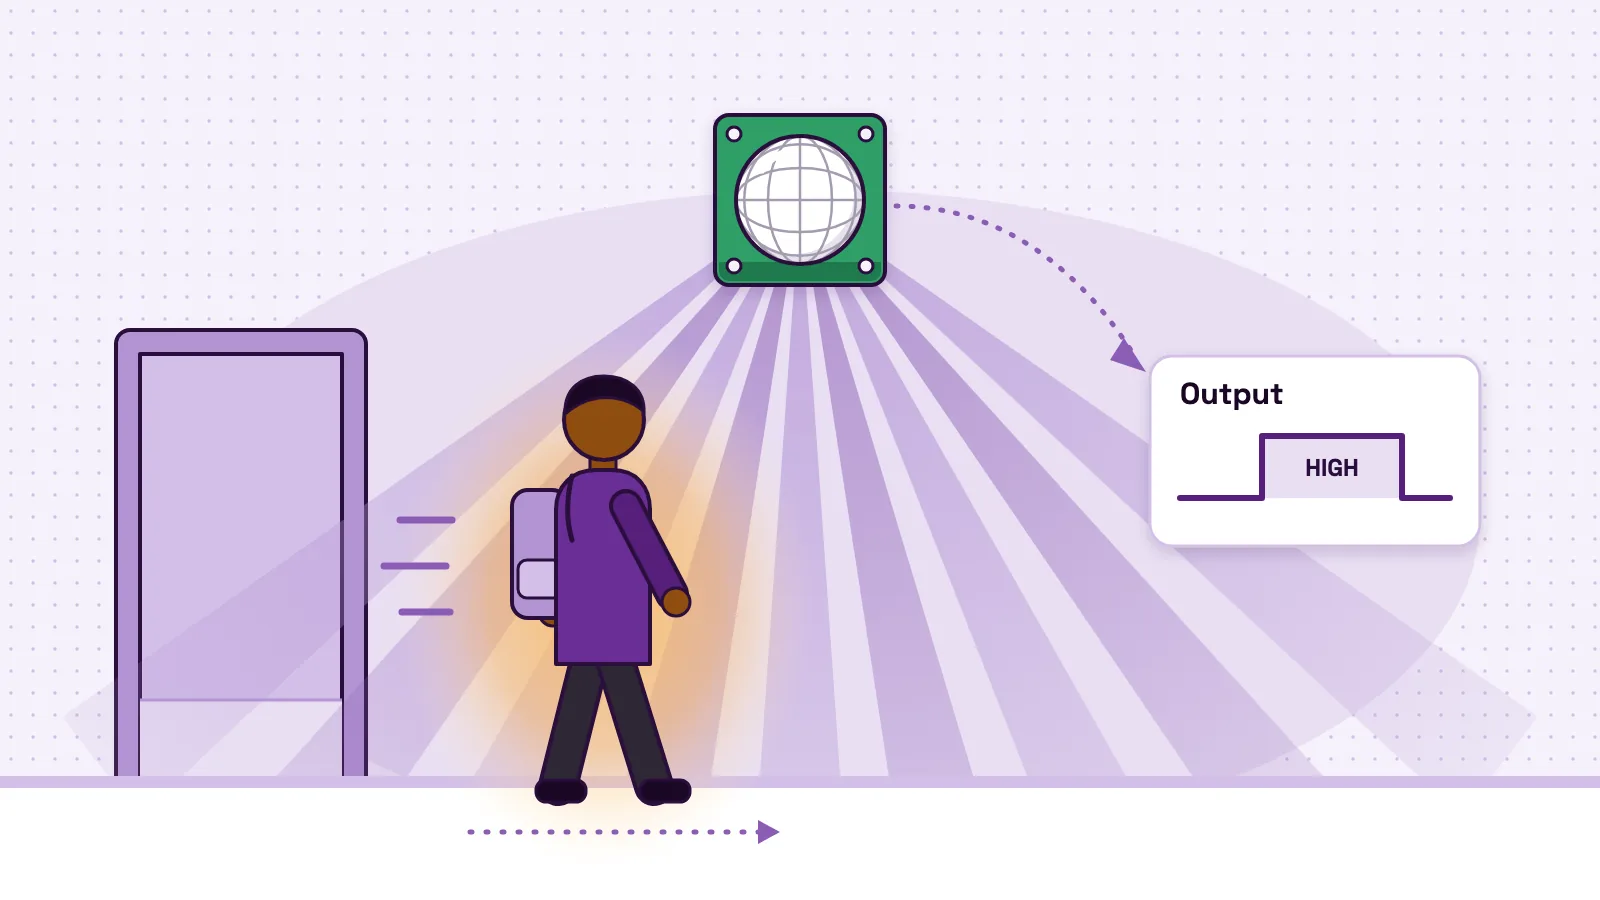
| PIR motion, HC-SR501 | Notices warm bodies moving; sends nothing out | No distance | Noticing a person walk past | Its output is only on or off |
- Sensor
- Ultrasonic, HC-SR04
- How it works
- Times an echo of 40 kHz sound
- Range
- 2 cm to 4 m
- Good at
- Glass, water, any colour, smoky air
- Weak at
- Soft, small or tilted targets; slower than light
- Sensor
- Infrared, Sharp GP2Y0A21YK0F
- How it works
- Infrared light and triangulation; gives a voltage
- Range
- 10 cm to 80 cm
- Good at
- A target's colour or shine and the air temperature barely affect it
- Weak at
- Nothing under 10 cm or past 80 cm
- Sensor
- Laser time of flight, VL53L0X
- How it works
- Times invisible laser light
- Range
- About 3 cm to 1.2 m, up to about 2 m in long-range mode on white
- Good at
- A small module with quick readings
- Weak at
- Glass and water; objects that absorb the light; smoke or fog
- Sensor
- PIR motion, HC-SR501
- How it works
- Notices warm bodies moving; sends nothing out
- Range
- No distance
- Good at
- Noticing a person walk past
- Weak at
- Its output is only on or off
Table note: figures from the HC-SR04 datasheet (opens in a new tab), the Sharp GP2Y0A21YK0F datasheet (opens in a new tab), Adafruit's VL53L0X page (opens in a new tab) (which gives 3 to 12 percent accuracy depending on lighting and distance) and TI's ultrasonic sensing note (opens in a new tab), which compares sound with light-based sensing.
Pick by the job. For a parking sensor, a touch-free dustbin lid or a tank level, the ultrasonic sensor is cheap and forgiving. For a fast robot that needs quick readings, a light-based sensor suits better, because light is far faster than sound. To know only that someone walked past, use a PIR; the PIR motion sensor guide explains how it works.
Using the HC-SR04 on the MakerBuddy board with no code
On MakerBuddy the distance sensor needs no code. Plug it in, open a dashboard and find the Distance card, which shows centimetres to one decimal place. A laptop uses the Chrome, Edge or Firefox extension, and a Mac, iPhone or iPad uses Safari, as the guide to choosing a MakerBuddy dashboard explains. Android phones cannot control the board yet.
Once a second, the firmware sends the 10 µs start pulse on GPIO 15 and listens on GPIO 2 for up to 24 ms. It multiplies the echo time by 0.034 and halves it. It keeps answers between 2 cm and 500 cm, and after a miss it keeps the last good distance.
The 24 ms limit matters more than the 500 cm one. By the firmware's own maths, 24,000 µs × 0.034 ÷ 2 = 408 cm. So in practice the board reads from 2 cm to about 4 m. Before the first good reading the card shows 999.0, which means "no echo yet". The card updates about every 2 seconds. The MakerBuddy technical details list these limits.
You can show the distance on the kit's text screen by typing {distance} into your own screen text. The screen's default rotation also shows it, beside the light level. One thing distance cannot do is drive the servo through servo mapping, which offers soil, gas, light, humidity and the two temperatures only. To move the servo from a distance, use rules. The servo motor guide covers the motor side.
Week 12, Distance and Echolocation is the lesson for this sensor. Its Try It demo, Measure with Echoes, runs in the browser before you touch a kit. The MakerBuddy project idea library has six ideas that use the distance sensor, from a Distance Beeper to Room Mapping, and all six are built without code.
Worked example: a parking assistant with three rules
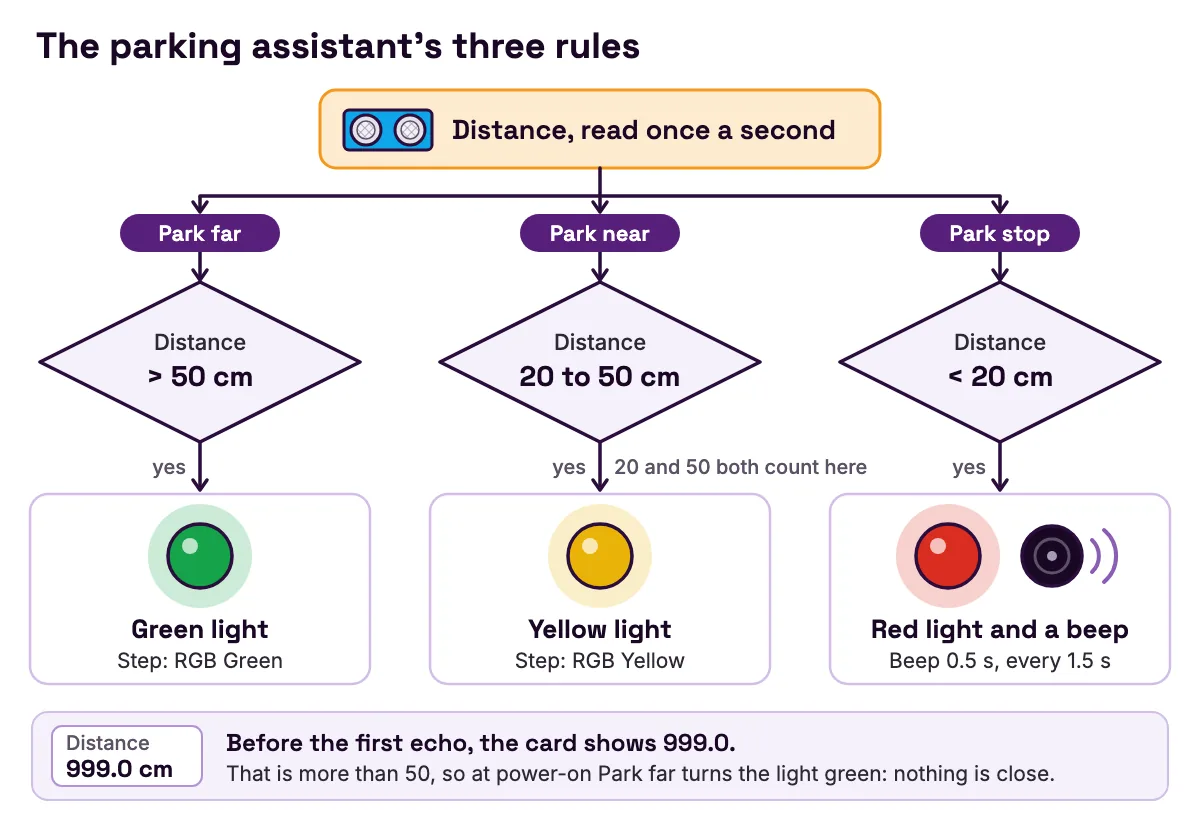
This builds the Garage Park Assist from the project idea library and adds a beep. The colour light turns green when a car is far from the wall, yellow when it is close, and red with a beep when it should stop. If rules are new to you, read if-then statements explained with real sensors first.
Step 1: measure your space. Put the sensor at the wall, facing out. Hold a large book where the car should stop and read the Distance card. Then hold it where the driver should slow down. Wait 3 seconds before each reading. Say you get 20 cm and 50 cm.
Step 2: in the dashboard's Create Rule panel, make three rules. Each one uses the Condition loop mode, so it runs while its test is true. In Loop Condition, pick the sensor "Distance (HC-SR04)", an operator and a threshold. For the middle rule, tick Use Range and add a second test with AND.
| Rule Name | Loop Condition | Steps: Action, then Delay (ms) |
|---|---|---|
| Park far | Distance Greater than (>) 50 | 1. RGB Green, 1000 |
| Park near | Distance Greater or equal (>=) 20, Use Range, AND, Less or equal (<=) 50 | 1. RGB Yellow, 1000 |
| Park stop | Distance Less than (<) 20 | 1. RGB Red, 0. 2. Buzzer On, 500. 3. Buzzer Off, 1000 |
- Rule Name
- Park far
- Loop Condition
- Distance Greater than (>) 50
- Steps: Action, then Delay (ms)
- 1. RGB Green, 1000
- Rule Name
- Park near
- Loop Condition
- Distance Greater or equal (>=) 20, Use Range, AND, Less or equal (<=) 50
- Steps: Action, then Delay (ms)
- 1. RGB Yellow, 1000
- Rule Name
- Park stop
- Loop Condition
- Distance Less than (<) 20
- Steps: Action, then Delay (ms)
- 1. RGB Red, 0. 2. Buzzer On, 500. 3. Buzzer Off, 1000
Step 3: check that the rules never overlap. Every distance falls into exactly one rule. Both 20 and 50 belong to Park near, because of the "or equal" operators. If two rules could be true at once, the colour light would flick between them.
Step 4: test it. Walk the book slowly towards the sensor. A Condition rule repeats its steps for as long as its test stays true. So Park stop beeps for half a second, waits one second, and beeps again, every 1.5 seconds. When its test turns false, the rule finishes the cycle it is on, so the buzzer always ends off.
Expect a short delay at each change. The board reads the sensor once a second, and a test must stay true for 0.3 seconds before its rule starts. A rule that has just turned false also holds on to the colour light until its current step's delay ends. So a colour change can take a second or two.
At power-on the distance is 999.0, so Park far turns the light green, which is right: nothing is close.
A gate needs one more idea. If it opens below 10 cm and closes above 10 cm, it flaps when a car sits right on 10. Week 27, Range Logic teaches threshold windows, a gap between the on number and the off number. Week 29 and Week 30 build a servo gate that opens below one number and closes only above a bigger one. The smart parking system project with an ultrasonic sensor and servo gate walks through the full build.
A board holds up to 10 rules of up to 10 steps each. They run on the board itself, so the parking assistant keeps working after you close the dashboard. The MakerBuddy rules documentation lists every condition and step.
Reading the HC-SR04 with Arduino code on an ESP32
This sketch reads the HC-SR04 on the MakerBuddy board ten times a second and prints the echo time and the distance. Use the ESP32 Dev Module board with "esp32 by Espressif Systems", and set the Serial Monitor to 115200 baud. New to uploading? Follow how to program an ESP32 with the Arduino IDE.
// MakerBuddy board (ESP32 Dev Module): read the HC-SR04 distance sensor.
// Uploading this replaces the MakerBuddy firmware until you upload that again.

const int TRIG_PIN = 15;  // the HC-SR04 socket's Trig line
const int ECHO_PIN = 2;   // the HC-SR04 socket's Echo line

const unsigned long ECHO_TIMEOUT_US = 24000;  // stop listening after 24 ms, like the firmware
const float AIR_TEMP_C = 20.0;                // change this to your room temperature

float lastGoodCm = -1.0;  // -1 means no good reading yet

// Speed of sound in centimetres per microsecond: (331 + 0.6 x T) m/s divided by 10,000.
float soundCmPerUs(float tempC) {
  return (331.0 + 0.6 * tempC) / 10000.0;
}

// Send one ping. Return the echo time in microseconds, or 0 if no echo came back in time.
unsigned long pingEchoUs() {
  digitalWrite(TRIG_PIN, LOW);
  delayMicroseconds(2);
  digitalWrite(TRIG_PIN, HIGH);
  delayMicroseconds(10);  // the 10 microsecond start pulse from the datasheet
  digitalWrite(TRIG_PIN, LOW);
  return pulseIn(ECHO_PIN, HIGH, ECHO_TIMEOUT_US);
}

void setup() {
  Serial.begin(115200);
  pinMode(TRIG_PIN, OUTPUT);
  pinMode(ECHO_PIN, INPUT);
}

void loop() {
  unsigned long echoUs = pingEchoUs();
  float cm = echoUs * soundCmPerUs(AIR_TEMP_C) / 2.0;  // out and back, so halve it

  if (echoUs > 0 && cm >= 2.0 && cm <= 400.0) {
    lastGoodCm = cm;  // a good reading: keep it
  }

  Serial.print("Echo time: ");
  Serial.print(echoUs);  // 0 means no echo before the timeout
  Serial.print(" us   Distance: ");
  if (lastGoodCm < 0) {
    Serial.println("no good reading yet");
  } else {
    Serial.print(lastGoodCm, 1);
    Serial.println(" cm");
  }

  delay(100);  // the datasheet suggests more than 60 ms between pings
}
What each part does:
- 1
pingEchoUs()holds Trig low for 2 µs so the pulse starts clean, then high for 10 µs, the datasheet's start signal. The MakerBuddy firmware does the same. - 2
pulseIn()measures how long Echo stays high. The Arduino pulseIn reference (opens in a new tab) says it returns 0 if no pulse starts before the timeout, and that the default timeout is one second. A one-second wait would freeze the sketch whenever an echo goes missing, so this sketch waits 24 ms, enough for about 4 m. - 3
soundCmPerUs()uses the temperature rule. ChangeAIR_TEMP_Cto 0 or 40 and watch the same echo give a different distance. - 4
The
ifkeeps readings between 2 cm and 400 cm, the datasheet range. Otherwise the last good value stays, as in the MakerBuddy firmware.
When you finish, put the MakerBuddy firmware back with install by USB. A later guide adds a text screen: ultrasonic sensor wiring and code with a distance display.
Common HC-SR04 problems: symptom, cause and fix
The Distance card is stuck at 999.0
- Symptom: the card shows 999.0 and never changes.
- Cause: no good echo has arrived since power-on. Usually a wire is loose, or Trig and Echo are swapped.
- Fix: unplug the USB cable, check each wire against the VCC, Trig, Echo and GND labels, then aim at a flat wall 50 cm to 100 cm away.
The number freezes while you move
- Symptom: the distance holds one value while the object moves.
- Cause: the board keeps the last good reading after a miss. The object is too soft, small or tilted, closer than 2 cm, or further than about 4 m.
- Fix: test with a large flat book held face on. The MakerBuddy troubleshooting page also says to check the sensor's socket.
Readings jump to a short distance
- Symptom: the reading drops to a number that matches nothing in front of you.
- Cause: the table, the floor or a side wall inside the cone sends back an echo first.
- Fix: raise the sensor, aim it level and clear the space around the beam.
Every reading is off by about the same amount
- Symptom: the sensor is steady but always a centimetre or more away from your ruler.
- Cause: you measured from a different point than the sensor does, such as the edge of the board, or the air is far from the 15 °C the firmware assumes.
- Fix: measure from the front of the T and R cans. Then note the error at a few distances, as the Week 12 accuracy challenge does, and subtract the average.
Your own sketch prints 0 every time
- Symptom: every line in the Serial Monitor shows an echo time of 0.
- Cause:
pulseIn()timed out. The pins in the sketch may not match the wiring, or the sensor has no 5 V power. - Fix: match
TRIG_PINandECHO_PINto the wires, and give Vcc 5 V, as Adafruit's HC-SR04 page (opens in a new tab) recommends.
When an ultrasonic sensor is the wrong tool
- Small or thin targets: a pencil is far smaller than the 0.5 square metres the HC-SR04 datasheet (opens in a new tab) asks for. Put a card on the object, or choose a different sensor.
- Fast events: the MakerBuddy board measures once a second, and your own sketch about every 60 ms at best, the gap the same datasheet suggests between pings.
- Wet or dusty places: TI's note (opens in a new tab) warns that rain, dust and dirt damage open-top transducers, while closed-top ones cope better. Unless your sensor's datasheet says it is sealed, keep it indoors and dry.
The HC-SR04 accuracy guide on blind spots and jumping readings goes deeper into these limits.
Do you need a kit to learn this? Not to start. The Week 12 demo runs in the browser, and every MakerBuddy dashboard has a demo mode: type demo where it asks for the board's address. The MakerBuddy kit includes the HC-SR04 with its own labelled header, along with the colour light, buzzer, servo and text screen used above. More sensor guides are on the MakerBuddy blog.
FAQ
What is the HC-SR04 ultrasonic sensor used for?
It measures how far away an object is without touching it. Students use it for parking sensors, touch-free dustbin lids, automatic doors, height meters and robots that avoid walls. On MakerBuddy it also feeds rules, so a distance can switch a light, a buzzer or a servo with no code.
How far can an ultrasonic sensor detect?
The HC-SR04's datasheet (opens in a new tab) gives 2 cm to 400 cm, and Adafruit (opens in a new tab) says 10 cm to 250 cm gives the best results. On the MakerBuddy board it works from 2 cm to about 4 m, because the board stops listening after 24 ms.
How does an ultrasonic transducer work?
It is a piezoelectric part that turns an electrical signal into vibration and back again, as TI's note on ultrasonic sensing (opens in a new tab) explains. So it can send out ultrasound and also turn an echo into a small signal. The HC-SR04 uses one transducer to send and a second to listen.
Why do you divide by 2 in the ultrasonic distance formula?
The measured time covers two trips: out to the object and back again. Time × speed gives the whole path. Halving it gives the distance one way, which is the distance to the object.
Is the HC-SR04 analog or digital?
Digital. The HC-SR04 datasheet (opens in a new tab) calls its Echo output a TTL level signal, so the pin is only ever high or low, and the distance is carried by how long the high pulse lasts. Your board times the pulse instead of reading a voltage, so it does not need an analog pin. The guide to analog vs digital signals explains the difference.
Can the HC-SR04 run on 3.3 V?
Not well. Adafruit (opens in a new tab) says it needs 5 V power for best results, and its Echo output is 5 V logic, so a bare 3.3 V ESP32 needs a divider on Echo, such as two 10K resistors.
Can an HC-SR04 detect water?
Yes. TI's note (opens in a new tab) lists water and glass among the materials an ultrasonic sensor detects, because sound bounces off their surfaces. That is why ultrasonic sensors are used to measure tanks: point the sensor straight down, and the water depth is the tank's height minus the distance. The water tank level monitor project builds one. Keep the sensor itself dry.
Is LiDAR better than an ultrasonic sensor?
For some jobs. TI's note (opens in a new tab) says LiDAR and radar give many measuring points at once, accurate enough to map a space, but cost much more. Light-based sensors are also faster. An ultrasonic sensor is cheaper, copes with smoky air and detects glass and water, which light passes through.
Sources
- Elecfreaks, HC-SR04 ultrasonic ranging module datasheet (SparkFun copy) (opens in a new tab): 2 cm to 400 cm, accuracy can reach 3 mm, 10 µs trigger, eight 40 kHz cycles, distance = high time × 340 m/s ÷ 2, µs ÷ 58 = cm and µs ÷ 148 = inches, measuring cycle over 60 ms, 5 V and 15 mA, 15 degrees, 45 × 20 × 15 mm, Echo as a TTL level signal, connect Gnd first on a powered circuit, target of at least 0.5 square metres.
- Texas Instruments, Ultrasonic Sensing Basics (SLAA907D) (opens in a new tab): piezoelectric transducers, 343 m/s at 20 °C in dry air, speed = 331 + 0.6 × °C, parking assist with 4 to 16 sensors, detectable materials including glass and water, soft and angled targets, ringing-decay blind zone and separate send and receive transducers, large, dense, flat, smooth targets at 90 degrees, objects in smoky air, comparison with infrared, optical time of flight, LiDAR and radar, open-top and closed-top transducers.
- The Physics Classroom, The Speed of Sound (opens in a new tab): speed = 331 m/s + 0.6 m/s per °C in dry air, 343 m/s at 20 °C, reasonably accurate from 0 °C to 100 °C, humidity a lesser effect, bat echolocation.
- The Physics Classroom, Pitch and Frequency (opens in a new tab): human hearing about 20 Hz to 20,000 Hz, ultrasound above that, dogs up to about 45,000 Hz and cats up to about 85,000 Hz.
- Adafruit, HC-SR04 ultrasonic sonar distance sensor and two 10K resistors (opens in a new tab): 5 V power for best results, Trig accepts 3 V or 5 V, Echo is 5 V logic, two 10K resistors as a divider to 2.5 V, about 2 cm to 400 cm with best results from 10 cm to 250 cm.
- Sharp, GP2Y0A21YK0F distance measuring sensor datasheet (Pololu copy) (opens in a new tab): 10 cm to 80 cm, analog output, infrared emitter and position sensitive detector, triangulation, reflectivity and temperature affect it little.
- Adafruit, VL53L0X time of flight distance sensor (opens in a new tab): invisible laser source, about 30 mm to 1.2 m in default mode and 1.5 m to 2 m in long-range mode on a white surface, 3 to 12 percent accuracy depending on lighting and distance, light-absorbing objects read poorly.
- Arduino, pulseIn() language reference (opens in a new tab): returns the pulse length in microseconds, or 0 if no pulse started before the timeout; the default timeout is one second.
- Espressif, ESP32 series datasheet (opens in a new tab): electrical characteristics given at 3.3 V.