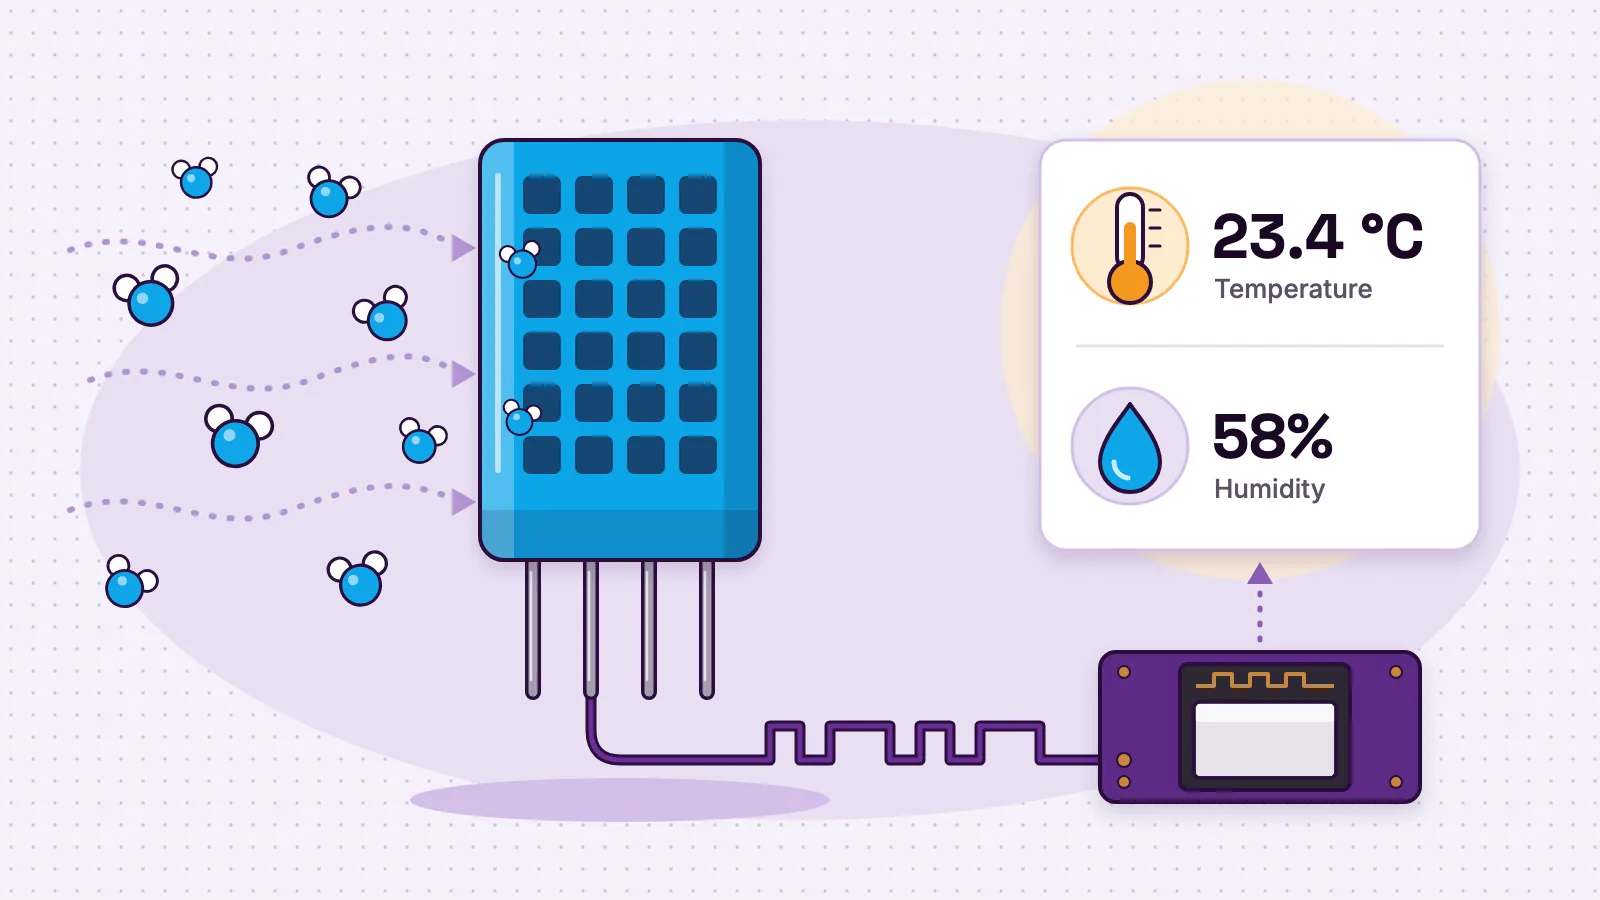
The DHT11 is a low-cost sensor that measures the temperature and relative humidity of the air, then sends both to a microcontroller as digital data on one wire. Its maker, Aosong, rates it at ±2 °C and ±5% relative humidity (RH) at 25 °C in its DHT11 datasheet (opens in a new tab). The bare sensor has four pins: power, data, an unused pin and ground. Some small modules built around it, such as Waveshare's DHT11 module (opens in a new tab), have three. It gives a fresh reading every second or two, which suits rooms, greenhouses and weather stations, but not fast changes.
On the MakerBuddy board the DHT11 plugs into a labelled socket, so you need no wiring and no code to read it. Lesson 10, Atmospheric Sensing teaches it, with a Try it demo that runs in your browser before you touch any hardware.
DHT11 specs at a glance
Three documents describe the DHT11, and they do not fully agree. Aosong's version 1.3 datasheet, dated March 2017, changed the humidity part from a "resistance type" to a "capacitive" one and widened both ranges. OSEPP's English translation of the older datasheet keeps the first ranges.
| Spec | Aosong datasheet V1.3 (opens in a new tab) | Older datasheet, OSEPP translation (opens in a new tab) | Adafruit DHT guide (opens in a new tab) |
|---|---|---|---|
| Humidity part | Capacitive | Resistive | Capacitive |
| Humidity range | 5–95% RH | 20–90% RH at 25 °C, 20–80% RH at 50 °C | 20–80% |
| Humidity accuracy | ±5% RH at 25 °C | ±5% RH from 0 to 50 °C | 5% |
| Temperature range | −20 to 60 °C | 0 to 50 °C | 0 to 50 °C |
| Temperature accuracy | ±2 °C at 25 °C | ±2 °C | ±2 °C |
| Response time (63% of a change) | Humidity under 6 s, temperature under 10 s | Humidity 6–15 s, temperature 6–30 s | Not given |
| Time between readings | More than 2 s | At least 1 s | At least 1 s |
| Supply | 3.3–5.5 V | 3–5.5 V | 3–5 V |
- Spec
- Humidity part
- Adafruit DHT guide (opens in a new tab)
- Capacitive
- Spec
- Humidity range
- Older datasheet, OSEPP translation (opens in a new tab)
- 20–90% RH at 25 °C, 20–80% RH at 50 °C
- Spec
- Humidity accuracy
- Aosong datasheet V1.3 (opens in a new tab)
- ±5% RH at 25 °C
- Older datasheet, OSEPP translation (opens in a new tab)
- ±5% RH from 0 to 50 °C
- Spec
- Temperature range
- Aosong datasheet V1.3 (opens in a new tab)
- −20 to 60 °C
- Adafruit DHT guide (opens in a new tab)
- 0 to 50 °C
- Spec
- Temperature accuracy
- Aosong datasheet V1.3 (opens in a new tab)
- ±2 °C at 25 °C
- Spec
- Response time (63% of a change)
- Aosong datasheet V1.3 (opens in a new tab)
- Humidity under 6 s, temperature under 10 s
- Older datasheet, OSEPP translation (opens in a new tab)
- Humidity 6–15 s, temperature 6–30 s
- Spec
- Time between readings
- Aosong datasheet V1.3 (opens in a new tab)
- More than 2 s
- Adafruit DHT guide (opens in a new tab)
- At least 1 s
- Spec
- Supply
You cannot always tell which version you have, so plan with the narrow figures: 0 to 50 °C, 20 to 80% RH and one reading every 2 seconds. Humidity always comes in whole numbers, because its decimal byte is always 0, as Aosong's data format notes (opens in a new tab) say.
The visual guide to the types of sensors used in student projects shows where the DHT11 fits in a student kit. More sensor guides are on the MakerBuddy blog.
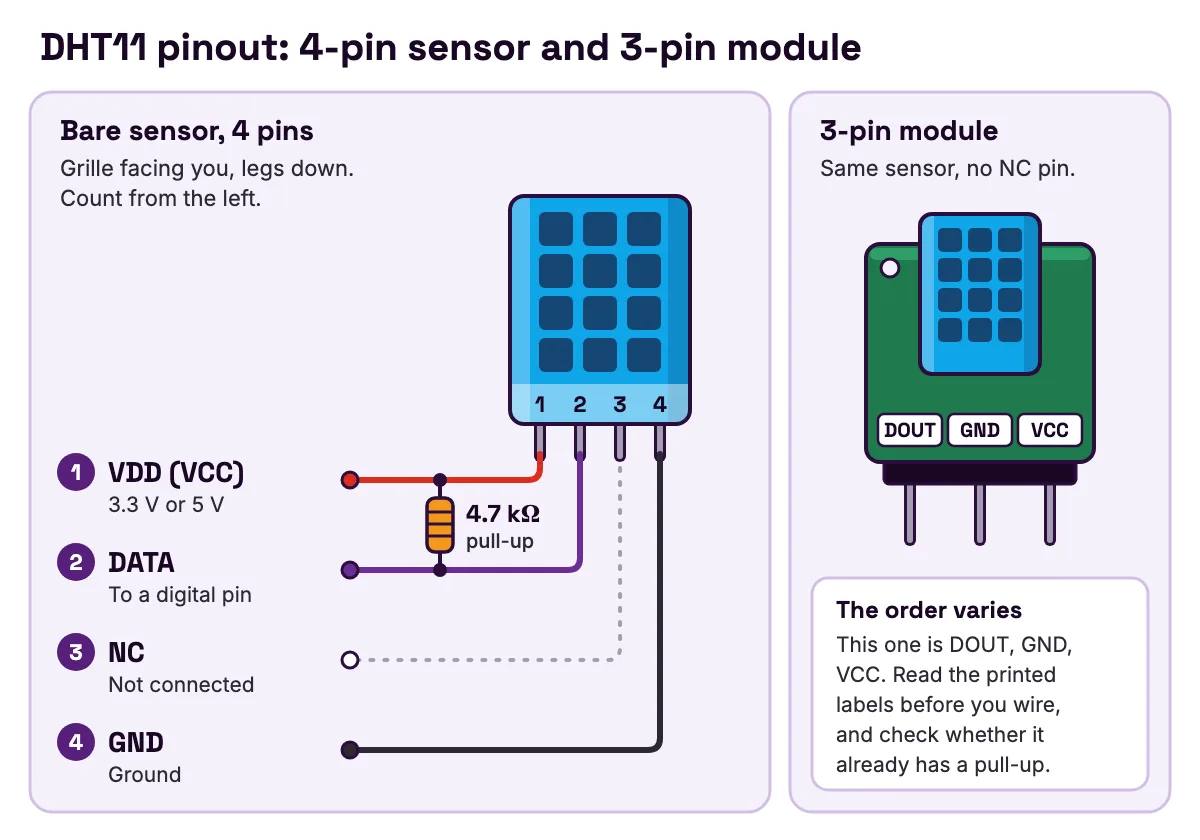
DHT11 pinout: the 4-pin sensor and 3-pin modules
Hold the bare sensor with its grille facing you and its legs pointing down. The pins count from left to right.
| Pin | Name | What it does | Connect it to |
|---|---|---|---|
| 1 | VDD (VCC) | Power | 3.3 V or 5 V |
| 2 | DATA | Sends and receives data on one wire | A digital pin, with a pull-up resistor to power |
| 3 | NC | Not connected | Nothing |
| 4 | GND | Ground | Ground |
- Pin
- 1
- Name
- VDD (VCC)
- What it does
- Power
- Connect it to
- 3.3 V or 5 V
- Pin
- 2
- Name
- DATA
- What it does
- Sends and receives data on one wire
- Connect it to
- A digital pin, with a pull-up resistor to power
- Pin
- 3
- Name
- NC
- What it does
- Not connected
- Connect it to
- Nothing
- Pin
- 4
- Name
- GND
- What it does
- Ground
- Connect it to
- Ground
Pin names come from Aosong's datasheet (opens in a new tab), whose drawing numbers the pins 1 to 4 from the left with the grille facing you. Adafruit's wiring steps (opens in a new tab) give the same order: the left-most pin is power and the right-most is ground.
The data pin needs a pull-up resistor. The line rests high, the microcontroller and the sensor take turns pulling it low, and the resistor pulls it back up between pulses. Without one, reads fail. Aosong recommends 4.7 kΩ for cables under 5 m; Adafruit's wiring page (opens in a new tab) uses 10 kΩ and notes that an Arduino's built-in pull-ups are very weak, about 20–50 kΩ. The guide to pull-up and pull-down resistors explains why.
A 3-pin module is the same sensor on a small board, without the unused pin. The order is not fixed: Waveshare's DHT11 module (opens in a new tab) lists DOUT, GND and VCC. Read the printed labels before you wire, and check whether the module already has a pull-up. On a 3.3 V board such as the ESP32, Adafruit's CircuitPython wiring advice (opens in a new tab) is to power the sensor from 5 V if 3 V is not enough, with the pull-up going to 3.3 V.
On the MakerBuddy board you wire nothing. The DHT11 plugs into the 3-pin socket marked 25 on the right edge of the board, and the plug fits only one way. Unplug the USB cable first.
How does a DHT sensor measure humidity and temperature?
Relative humidity compares the water vapour in the air with the most the air could hold at that temperature. The US National Weather Service glossary entry for relative humidity (opens in a new tab) says it "is a function of both moisture content and temperature". So warming the same air lowers its relative humidity, even though the amount of water has not changed.
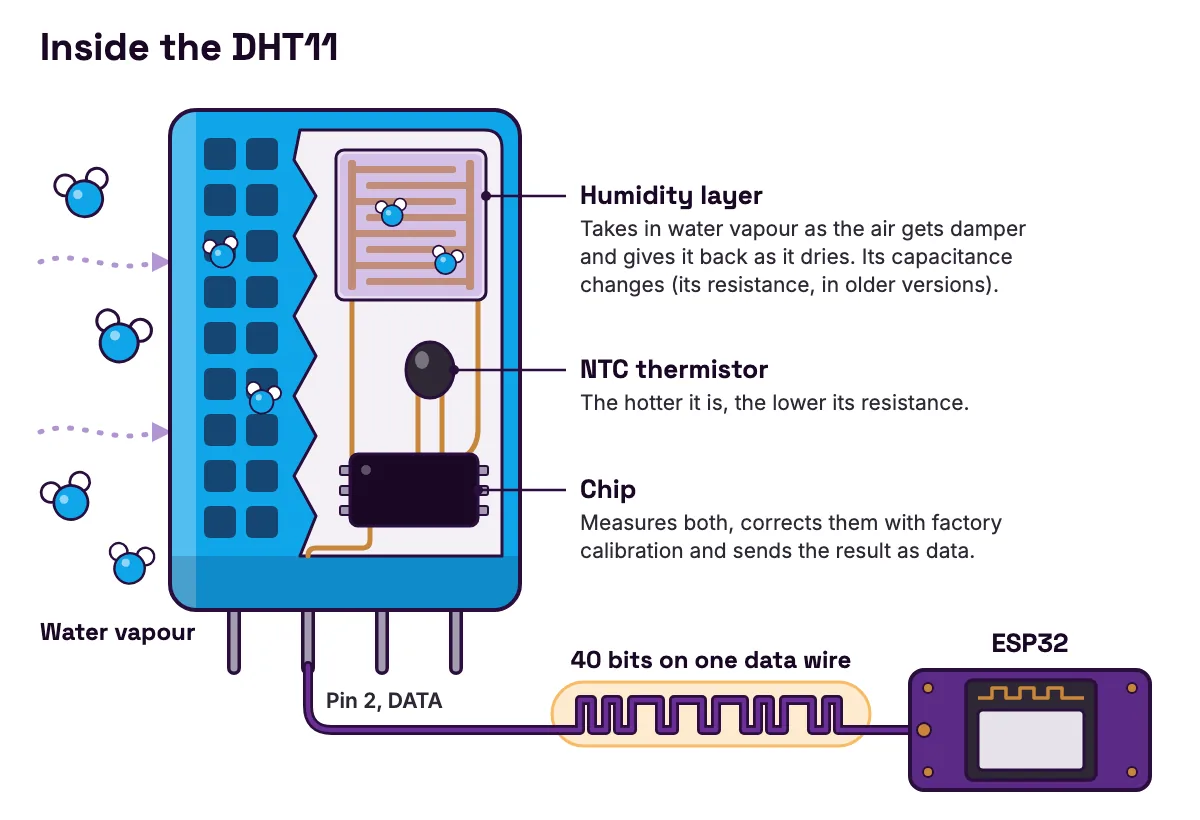
Inside the DHT11's grille are two sensing parts and a small chip.
- The humidity part is a thin layer that takes in water vapour as the air gets damper and gives it back as the air dries. As its water changes, so does its electrical behaviour: its resistance in the older design, or its capacitance, how much charge it can hold, in version 1.3.
- The temperature part is an NTC thermistor. Oak National Academy's lesson on thermistors (opens in a new tab) puts it simply: the hotter it is, the lower its resistance.
- The chip measures both parts, corrects them with calibration numbers stored at the factory and sends the results as digital data.
The sensor measures temperature because relative humidity depends on it, which is also why Aosong asks for it to sit away from anything warm. The guide to how humidity sensors work and why readings drift compares the DHT11 with other types.
How the DHT11 sends its reading: 40 bits on one wire
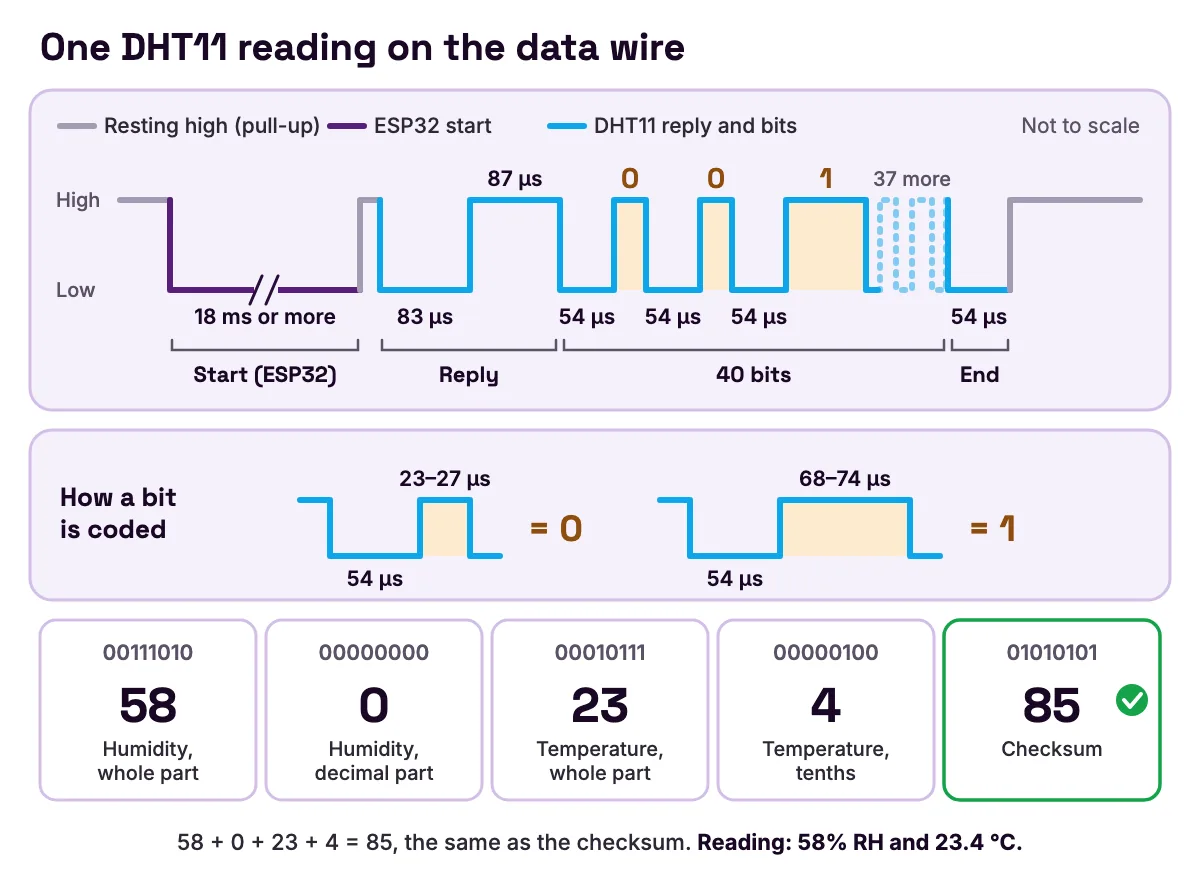
The DHT11 only speaks when asked, and one wire carries both the question and the answer. Aosong's version 1.3 datasheet (opens in a new tab) gives the timing:
- 1
The line rests high, held there by the pull-up resistor.
- 2
The microcontroller pulls it low for at least 18 ms. That is the start signal.
- 3
It lets go. The DHT11 replies by pulling the line low for about 83 µs, then high for about 87 µs.
- 4
The DHT11 sends 40 bits. Each starts with about 54 µs low. Then 23 to 27 µs high means 0, and 68 to 74 µs high means 1.
- 5
It ends with about 54 µs low, then lets the line rise again.
The 40 bits are five bytes: humidity whole part, humidity decimal part, temperature whole part, temperature decimal part, then a checksum. One detail surprises people: each answer is the result of the previous measurement, so after a long gap the datasheet says to read twice and use the second answer.
Worked example: decode one DHT11 reading by hand
Say the sensor sends these 40 bits. They are an example chosen for this guide.
00111010 00000000 00010111 00000100 01010101Split them into five bytes. From left to right, the bit positions are worth 128, 64, 32, 16, 8, 4, 2 and 1.
| Byte | Bits | Sum of the 1 bits | Value | Meaning |
|---|---|---|---|---|
| 1 | 0011 1010 | 32 + 16 + 8 + 2 | 58 | Humidity, whole part |
| 2 | 0000 0000 | none | 0 | Humidity, decimal part |
| 3 | 0001 0111 | 16 + 4 + 2 + 1 | 23 | Temperature, whole part |
| 4 | 0000 0100 | 4 | 4 | Temperature, tenths |
| 5 | 0101 0101 | 64 + 16 + 4 + 1 | 85 | Checksum |
- Byte
- 1
- Bits
- 0011 1010
- Sum of the 1 bits
- 32 + 16 + 8 + 2
- Value
- 58
- Meaning
- Humidity, whole part
- Byte
- 2
- Bits
- 0000 0000
- Sum of the 1 bits
- none
- Value
- 0
- Meaning
- Humidity, decimal part
- Byte
- 3
- Bits
- 0001 0111
- Sum of the 1 bits
- 16 + 4 + 2 + 1
- Value
- 23
- Meaning
- Temperature, whole part
- Byte
- 4
- Bits
- 0000 0100
- Sum of the 1 bits
- 4
- Value
- 4
- Meaning
- Temperature, tenths
- Byte
- 5
- Bits
- 0101 0101
- Sum of the 1 bits
- 64 + 16 + 4 + 1
- Value
- 85
- Meaning
- Checksum
Now check it. The checksum must equal the first four bytes added together, keeping only the last 8 bits if the total passes 255. Here 58 + 0 + 23 + 4 = 85, which matches byte 5. The reading is 58% RH and 23.4 °C. On a version 1.3 sensor the top bit of byte 4 is a minus sign; here it is 0, so the temperature is above zero, as the datasheet's data format (opens in a new tab) describes.
Now flip one bit on the way. Byte 1 arrives as 0011 1011, which is 59. The sum becomes 86, but the checksum still says 85, so the message is thrown away. In Adafruit's DHT library (opens in a new tab), a failed check makes the reading "not a number", written NaN, which explains the 0.0 readings later in this guide.
DHT11 accuracy: what ±2 °C and ±5% RH really mean
Accuracy is how far a reading can be from the truth. Resolution is the smallest step it can change by. The DHT11 is weak on both, which is fine in a classroom if you know it. The figures below follow Aosong's datasheet (opens in a new tab).
- ±2 °C: if the room is truly 22 °C, a DHT11 in spec can read anything from 20 to 24 °C. Two sensors side by side can differ by 4 °C and both be working.
- ±5% RH: if the air is truly at 50%, any reading from 45 to 55% is in spec, so two sensors can differ by 10 points.
- Whole-number steps: humidity moves in steps of 1%, and the older datasheet (opens in a new tab) gives a temperature resolution of 1 °C. A reading that flicks between 23 and 24 with nothing changing is sitting near a step, not failing.
- Response time: the datasheet gives the time to cover 63% of a sudden change; after three such times the reading has covered about 95%. So after a move, wait a few minutes before you write anything down.
- Placement: keep it in moving air, away from heat and strong sunlight. A DHT11 beside a laptop vent measures its own spot, not the room.
Worked example: what the error does to a dew point
The dew point is the temperature at which the air's water vapour starts to condense. A rule from Mark Lawrence's 2005 paper, given on the Columbia University IRI Data Library page on dew point (opens in a new tab), is fairly accurate above 50% RH:
dew point ≈ temperature − (100 − RH) ÷ 5
Your DHT11 reads 24 °C and 60%. The dew point is about 24 − 40 ÷ 5 = 16 °C. Now let the errors work against you. At 22 °C and 55% the answer would be 22 − 9 = 13 °C. At 26 °C and 65% it would be 26 − 7 = 19 °C. So this reading only tells you the dew point is somewhere from 13 to 19 °C. Errors add up when you calculate with them, which is worth saying in any Dew Point Calculator project from the MakerBuddy project idea library.
Bench test: check your DHT11 against a reference
The kit's waterproof DS18B20 probe makes a good reference: Adafruit's DS18B20 product page (opens in a new tab) rates it at ±0.5 °C from −10 to 85 °C, and Lesson 11, Precision Temperature compares the two.
- 1
Lay the probe's tip in the air beside the DHT11, out of sunlight, and wait 10 minutes.
- 2
Every hour or two through a school day, write down the time and both temperatures. The board has no clock, so the times come from your watch.
- 3
For each row, work out DHT11 minus probe, then average the differences. That is your sensor's offset.
Here is the sum with example numbers, not measurements:
| Time | Probe | DHT11 | Difference |
|---|---|---|---|
| 09:00 | 21.5 °C | 23 °C | +1.5 |
| 11:00 | 23.0 °C | 24 °C | +1.0 |
| 13:00 | 24.5 °C | 26 °C | +1.5 |
| 15:00 | 24.0 °C | 25 °C | +1.0 |
- Time
- 09:00
- Probe
- 21.5 °C
- DHT11
- 23 °C
- Difference
- +1.5
- Time
- 11:00
- Probe
- 23.0 °C
- DHT11
- 24 °C
- Difference
- +1.0
- Time
- 13:00
- Probe
- 24.5 °C
- DHT11
- 26 °C
- Difference
- +1.5
- Time
- 15:00
- Probe
- 24.0 °C
- DHT11
- 25 °C
- Difference
- +1.0
The average is (1.5 + 1.0 + 1.5 + 1.0) ÷ 4 = 1.25 °C. Every row is inside ±2 °C, so this example sensor is in spec and reads about 1 °C high. Subtract that from later readings and say so in your write-up.
The DHT11 on the MakerBuddy board
The MakerBuddy IoT Kit V1.0 includes a DHT11 that plugs into socket 25. The board comes in purple or green, and both colours are the same board. The ESP32 reads the sensor on GPIO 25, and the firmware is set up for a DHT11 only.
- Dashboard cards: Temperature (DHT) in °C and Humidity in percent.
- How often: the board asks once a second, but the DHT library repeats its last answer within 2 seconds, and the cards update about every 2 seconds. So a fresh reading arrives about every 2 seconds.
- Text screen: the default screen starts with temperature and humidity to one decimal place, and the
{temp}and{humidity}wildcards do the same in your own text, as the text screen details show. - Servo mapping: DHT11 temperature from 0 to 50 °C turns the servo across 0–180°, so each degree is worth 180 ÷ 50 = 3.6° and 25 °C points the arm at 90°. If the DHT11 cannot be read, the servo holds its angle, as the servo mapping notes explain.
- Rules: Temperature (DHT11) and Humidity (DHT11) are both in the rule form's sensor list.
Lesson 10's breath test is a good first check: breathe gently on the sensor from a few centimetres away and the humidity jumps, then falls back slowly. Lesson 16, the Data Logger, records readings over time, and the DIY weather station with an ESP32 builds a full display.
Why the DHT11 reads 0.0 when it is unplugged
Unplug the DHT11 and both cards show 0.0. The ESP32 sends its start signal on GPIO 25, but with no sensor there, nothing answers and the line stays high. The older datasheet (opens in a new tab) says a reply that stays high means the sensor is not responding and the connection needs checking. The library stops waiting and returns NaN. The firmware cannot send "not a number" to a card, so it sends 0.0 instead; the cards never show a dash. So 0.0 °C beside a humidity of 0.0 in a warm room is a failed read, not a frozen room. A 0.0 that clears on the next update points to one bad message, such as a failed checksum. A 0.0 that stays means the plug: unplug the USB cable, push the sensor firmly into socket 25 and power up again. The fix a problem guide lists the same check.
Build a no-code fan rule with the DHT11
This build, the Auto-Fan idea, switches a small low-voltage fan through the relay when the room gets warm, and off when it cools. You need the board, USB power, 2.4 GHz Wi-Fi (a phone hotspot works) and a laptop, iPhone or iPad with the dashboard open; Android phones cannot control the board yet. The relay is for low-voltage things only, never mains electricity, and Lesson 15, Relay Control, shows how to wire it.
Say your room reads 24 °C. Yours will differ, so move the numbers below to sit just above your room.
Step 1: make the Warm and Cool rules
- 1
Open the Rule Engine tab, type
Warmas the Rule Name and choose the Condition loop mode. - 2
Set Sensor to Temperature (DHT11), Operator to Greater than (>) and Threshold to 26.
- 3
Add Step: Relay On, Delay (ms) 1000. Click Save Rule.
- 4
Make a second rule called
Coolthe same way, with Less than (<) and 24, and the step Relay Off.
Step 2: test it
Cup your hands round the sensor without touching it. When the reading passes 26, the relay clicks on within a few seconds. Take your hands away and the fan stays on until the reading drops below 24. The gap between 24 and 26 stops the fan clicking on and off when the reading flicks by 1 °C; the guide to why a fan keeps switching on and off explains it. Rules run on the board, so the fan keeps working after you close the dashboard. Lesson 26, Sensor-Based Control, builds rules like these, and the guide to if-then statements with real sensors explains the logic.
Step 3: decide what happens when the sensor fails
Now unplug the DHT11. The reading becomes 0.0, and a rule treats 0.0 like any other number. 0.0 is less than 24, so the Cool rule runs and the fan stops. That is a safe way to fail.
Other rules are not so lucky. A "Too cold" rule that sounds the buzzer below 18 would sound as soon as the plug worked loose. The fix is a range: tick Use Range, choose AND, and add Greater than (>) 1. Now the rule needs a reading below 18 and above 1, so 0.0 can never set it off. Lesson 27, Range Logic, teaches ranges, and the automation rules documentation lists every option.
Read the DHT11 with Arduino code on an ESP32
This sketch reads the DHT11 in socket 25 every 2 seconds and prints the temperature, the humidity and a rough dew point. Install "DHT sensor library" by Adafruit from the Library Manager; Adafruit's Arduino setup steps (opens in a new tab) say it also needs "Adafruit Unified Sensor". Use the "esp32 by Espressif Systems" boards package, version 3.x, the ESP32 Dev Module board and a Serial Monitor at 115200 baud.
// MakerBuddy board (ESP32 Dev Module): read the DHT11 in socket 25.
// Uploading this replaces the MakerBuddy firmware until you upload that again.
// Needs "DHT sensor library" and "Adafruit Unified Sensor" from the Library Manager.

#include <DHT.h>

const int DHT_PIN = 25;   // the socket marked 25 on the board
DHT dht(DHT_PIN, DHT11);  // tell the library which sensor it is

void setup() {
  Serial.begin(115200);   // match the Serial Monitor speed
  dht.begin();
  delay(2000);            // let the sensor settle after power-on
}

void loop() {
  float humidity = dht.readHumidity();  // percent relative humidity
  float tempC = dht.readTemperature();  // degrees Celsius

  if (isnan(humidity) || isnan(tempC)) {
    // NaN means "not a number": the read failed. MakerBuddy shows this as 0.0.
    Serial.println("No reading. Check the plug in socket 25.");
  } else {
    Serial.printf("Temp %.1f C   Humidity %.1f %%", tempC, humidity);
    if (humidity > 50) {
      // Rough dew point rule, fair only above 50% humidity.
      float dewPoint = tempC - (100.0 - humidity) / 5.0;
      Serial.printf("   Dew point about %.0f C", dewPoint);
    }
    Serial.println();
  }

  delay(2000);  // the library gives a fresh reading at most every 2 seconds
}
Three lines matter most. DHT dht(DHT_PIN, DHT11) names the type, and the wrong type gives nonsense. isnan() catches failed reads before you use them. The 2-second delays respect the datasheet's wait after power-on and its 2 seconds between readings, and Adafruit's DHT library (opens in a new tab), which repeats its last result if asked again within 2 seconds. Breathe on the sensor and the humidity climbs; pull the plug and "No reading" appears. The guide to DHT11 wiring and code for Arduino and ESP32 goes further. When you finish, put the MakerBuddy firmware back with the steps in install by USB.
DHT11 vs DHT22 vs DS18B20
| DHT11 | DHT22 (AM2302) | DS18B20 waterproof probe | |
|---|---|---|---|
| Measures | Temperature and humidity | Temperature and humidity | Temperature only |
| Temperature range | 0 to 50 °C | −40 to 80 °C | −55 to 125 °C |
| Temperature accuracy | ±2 °C | ±0.5 °C | ±0.5 °C from −10 to 85 °C |
| Humidity | 20–80%, ±5% | 0–100%, ±2 to 5% | None |
| Fastest reading | Once a second | Once every 2 seconds | Under 750 ms |
| Goes in water | No | No | Yes, sealed tip |
- Measures
- DHT11
- Temperature and humidity
- DHT22 (AM2302)
- Temperature and humidity
- DS18B20 waterproof probe
- Temperature only
- Temperature range
- DHT11
- 0 to 50 °C
- DHT22 (AM2302)
- −40 to 80 °C
- DS18B20 waterproof probe
- −55 to 125 °C
- Temperature accuracy
- DHT11
- ±2 °C
- DHT22 (AM2302)
- ±0.5 °C
- DS18B20 waterproof probe
- ±0.5 °C from −10 to 85 °C
- Humidity
- DHT11
- 20–80%, ±5%
- DHT22 (AM2302)
- 0–100%, ±2 to 5%
- DS18B20 waterproof probe
- None
- Fastest reading
- DHT11
- Once a second
- DHT22 (AM2302)
- Once every 2 seconds
- DS18B20 waterproof probe
- Under 750 ms
- Goes in water
- DHT11
- No
- DHT22 (AM2302)
- No
- DS18B20 waterproof probe
- Yes, sealed tip
Figures from Adafruit's DHT guide (opens in a new tab) and Adafruit's DS18B20 product page (opens in a new tab).
Pick the DHT11 for humidity and a rough temperature, cheaply. Pick the DS18B20 waterproof probe when accuracy matters or the sensor must go into water or soil. The DHT22 is the upgrade for both readings, weighed up in DHT11 vs DHT22: which should you use?; the MakerBuddy firmware reads only a DHT11, so a DHT22 needs your own code. The MakerBuddy kit has both the DHT11 and the DS18B20 probe, which is what makes the bench test above possible.
Common DHT11 mistakes and how to fix them
Each mistake below has a symptom you can see, the cause behind it and the fix.
Both readings show 0.0
- Symptom: the Temperature (DHT) and Humidity cards both read 0.0.
- Cause: the board got no answer, usually because the plug is loose or out.
- Fix: unplug the USB cable, push the DHT11 firmly into socket 25, power up and do the breath test.
Your own sketch prints NaN every time
- Symptom: every read fails in your own circuit.
- Cause: no pull-up on the data line, the wrong pin in the code, or a read in the sensor's first second.
- Fix: add a 4.7 kΩ to 10 kΩ pull-up from data to power, as Adafruit's wiring guide (opens in a new tab) shows, check the pin, and wait at least a second after power-on before the first read, as the datasheet (opens in a new tab) asks.
The numbers are wildly wrong
- Symptom: humidity reads far over 100, or the temperature reads hundreds of degrees.
- Cause: the code says DHT22 but the part is a DHT11. For a DHT22, Adafruit's library (opens in a new tab) joins the first two bytes into one number, so the worked example's 58 and 0 become (58 × 256 + 0) ÷ 10 = 1484.8.
- Fix: use
DHT11as the type.
Humidity stays high long after the breath test
- Symptom: the humidity takes minutes to come back down.
- Cause: the layer gives water back slowly, and a close breath can push it to the top of its range. The datasheet (opens in a new tab) warns that use outside the working range can shift readings by up to 3% RH for a while.
- Fix: breathe from a few centimetres away, never blow or spit, keep the board dry, and wait for the reading to recover before the next test.
FAQ
What is the DHT11 sensor used for?
It measures air temperature and relative humidity. Aosong's datasheet (opens in a new tab) lists uses such as air conditioning, dehumidifiers, weather stations, data recorders and agriculture. In student projects it runs room thermometers, weather stations, greenhouse monitors and automatic fans.
How does a DHT sensor work?
A humidity-sensing layer and a thermistor change their electrical behaviour with moisture and heat. A small chip measures both, corrects them with factory calibration and sends 40 bits on one wire when asked, ending with a checksum, as Aosong's datasheet (opens in a new tab) describes.
Which sensor is better, DHT11 or DHT22?
The DHT22 is more accurate and covers more. Adafruit's DHT guide (opens in a new tab) gives it −40 to 80 °C at ±0.5 °C and 0–100% humidity, against the DHT11's 0 to 50 °C at ±2 °C and 20–80%. The DHT11 costs less, and it is enough for watching changes in a classroom.
How do I connect a DHT11 sensor to an Arduino or ESP32?
Connect VCC to 3.3 V or 5 V, GND to ground and DATA to a digital pin, with a pull-up from DATA to power: Aosong's datasheet (opens in a new tab) suggests 4.7 kΩ and Adafruit's wiring guide (opens in a new tab) uses 10 kΩ. A 3-pin module may already have one. Then install Adafruit's two libraries and read no more than once every 2 seconds.
How much voltage does a DHT11 need?
Aosong's version 1.3 datasheet (opens in a new tab) gives 3.3 to 5.5 V, with 5 V as typical. On 3.3 V, keep the cable short or the readings can drift. Adafruit's CircuitPython wiring guide (opens in a new tab) suggests 5 V power if 3 V is not enough.
Can a humidity sensor detect temperature?
A DHT11 does, with the thermistor beside its humidity layer. It needs one, because warming the same air lowers its relative humidity, as the National Weather Service glossary (opens in a new tab) explains.
Where is the best place to put a humidity sensor?
In open air with some air movement. Aosong's datasheet (opens in a new tab) asks for it to be kept away from heat sources and strong sunlight, so keep it clear of heaters, laptops, kettles and sunny windows. If it reads warmer than every thermometer nearby, something is heating it. Give it a few minutes after a move before you trust it.
Is 70% humidity very high?
Indoors, yes. The US Environmental Protection Agency's guide to mould and moisture (opens in a new tab) advises keeping indoor humidity below 60%, ideally between 30 and 50%. A DHT11 reading of 70% could truly be anywhere from 65 to 75%.
Sources
- Aosong, DHT11 temperature and humidity sensor datasheet V1.3 (Akizuki Denshi copy) (opens in a new tab): change from resistive to capacitive humidity element, pins numbered 1 to 4 from the left in the front-view drawing, 5–95% RH, −20 to 60 °C, ±5% RH and ±2 °C at 25 °C, response times, more than 2 s between readings, 3.3–5.5 V, 4.7 kΩ pull-up under 5 m, start, reply and bit timing, 40-bit format and checksum, previous-measurement note, placement, light and drift notes, applications.
- DHT11 humidity and temperature sensor datasheet, OSEPP English translation (Universidad Politécnica de Madrid copy) (opens in a new tab): resistive humidity element, 20–90% RH and 0–50 °C, accuracy, 1 °C and 1% RH resolution, response times, 3–5.5 V, at least 1 s between readings, a reply that stays high means the sensor is not responding.
- Adafruit, DHT11, DHT22 and AM2302 sensors overview (opens in a new tab): capacitive humidity sensor and thermistor, DHT11 "ultra low cost" against the DHT22's "low cost", DHT11 and DHT22 ranges, accuracy and sampling rates.
- Adafruit, Connecting to a DHTxx sensor (opens in a new tab): pin order, 10 kΩ pull-up, an Arduino's built-in pull-ups are very weak at about 20–50 kΩ.
- Adafruit, Using a DHTxx sensor with Arduino (opens in a new tab): DHT sensor library and the Adafruit Unified Sensor library.
- Adafruit, DHT CircuitPython code (opens in a new tab): left-most pin power, second pin data, right-most pin ground; 5 V power with the pull-up to 3.3 V on 3.3 V boards.
- Adafruit, DHT sensor library source, DHT.cpp (opens in a new tab): 2-second minimum interval, checksum test, NaN on a failed read, DHT11 and DHT22 byte handling.
- Waveshare, DHT11 temperature-humidity sensor wiki (opens in a new tab): a 3-pin module's pin order, DOUT, GND, VCC.
- US National Weather Service, glossary: relative humidity (opens in a new tab): definition, depends on moisture and temperature.
- Oak National Academy, LDRs and thermistors (opens in a new tab): a thermistor's resistance falls as it gets hotter.
- Columbia University IRI Data Library, How do I calculate dew point? (opens in a new tab): Td = T − (100 − RH)/5, fairly accurate above 50% RH, after Lawrence (2005).
- Adafruit, waterproof DS18B20 temperature sensor (opens in a new tab): −55 to 125 °C, ±0.5 °C from −10 to 85 °C, query time under 750 ms, waterproofed.
- US EPA, A brief guide to mold, moisture and your home (opens in a new tab): keep indoor humidity below 60%, ideally 30–50%.